


3
INSTALLATION
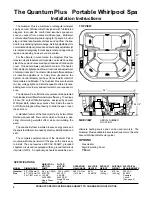
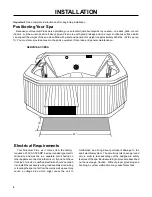
Installation Instructions
Inspection and Shipping Claim
Check for shipping damage upon receipt of the spa. Jacuzzi Whirlpool Bath is not responsible for damage to the spa
sustained during shipping. If damage is evident before unpacking, see instructions regarding shipping claims on the outside
of the carton and immediately file a claim with the carrier.
Once the spa has been removed from the carton and before it is permanently installed (see below on this page for unpacking
instructions), check the spa completely for damage. Fill the shell with water and operate the system (see Operating
Instructions) to check for leaks which may have resulted from shipping or handling. All Jacuzzi Whirlpool Bath spas are
factory tested for proper operation and watertight connections prior to shipping. If leaks or other problems are detected,
immediately notify your Jacuzzi Whirlpool Bath dealer or Authorized Service Agent, or call Jacuzzi Whirlpool Bath, (510) 938-
7411, for Warranty Service, (510-938-7411).
Npte: Damage or defects which could have been discovered anr repairedprior to installation and which are claimed
after final installation of the spa, are excluded from our warrenty.
Unpacking
1.
Remove the outer carton by disassembling bracing
and plastic bags. Leave the inner bag and corrugated
wrapping in place on the skirt to protect the product until
equipment set-up.
2.
Remove the box containing skirt panels and the acces-
sory package which contains the Owner’s Manual,
filter, cartridges, and extra lenses and bulbs. Set aside
skirt panels until equipment set-up. Set aside the filter
cartridges in a dry place until it is time to set up the spa
equipment. Store the extra lenses and bulb for later
use.
3.
The spa should be moved on a dolly in its upright
position while still attached to its shipping pallet. If the
pallet must be detached before the spa is moved (for
example, to allow it to pass through a door), detach it
from the pallet as instructed below, then carefully place
it vertically on a dolly which is wide enough to support
the entire width of the spa. The skirt is cosmetic (not
structural) and is not designed to support the spa.
PALLET
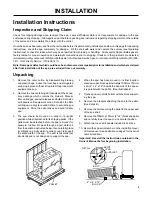
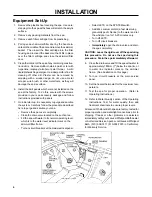
4.
When the spa has been moved to its final location,
place a wooden block approximately 100mm x 100mm
x 2m (4" x 4" x 72") beside the pan side of the spa so
it is parallel with the pallet. (See illustration B.)
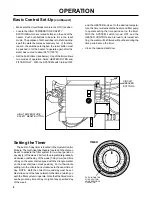
5.
Tip the spa over onto its bottom with the block support-
ing the spa.
6.
Remove the brackets attaching the spa to the pallet.
(See detail B.)
7.
Remove the bolts securing the pallet to the upper part
of the spa shell.
8.
Remove the 100mm x 100mm (4" x 4") block and pallet
and carefully lower the spa to a horizontal position.
9.
Attach two loose skirt panels included in skirt box.
10. Record the spa serial number on the inside front cover
of this manual. (See illustration on page 2 for the serial
number location.)
Important! Read all the instructions contained in the
Owner’s Manual before beginning installation.
4" X 4" X 72"
BLOCK
PAN
PALLET
BOLT
SKIRT
DETAIL
Содержание The Quantum Plus
Страница 1: ...TM Portable Whirlpool Spa Owner s Manual The Quantum Plus...
Страница 23: ......


