background image

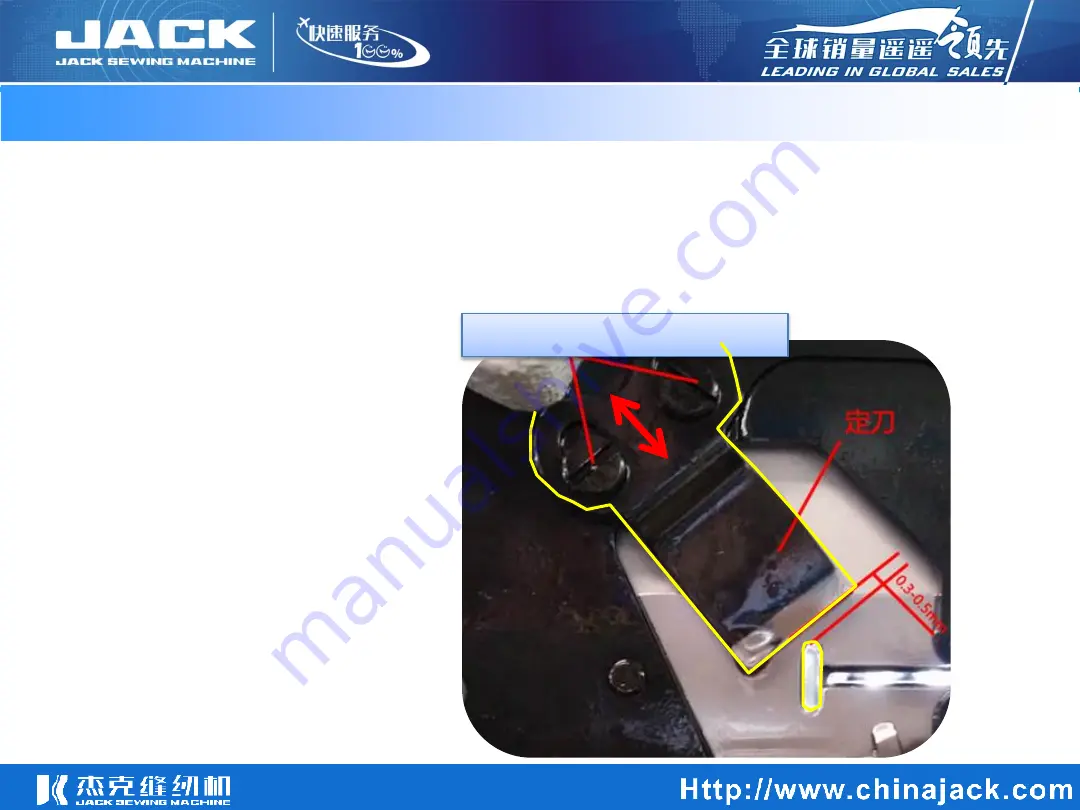
Adjustment stardard: 

the distance between fixed knife and needle plate hole is 0.3-0.5mm. 

Adjustment influence:

 if the distance between the fixed knife and the needle plate hole is too  

close, the thread breakage will happen when you sew. 

Adjustment method: 

1.Lose the fixed knife fasten screw. 

2. Adjust fixed knife, make the distance 

between the fixed knife and the needle 

plate hole to 0.3-0.5mm and then 

fasten the screw.  

19.0

Adjustment of the position of lower line fixed knife 


fixed knife fasten screw


fixed 
knife 

Содержание JK-T781E

Страница 1: ...JK T781E series...

Страница 2: ...2mm Stitch width 2 5 4mm 2 5 5mm 2 5 5mm 2 5 4mm Cutter length 6 4 19mm 1 4 3 4 6 4 25 4mm 1 4 1 6 4 31 7mm 1 4 1 1 4 6 4 19mm 1 4 3 4 Speed 100 3600rpm min Needle stroke 34 6mm Presser foot height 10...

Страница 3: ...il the distance between needle bar and the ruler is 0 Adjust the hook to make the tip of the hook from the upper end of the pinhole 1 6 1 8mm tighten the screw of Rotary hooks to make that the distanc...

Страница 4: ...the needle to make the needle in the middle of the pinhole move the needle bar to the lowest point observe and make the upper edge of the pinhole not exceed the needle plate needle plate lowest point...

Страница 5: ...e the pinhole at the the lowest plat 2 Adjust the rotary hook positioning screw util hook tip close to the needle but not hit the needle zero distance 3 pls note when the hook catchs thread the rotary...

Страница 6: ...he desired scale on the scale plate 2 Reinforce sewing width adjustment Tighten screw 2 to align the reinforcement pointer to the baseline pointer 3 Right baseline position twist screw 3 adjust the cu...

Страница 7: ...ize the knife will malfunction the position of the presser foot will change resulting in broken needle broken thread adjustment method when stopping make the scale line of plate align the middle posit...

Страница 8: ...Pull out the part put up the canning 2 Loose the screw let the pointer front to the number you need The number should be same as length of cutter Then tighten the screw 18 0 Adjustment of the button h...

Страница 9: ...e needle plate hole is too close the thread breakage will happen when you sew Adjustment method 1 Lose the fixed knife fasten screw 2 Adjust fixed knife make the distance between the fixed knife and t...

Страница 10: ...position adjustment 3mm Gap Sports pin Sensor chip Sensor The sensor chip is aligned with up side of the stamp mark of sensor Stamp mark Larger Smaller Adjustment methods 1 Loosen the setscrews and ad...

Страница 11: ...ss can not lift the foot when stop sewing the sensor lamp lights up and presses presser lift the presser foot Easy to adjust the presser foot up and down during maintain Adjustment method Loosen the s...

Страница 12: ...key to enter the user parameter mode 2 Press and hold the key to enter the technician parameter mode Set the value increment parameter increment 1 In the parameter selection area as the key to increa...

Страница 13: ...D display script and actual script comparison table 3 Display mode of the LCD screen Digital script part Actual value LCD English script part English alphabet LCD English alphabet LCD English alphabet...

Страница 14: ...Press the up and down key and at the same time boot the machine up it will show P11 Press F key and reboot Press enter key to save it 4 Factory reset...

Страница 15: ...ss F to get into user parameter mode Press up and down key to change parameter items Press enter key to get the value of this parameter Press up and down key to modify the parameter value Press F key...

Страница 16: ...same time boot the machine up Press up and down key to change parameter items Press enter key to get the value of this parameter Press up and down key to modify the parameter value Press enter key to...

Страница 17: ...F and enter key and at the same time boot the machine up Press up key to find P26 speed limit and the press ENTER to get the value Press F key to get out of this mode Press up and down key to modify...

Страница 18: ...stment Press the up and down key and at the same time boot the machine up Move the hand wheel to adjust and press enter key to save Press up key to find P27 and the press ENTER to get into it Press F...

Страница 19: ...10 360 80 actual speed display number 10 P05 Speed limit for 2nd stitch 10 360 80 actual speed display number 10 P06 Speed limit for 3rd stitch 10 360 200 actual speed display number 10 P07 Speed lim...

Страница 20: ...p time 1 250 20 In C test setting stop time P21 A test 0 1 0 In A test continual working test with speed P01 P22 B test 0 1 0 In B test full functional test with speed P01 P23 C test 0 1 0 In C test n...

Страница 21: ...nsor optoelectronic switch is ok 2 Check if stepper motor s mechanical structure is right E7 a Loose contact of engine plug b Position signal abnormal c Head is blocked d Fabric is too heavy e module...

Страница 22: ...cooling fin is good contact E14 Encoder signal fault Check whether the encoder signal is right or change the encoder E15 Power module abnormal overcurrent production Module driver efforts and head ef...

Отзывы: