Approved Installation Manual for the Experimental
Report No 104
EDM-350
Page 11 of 46 Rev A
Engine Data Management System Date 7-10-2021
Chromel-Alumel for JPI temp probes) using copper butt splices. The other signal and power wires are made from
normal copper and must meet MIL-W-32759/16 or equivalent.
CAUTION: Be sure the installation does not result in interference with any aircraft control movements.
When
the installation is complete all wires should be secured using ties and carefully checked for interference, rubbing or
chafing with flight controls and associated cables or any other moving parts.
7.
Pressurized Aircraft wire Routing
Pressurized Aircraft have a factory installed pressure bulkhead pass thru boot or connector at the pressure vessel or
firewall where all electrical wires from the engine pass through to the cockpit. If you can not find the opening follow
the wires from the engine to the pressure vessel. If a boot with sealant is used, remove the sealant, pass the signal
wires from the transducers mounted in the engine compartment to the display unit. Upon accomplishing this reseal
the opening with factory recommended sealant.
An alternate method for a cannon connector is to use existing wires in the aircraft going thru the pressure bulkhead.
The EDM-350 replaces the RPM, MAP, CHT, Oil Temperature, Oil Pressure Fuel Pressure, Fuel Flow and TIT
gauges which have wires going thru the pressure bulkhead. Making a new hole in the pressure bulkhead is beyond
the scope of this document and should be done according to best practices.
8.
Power Connection
The EDM automatically adapts to either a 14 or 28-volt electrical system. The
Avionics Bus power
wire to the EDM
should be 20ga copper. A
5 amp circuit breaker
is required.
Connect the EDM ground wire to the engine block.
For lighting, no connection to the aircraft dimmer system is required because the instrument dims automatically with
reductions in ambient light. Required power for the 350 is 1.0 amp at 14vdc
9.
Probe Wiring
When cutting the pair of leads to the proper length to connect to the probes, leave enough slack in the wiring so that
probe may be interchanged to an adjacent cylinder if necessary for trouble-shooting and servicing. Thermocouple
wire length is not critical and should be trimmed to any length as required for a clean installation.
The Temperature probe must be wired with the correct polarity. The temperature probe connects to its temperature
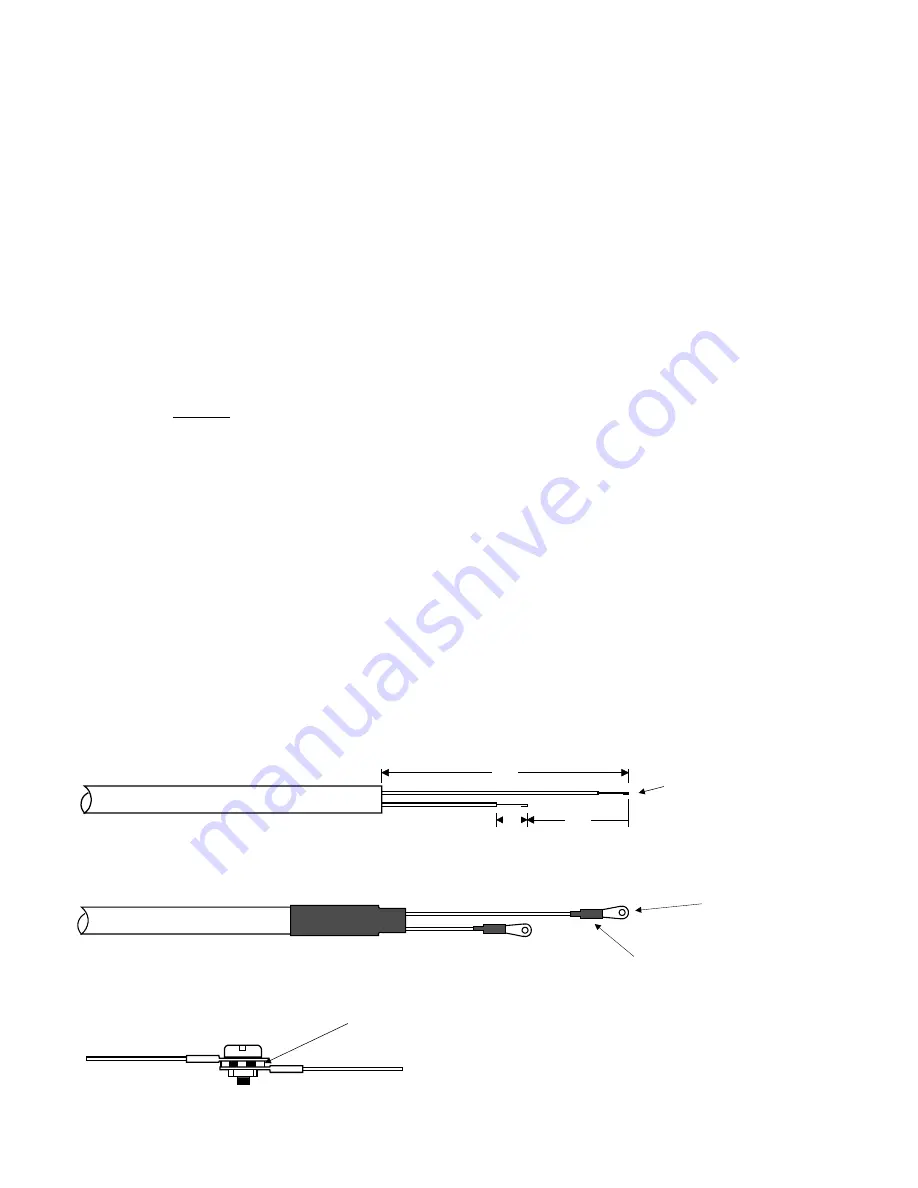
indicator with yellow jacket Teflon Chromel-Alumel wire supplied. Strip the wires as shown below—observing color-
coding.
1/4"
1 1/2"
Fold back wire
double before
crimping terminals
2 1/4"
Thermocouple wire harness
red
yellow
Terminate each wire with a crimp-on ring terminal, provided. The ring terminals may be crimped with an AMP part
number 48518 crimp tool is recommended however, a “service-type” tool may also be used. Verify the quality of
each crimp with a sharp tug on the wire. The terminal should be impossible to pull off when crimped correctly.
shrink tubing
ring terminal
Place a ¼ x 4-inch sleeve over each pair of wires in the wiring. Connect the wire ring lug to the probe ring lug using
the supplied number 4 screws and nuts, placing the star washer
between
the ring lugs, not against the nut.
Important: place star waster between two ring
terminals and tighten nut and bolt as
necessary
to instrument
to probe
Slide the sleeve over the joint and secure with three tie-wraps.


