background image

M

AINTENANCE

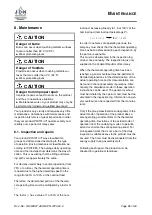
8.6.3. Re-lubricate the lifting motor

CAUTION

Danger of injury from pre-tensioned
springs

Pre-tensioned springs are released when disas-
sembling the engine covers.

I

Carefully loosen and remove the engine cover!

NOTICE

The grease filling in the rotor chambers is suffi-
cient for approximately 250hours under normal
operating conditions. The rotor chambers only
empty to approximately 60%. In this condition,
refilling must be performed.

NOTICE

See the spare parts list for tightening torques

In order to re-lubricate the motor, it must be re-
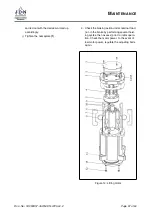
moved (Abbildung (

,

Figure 14, the lifting motor

can be removed from the hoist to simplify matters):

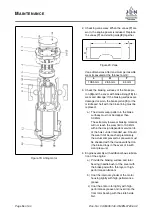
1. Engine disassembly:

a) Relieve the product and disconnect from

the power supply.

b) Unscrew the nameplate

(1)

.

c) Remove the motor cover bolts

(2)

and

detach the engine cover

(3)

(when the

cover bolts are loosened, the tension in
the brake springs

(4)

is fully released).

d) Remove the brake springs.

e) Remove the brake piston

(5)

from the

internal cylinder integrated in the engine
housing. If present, bore holes can be
used to facilitate assembly.

f) Pull out the rotor

(6)

htogether with

vanes

(7)

and starting aids

(8)

.

2. Renewing motor lubrication:

The retaining rings

(9)

and Vyon washers

(10)

must be removed in order to refill the lubrica-
tion chambers of the rotor. Then fill the lubri-
cant chambers with high-performance lubri-
cant (JDN item. no 11904) without forming
cavities! Use new Vyon washers to close off

the lubricant chambers and secure these us-
ing retaining rings.

3. Engine assembly with additional basic lubrica-

tion of the engine:

a) Provide the braking surface and rotor

bearing (needle bush) of the cover with
the brake pad with a thin layer of high-
performance lubricant.

b) Coat the internal cylinder of the motor

housing lightly with high-performance
grease

c) Coat the entire rotor lightly with high-

performance grease and insert into the
front rotor bearing with the clutch side
first.

d) Coat the vanes lightly with high-

performance grease and insert into the
rotor slots with the starting aids.

e) Coat the entire braking piston surface, in-

cluding the brake piston seal, lightly with
high-performance lubricant and push
the brake piston into the internal cylinder
with the braking surface first. Note the
position of the eccentric bore.

f) Insert the brake springs into the bores of

the brake piston.

g) Loosen adjustment bolts

(14)

and lock

nuts

(15)

. Screw back adjusting bolts

sufficiently.

h) Apply high-performance grease lightly to

rotor bearing (needle bush) in the mo-
tor cover and install motor cover. Ensure
correct seating of the brake springs and
the locating pins to the motor housing
and to the brake piston. Do not tighten
the four adjusting bolts after bolting the
motor cover in place, only screw them in
loosely by hand to the stop in the cover.
Screw back the lock nuts sufficiently be-
forehand.

i) Then screw back the adjusting bolts

45

from the stop, hold and lock with

the nuts. For lifting heights of 10 metres
(33 feet) and more, a setting of up to 60

may be required. For operation in areas
with ambient temperatures exceeding
30

C (86

F), the adjustment must be

Page

46

of 60

Doc.-No.: VA053957-40-OM-EN-0720-60-2

Содержание PROFI 3 Ti

Страница 1: ...OPERATING AND ASSEMBLY INSTRUCTIONS Hoist PROFI 3 TI Serial No P604247 P604248 Doc No VA053957 40 OM EN 0720 60 2 ORIGINAL OPERATING AND ASSEMBLY INSTRUCTIONS Representation may differ from actual pro...

Страница 2: ......

Страница 3: ...il ity for damage due to Non observance of the instructions Inappropriate use Use by untrained personnel Unauthorised conversions Technical changes Use of unauthorised spare parts Copyright protection...

Страница 4: ......

Страница 5: ...ation 25 4 2 2 Storage 25 5 Initial operation 27 5 1 Unpacking 27 5 2 Attach the hoist 27 5 3 Connecting the power supply 28 5 4 Lubricating the chain 28 5 5 Tests before commissioning 28 5 5 1 Check...

Страница 6: ...k mount 51 8 17 Check the hook shackle and eyelets 52 8 18 Check silencer 53 8 19 Check lifting motor 53 8 20 Replace chain 55 9 Faults causes and remedies 57 A Technical data 59 B Dimensions 60 Page...

Страница 7: ...classified in four stages in these operating instructions DANGER Indicates an imminently hazardous situation that will result in death or serious injury if not avoided WARNING Indicates a possibly ha...

Страница 8: ......

Страница 9: ...explosion protection regu lations are to be observed such as BGR 104 Explosion protection regulations BGR 132 Preventing ignition hazards due to electrostatic charges In other countries the correspond...

Страница 10: ...the prescribed maintenance inter vals I Only use the product for work that is de scribed as intended I Observe the conditions of use described in these instructions for your product Page 10 of 60 Doc...

Страница 11: ...perating instructions and compliance with the inspection and maintenance conditions 3 2 Improper use Among others the following are considered im proper uses Changing load capacities with the load pos...

Страница 12: ...used as the chain could fall out here or become knotted Please contact us if necessary For other foreseeable misuses Rules for safe operation page 33 Your product PROFI 3 TI may not be used in the fo...

Страница 13: ...load capacity of your product PROFI 3 TI is 3 2t 3 5 2 Driving mechanism classification Your PROFI 3 TI corresponds to the driving mech anism classification M3 1Bm according to ISO 4301 FEM 9 511 The...

Страница 14: ...Page 21 3 5 4 Vane motor The vane motor Figure 4 consists of a cylin der liner 1 with two lateral bearing washers and an inner rotor 2 The rotor is mounted eccentrically in the cylinder liner and is p...

Страница 15: ...return to the neutral position when released All movements are stopped instantaneously and the load is securely held in its current position 3 5 7 EMERGENCY STOP device Your control system is equippe...

Страница 16: ...ment in due time Striking the buffer against the housing is to be avoided This may result in damage to the buffers Your product is equipped with a limiter that stops the lowering movement Figure 7 In...

Страница 17: ...only genuine JDN chains may be installed Your product PROFI 3 TI has 1 falls and the chain size 13 x 36 The chain is manufactured according to DIN EN 818 7 The permissible temperature range is 40 C 4...

Страница 18: ...ower requirement 3 8 1 Connections The connection for the compressed air supply has the size G 3 4 Please use the corresponding hose lines for the selected pressure 3 8 2 Pressure WARNING Danger of ex...

Страница 19: ...he com pressed air add an anti icing agent to the lubri cating oil or use an air lubricator type no 11900 with an anti icing addictive for the corresponding temperatures Your product PROFI 3 TI must b...

Страница 20: ...oiler Air lubricator D kine matic viscosity about 30mm2 s cSt at 40 C possibly with anti icing agent Chain lubrication Chain oil or vehi cle motor oil kine matic viscosity about 150mm2 s cSt at 40 C o...

Страница 21: ...e working area of the hoists at potential friction impact or grinding points It is therefore possible to exclude sparking due to mechanical influences with these material combinations The external hou...

Страница 22: ...nitrobenzene Town gas Butadine 1 3 Dioxane 1 4 Divinyl ether Ethyl alcohol Ethylene Ethyle glycol Ethylen oxide Isoprene n Propylalkohol Dimethyl ether Hydrogen sulphide Ethyl ether Ether Schwefel et...

Страница 23: ...s so that the sliding velocities for potential friction points between the chain and the surroundings remain well below 1 m s FS Hoists with increased spark protection Copper plated load hook and bott...

Страница 24: ...126 C max permissible surface temperature For further information 6789 6Guideline 2014 34 EU of the European Parliament and the Council 7DIN EN 1127 1 Explosive atmospheres Explosion preven tion and...

Страница 25: ...trol and supply hoses together so that they are not kinked 4 2 Storage conditions 4 2 1 Breaks in operation 1 Bring the load hook clevis into the upper end position Ensure that the lifting limiter is...

Страница 26: ......

Страница 27: ...product PROFI 3 TI may only be installed by qualified personnel WARNING Danger from chain fracture Vibrations damage the chain and can lead to chain breakage I The supporting structure must form a ri...

Страница 28: ...mount the hose clamp Screw on the union nut 5 4 Lubricating the chain Before tests can be carried out the chain must be lubricated The chain of your product PROFI 3 TI must be lubricated in the links...

Страница 29: ...elease all control ele ments of the controls one after the other The control elements must return to their initial po sitions immediately The on and off function must operate without problem All contr...

Страница 30: ...e engaged briefly in order to prevent unnecessary wear and overheating of the drive The testing of the overload protection is based on the attachment of test loads 1 Attach 125 of load capacity If thi...

Страница 31: ...ill stall in the process 4 Following successful testing the buffer must be unloaded 5 5 7 Check lowering limiter WARNING Danger from chain fracture If the buffers are damaged inadmissibly high loads m...

Страница 32: ......

Страница 33: ...too long Only use an original JDN chain container Do not exceed the permissible fill capacity of the chain container When operating the chain container avoid dangers from an empty chain falling catch...

Страница 34: ...rm in the operator s language while taking this user manual into con sideration These instructions shall regulate measures for safe operation according to the operational con ditions In addition all i...

Страница 35: ...ruck and killed from lowering loads I Make sure that no one is below the load or in the hazard area of the load NOTICE Danger from overloading Ensure that for all appli cations of your product PROFI 3...

Страница 36: ...ement will be stopped immediately Only in the case of failure of this stop function the red EMERGENCY STOP button 1 is to be pressed down firmly The EMERGENCY STOP button clicks into place Your produc...

Страница 37: ...emove the control device 8 Carefully hang up your product PROFI 3 TI and transport away 7 2 Disposal Your product PROFI 3 TI contains a series of ma terials that you may have to dispose of or have re...

Страница 38: ......

Страница 39: ...or of fv The factor fv has a value of 1 at 50 of the nom inal load increasing linearly to 1 5 at 100 of the nominal load nominal load percentage P fv 1 0 5 P 50 50 for P 50 In order to achieve safe op...

Страница 40: ...ke the weight of the harness into account This is permissible if the ratio W eight of the harness Load capacity 0 05 To determine the mode of operation for calculating the partial operating times actu...

Страница 41: ...ate Specialist inspector in hours L1 light L2 med ium L3 heavy L4 very heavy column 2 x column 3 x operating days x factor 1 2 When zero has been reached a general overhaul must be performed Signature...

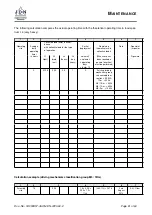
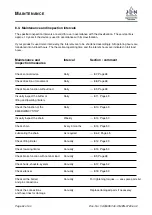
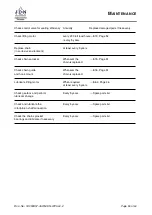
Страница 42: ...8 Page 48 Check brake function without load Daily 8 9 Page 48 Visually inspect the buffer of Daily 8 11 Page 49 lifting and lowering limiters Check the function of the Daily 8 10 Page 49 EMERGENCY STO...

Страница 43: ...ge 51 chain is replaced Check chain guide Whenever the 8 16 Page 51 and hook mount chain is replaced Lubricate lifting motor When required 8 6 3 Page 46 at least every 5 years Check gearbox and perfor...

Страница 44: ...rt from your product I protect your product from corrosion 8 6 Lubricate and grease 8 6 1 Operating materials CAUTION Danger of skin irritation Oils and greases may cause skin irritation I Wear protec...

Страница 45: ...dropping point 180 C Application temper atures 20 C bis 120 C Designation according to DIN 51825 KP2K 20 active ingredients EP additives to reduce wear and ageing pro tection water resistant and anti...

Страница 46: ...s ing retaining rings 3 Engine assembly with additional basic lubrica tion of the engine a Provide the braking surface and rotor bearing needle bush of the cover with the brake pad with a thin layer o...

Страница 47: ...the braking action under nominal load run in the brake by performing several hoist ing cycles then assess prior to initial opera tion Check the motor power In the event of low motor power regulate the...

Страница 48: ...gs it may be due to a faulty brake The load may fall I Do not use the product I Have the product repaired Check without load I Alternately switch your unloaded product PROFI 3 TI between lifting and l...

Страница 49: ...buffer The buffer of the lifting limiter optional and low ering limiter must be visually inspected daily If the buffers have cracks permanent deformations or other damage they must be replaced 8 12 C...

Страница 50: ...ne of the features listed below the chain may break upon further use I Do not use the product I Replace the chain Corrosion pitting Bent or damaged chain links Chain drawn tight Wear over 11 pitches d...

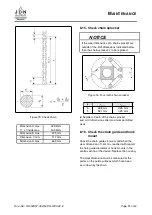
Страница 51: ...chain sprocket z amin xmax 4 32 8 mm 0 25 mm 5 32 1 mm 0 25 mm z Number of teeth of the chain sprocket a x Limit dimensions after maximum permitted wear 8 16 Check the chain guide and hook mount Chec...

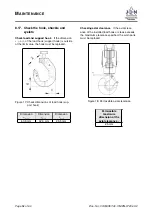
Страница 52: ...ensions of load hook sup port hook Dimension xmax Dimension ymin Dimension hmin 60 9 mm 42 0 mm 35 5 mm Checking axial clearance If the axial clear ance of the installed load hook or clevis exceeds th...

Страница 53: ...tensioned springs Pre tensioned springs are released when disas sembling the engine covers I Carefully loosen and remove the engine cover NOTICE See the spare parts list for tightening torques In orde...

Страница 54: ...extremely low wear braking material will not reach the wear limit of 0 02mm within the design dependent service life of the hoist under intended use Should the wear limit be reached prematurely the a...

Страница 55: ...es then assess prior to initial opera tion Check the motor power In the event of low motor power regulate the adjusting bolts again 8 20 Replace chain WARNING Danger from chain fracture The chain is s...

Страница 56: ...sleeve 4 to secure the chain end link 7 Mount the components on the idle chain a Push the buffer discs 3 edge encloses buffer and the buffer 2 onto the chain b Insert the 12th chain link into the chai...

Страница 57: ...Supply hoses leaking or loose Check connections Cross section of the line too small Use line with sufficient cross section Brake does not release fully Bring the inlet pressure to the required value c...

Страница 58: ...in with a new JDN chain Wrong chain drawn in Identify chain and replace with JDN chain if necessary Defective gearbox bearing Have product repaired LIFTING AND LOWERING SPEED DECLINES OR ENGINE STOPS...

Страница 59: ...nominal load 4 m3 min 142 cfm Air consumption at lowering with nominal load 5 5 m3 min 195 cfm Hose connection G 3 4 Hose dimension inside 19 mm 3 4 inch Motor output lifting motor 3 5 kW Lifting spe...

Страница 60: ...DIMENSIONS B Dimensions mm inch A 593 23 3 B 373 14 7 C 233 9 2 D 483 19 0 E1 40 1 6 E2 30 1 2 F 187 7 4 G 233 9 2 Page 60 of 60 Doc No VA053957 40 OM EN 0720 60 2...

Отзывы: