iXsystems TrueNAS X Series Скачать руководство пользователя страница 7

Support: 1-855-473-7449 or 1-408-943-4100   

                                                       Email: 

[email protected]

Page 5

4  Install Drive Trays

Drive trays are used to mount drives in the chassis. Each drive tray has two status LEDs. The top LED is blue when 

the drive is active or a hot spare. The bottom LED changes to amber if a fault has occurred.

A tray must be placed in each drive bay to maintain proper airflow for cooling. If fewer than twelve drives are con

-

nected, empty “air baffle” trays must be placed in the empty bays.

A standard drive tray installation order simplifies support and is strongly recommended:

• 

SSD drives for write cache (W), if present

• 

SSD drives for read cache (R), if present

•  Hard drives or SSD drives for data storage

• 

Air baffle filler trays to fill any remaining empty bays

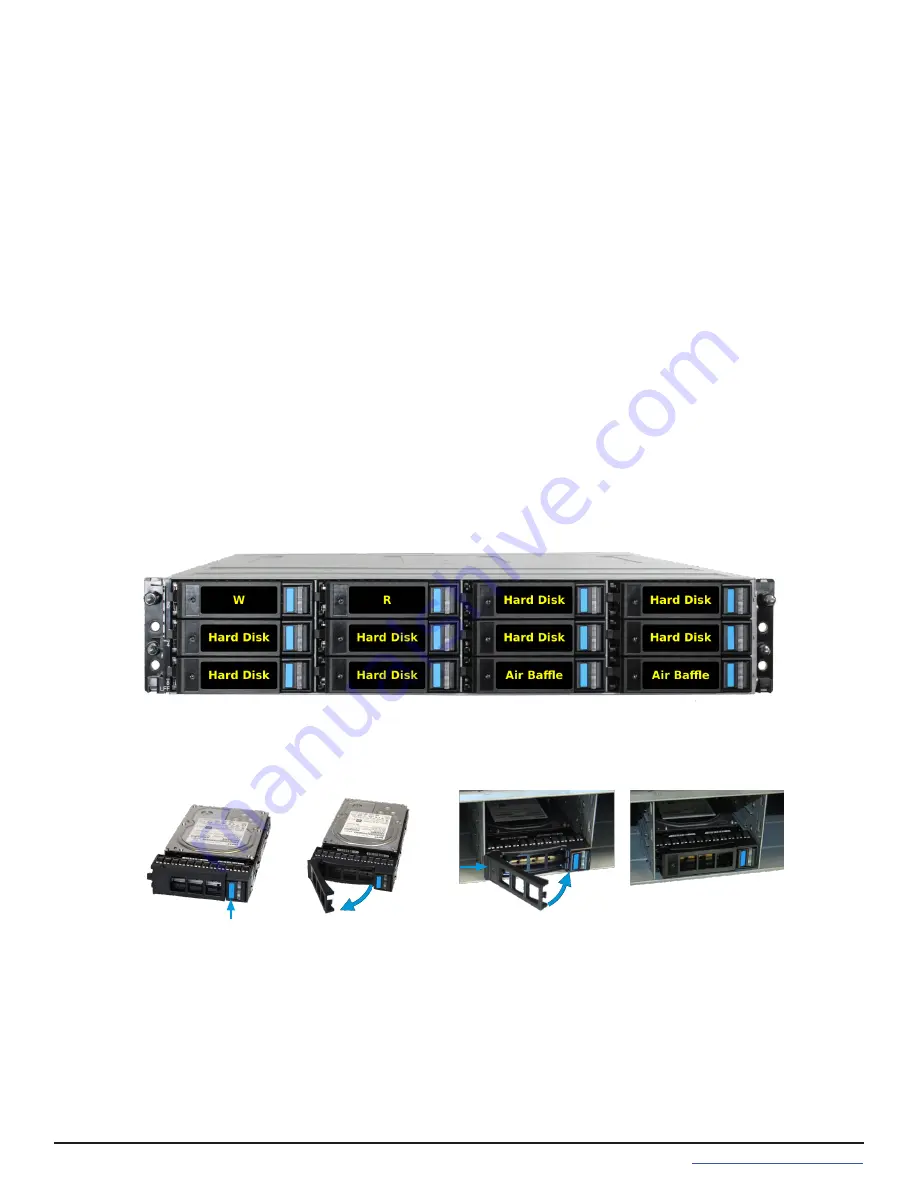
Install the first drive tray in the top left drive bay. Install the next drive tray to the right of the first. Install remaining 

drive trays to the right across the row. After a row is filled with drives, move down to the next row and start again 

with the left bay.

This example shows the proper order for a write cache (W) SSD, a read cache (R) SSD, eight hard drives, and two 

empty air baffle trays.

To load an individual drive tray into a bay, press the blue button to open the latch. Carefully slide the tray into a 

drive bay until the left side of the latch touches the metal front edge of the chassis, then gently swing the latch 

closed until it clicks into place.

TrueNAS appliances only support qualified hard drives and SSDs. Contact the Sales Team if you need more drives 

or replacements.  Adding unqualified drives to the system voids the warranty. Call Support if drives are improperly 

installed in trays.

4.1  Replacing Drives

Depending on the configuration ordered, X-Series drive trays come preinstalled with 3.5” drives, 2.5” drives with 

adapter, 2.5” read intensive (RI) drives with interposer and adapter, and/or empty air baffles that preserve system 

air flow. Drives that lose functionality can be removed from the tray and a new drive installed in its place or a sys

-

tem upgraded by removing the air baffles and installing new drives ordered from iXsystems.

Содержание TrueNAS X Series

Страница 1: ...TrueNAS X Series Unified Storage Array Basic Setup Guide Version 1 8...

Страница 2: ...l Spring 3 3 3 Attaching Rails to the Rack 4 4 Install Drive Trays 5 4 1 Replacing Drives 5 5 Connect Expansion Shelves 7 6 Connect Network Cables 7 7 Connect Power Cord 7 8 Install Bezel Optional 7 9...

Страница 3: ...Trays must be installed in all bays to main tain proper air ow for cooling Up to ten drive trays are packed in a cardboard tray Additional drive trays are packed with the accessory kit Rail Extenders...

Страница 4: ...n It turns on if the TrueNAS software issues an alert The X Series has one or two storage controllers in a side by side configuration 1 Gigabit Ethernet connector 1 2 Gigabit Ethernet connector 2 3 US...

Страница 5: ...llation of the included rail extenders For these deeper racks install cage nuts on the outside rear of the rack The tabs on the cage nuts must be horizontal as shown Using the included bolts install t...

Страница 6: ...d the front of the rack aligning the pins on both ends of the rail with the mounting holes in the rack Swing the clamp latch closed to hold the rail in place Use two of the supplied screws to secure t...

Страница 7: ...s move down to the next row and start again with the left bay This example shows the proper order for a write cache W SSD a read cache R SSD eight hard drives and two empty air baffle trays To load an...

Страница 8: ...hat hold the 2 5 drive to the adapter 2 Follow this process in reverse to add the new 2 5 drive to an adapter and attach to the drive tray Warning the interposer is considered part of the 2 5 drive an...

Страница 9: ...port on the X Series must be connected with a shielded Ethernet cable 7 Connect Power Cord If any TrueNAS expansion shelves are connected to the X Series power on the expansion shelves and wait at le...

Страница 10: ...s in the blue clip on the bottom of the controller to release the two black locking levers Swing the locking levers outward and pull the controller out of the system 8 Install Bezel Optional The syste...

Страница 11: ...sed your X Series with only one controller you can upgrade it by adding a second controller To re move the blanking plate from the empty controller slot press in the blue clip on the bottom of the pla...

Страница 12: ...stalling or Adding a Controller Hold the controller by the sides and align with the opening on the back of the chassis Slide the controller into the X Series chassis until it stops 1 Swing the locking...

Страница 13: ...emote support requires functioning addresses If iXsystems preconfigured the system they have set the OOBM interfaces to the requested IP addresses Otherwise the OOBM IP addresses default to these stat...

Страница 14: ...mple uses the eth0ipaddress address ipmitool H eth0ipaddress U admin bmc reset cold Configuring Static IP Addresses The OOBM system can be set to use a static IP address and netmask This example shows...

Страница 15: ...IPMItool for remote Out of Band management on the X Series Other IPMI utilities may not work correctly or even damage the X Series system The ipmitool connection password is randomized for security an...

Страница 16: ...S only toll free 1 855 499 5131 International 1 408 878 3140 International calling rates will apply 12 Additional Resources The TrueNAS Documentation Hub has complete software configuration and usage...

Отзывы: