Pre-Check The Settings
1. Close the pattern adjustment knob (#14) fully by gently twisting
it clockwise until it stops. It doesn’t need to be tight.
2. Open the fluid-adjustment knob (#22) fully by gently twisting it
counterclockwise.
NOTE:
You might unscrew the fluid adjustment
knob off of the airbrush. Don’t worry. Screw it back on one or
two full turns.
3. Open the air adjustment knob (#23) fully by twisting it counter
clockwise until it stops. It doesn’t need to be tight.
4. Loosen air cap cover ring (#3) to adjust the air cap (#1), specifically
the little finger-like projections until they are horizontal to the
ground. Then tighten air cap cover ring (#3).
Assembly
1. Screw the air hose firmly onto the air source outlet.
NOTE:
In many cases the air source is a compressor.
2. Screw the air hose firmly onto the G-Series’ air inlet beneath
the handle.
G6 Bottle Set Spraying
1. Fill a bottle at least 1/2 of the way full of properly prepared paint.
2. Screw the lid (bottle cap set) onto the bottle.
3. Screw the bottle onto the airbrush-gun.
4. Adjust the air source pressure to 35-55 psi and spray.
G3, G5 and G6 Spraying
1. Screw the metal cup onto the airbrush-gun.
2. Fill cup at least 1/2 of the way full of properly prepared paint.
3. Attach lid to cup.
4. Adjust the air source to 35-55 psi and spray.
General Spraying
1. Pull the trigger back slightly and only the air will come out.
2. Pull the trigger back more until paint starts to spray in small
amounts.
3. Pulling the trigger back further releases even more paint until
the trigger is pulled as far as it can go.
GETTING STARTED
7
Содержание Full Finish G-Series G3
Страница 1: ...Operating Instruction Manual...
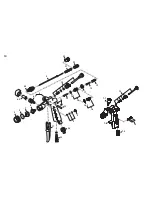
Страница 10: ...20 7 1 14 5 14 12 15 10 13 16 16 1 17 18 19 6 4 11 23 7 2 24 8 9 1 2 3 6 1 6 2 7 21 22 22 16 16 2 10...
Страница 13: ...4...
Страница 14: ...3 CAUTION...
Страница 15: ...2...
Страница 16: ...1 ECL903 IM KMA G3 G5 G6...


