


English
English
English
English
5
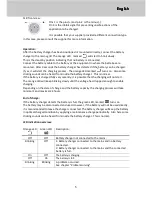
XLR front view:
Pins 1 is the plus (+) and pin 2 is the minus (-).
Pin 3 is the inhibit signal for preventing unsafe actions of the
application to be charged.
It is possible that your supplier provided a different connection type.
In this case, please consult the supplier for more information.
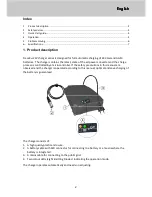
Operation:
After the battery charger has been positioned or mounted correctly, connect the battery
charger to the mains grid. The orange LED , marked
will start to blink slowly.
This is the stand-by position indicating that no battery is connected.
Connect the battery cable to the battery or the equipment in where the batteries are
mounted. After 3 seconds the battery charger has detected if the battery can be charged.
If yes, it will start the charging process. The orange LED marked
turns on. Also some
clicking sounds can be heard from inside the battery charger. This is normal.
If the battery is charged fully very recently, it is possible that the charging will not start.
The orange LED will keep blinking slowly until the voltage has dropped enough to enable
charging.
Depending on the state of charge and the battery capacity the charging process will take
minimal 1 and maximal 24 hours.
End of charge:
If the battery charger detects the battery is full, the green LED, marked
turns on.
The battery may be disconnected and used. However, if the battery will not be used directly,
it is recommended to leave the charger connected. The battery charger will keep the battery
in optimal charged condition by applying a maintenance charge periodically. Also here some
clicking sounds can be heard from inside the battery charger. This is normal.
LED indication overview:
Orange LED
Green LED
Description:
Off
Off
Battery charger not connected to the mains.
Blinking
Off
1: Battery charger connected to the mains and no battery
connected.
2: Battery charger connected to the mains and the connected
battery is full.
On
Off
The battery is charging
.
Off
On
The battery is full.
Blinking
Blinking
A problem occurred.
See chapter “Problem solving”