


English
English
English
English
4
-
Batteries are capable of providing much energy in a very short time. Prevent short
circuits any way. For example walking over the cables or damaging the cables or
connector by improper use.
-
Do not shorten the length of the charge cable.
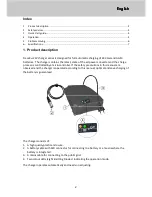
3. Quick start guide
The battery charger is very simple to operate.
1.
Connect the battery charger to the mains. The orange LED , marked
will blink.
2.
Connect the battery cable to the battery to be charged. When the battery charger
decides that the battery should be charged , The orange LED marked
turns on
continuously and the charging will start.
3.
As long as the orange LED marked
is on and it is not necessary to use the battery, it
is recommended not to interrupt the charge process. Interrupted charges will shorten
the battery life.
4.
When the battery is full the green LED, marked
turns on. The battery can be used
now. However, if the battery will not be used directly, it is recommended to leave the
charger connected. The battery charger will keep the battery in optimal charged
condition.
5.
If there is a problem, the charger will indicate this by quickly blinking the orange and
green LEDs simultaneously. Please consult the chapter “Problem solving”.
4. Operation
Positioning:
The battery charger is not suited for outdoor use.
Put the charger on a stable place.
Keep at least an area of 10cm around the enclosure for proper battery charger cooling.
During charging, the enclosure can become hand warm. This is normal.
The 12A version is equipped with a build in fan, operating automatically when the internal
battery charger temperature increases. With insufficient cooling or too high ambient
temperatures the output power will be reduced. The time required for the total charge
process may increase. For this reason, do not subject the battery charger to direct sunlight.
Electrical connections:
The battery charger is equipped with a EU plug for connection to the 220-240V/50Hz mains
grid. By default the battery charger has a XLR connector for connecting to the battery.