


31
Chapter 6 RECORD OPERATION AND MENU SETUP
6.1 Record Operation
The DVR provide three methods of recording for your choice as following:
1. Manual Recording: You can just press the
button on the front panel during any
LIVE monitoring time. Press the RECORD button again to exit recording mode.
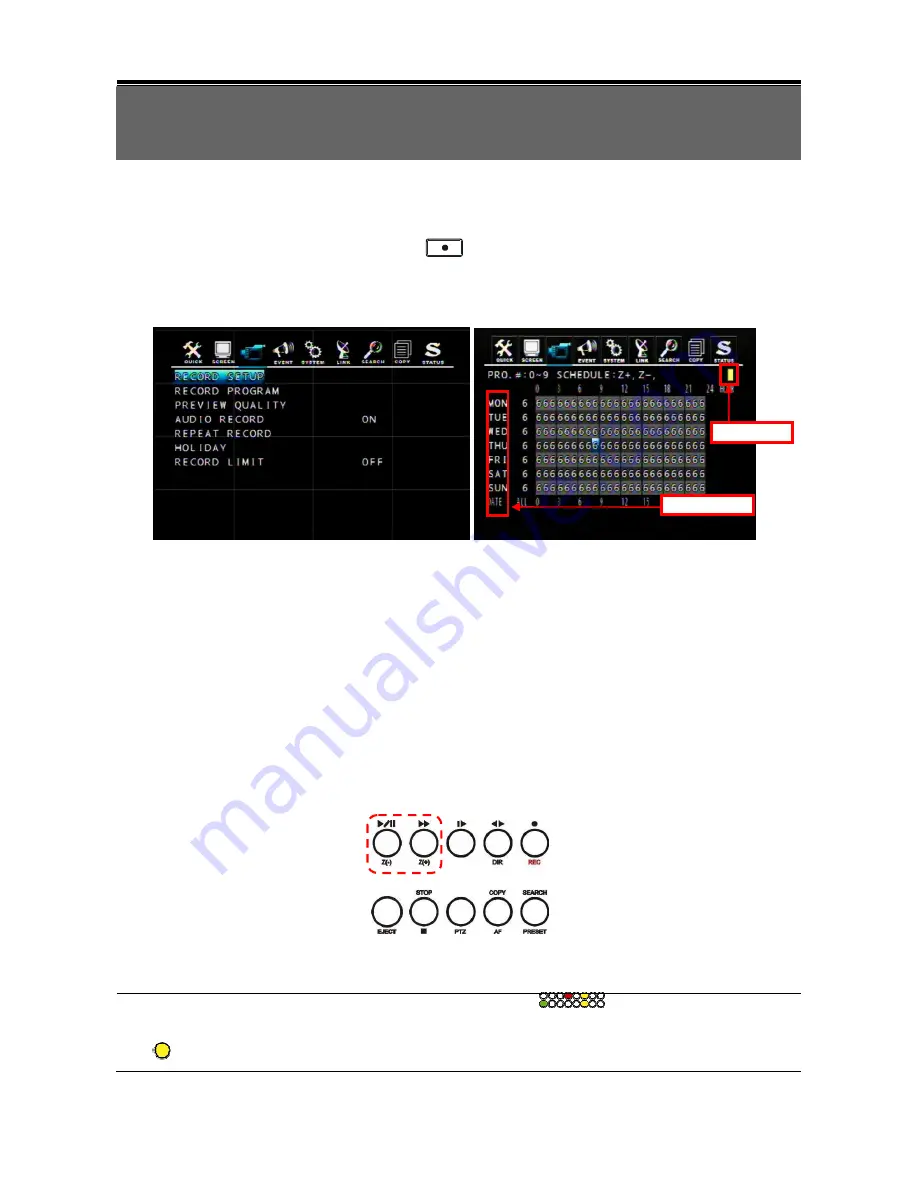
2. Schedule Recording: You can prearrange the schedule recording time (RECORD -> RECORD SETUP) by
applying Front Panel Control or Mouse Control.
Front Panel Control:
Select (
▲
/
▼
/
◄
/
►
) the desired record time on the RECORD PROGRAM schedule, and then press Z(+)
button to enable schedule record. The time point you’ve selected becomes color yellow. When the time
matches the setup, DVR will start recording according to the RECORD PROGRAM previously setup. To
cancel schedule record, please move the cursor to the yellow color time point and then press Z(-) button.
Move the cursor to any time point on the vertical ALL roll to enable the record schedule on the time point of
the whole horizontal roll.
Mouse Control:
Select (click-on) the desired record time on the RECORD PROGRAM schedule, and then click the yellow
rectangle icon (on the top right hand corner) to enable schedule record. The time point you’ve selected
becomes color yellow. When the time matches the setup, DVR will start record according to the RECORD
PROGRAM previously setup. To cancel schedule record, please move the cursor to the yellow color time
point and then click on the yellow rectangle icon. Move the cursor to any time point on the vertical ALL roll
to enable the record schedule on the time point of the whole horizontal roll.
3. Event Recording: DVR provides many kinds of Event setup; VIDEO LOSS, MOTION DETECTION
and ALARM; if the event occurs, the event record will be started.
Recording status will be shown on the screen as different colors (
) according to the recording
type:
- “
(Yellow) ” : Manual Recording mode
Vertical ALL Roll
Rectangle Icon


