ISSI PSP-CCD-C Скачать руководство пользователя страница 10


Innovative Scientific Solutions, Inc.


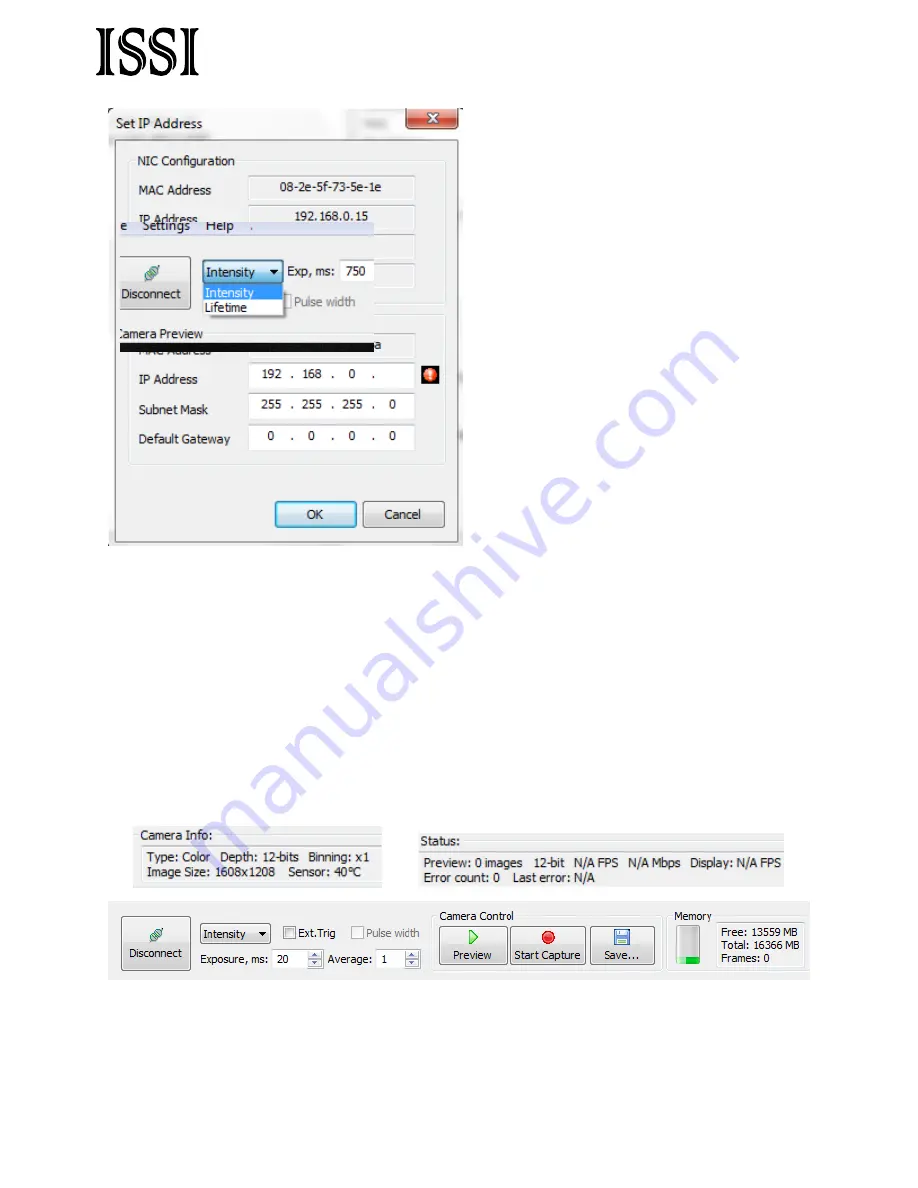
The NIC Configuration displays the MAC 
Address, IP Address, Subnet Mask and 
Default Gateway of the computer’s network 
interface card where the camera is connected. 
The GigE Vision Device IP Configuration 
shows the same parameters on the camera 
connected.  The camera IP address, Subnet 
Mask and Default Gateway can be changed 
from this window.  The IP Address of the 
camera should match that of the computer 
with the exception of the fourth number, 
which should be different form the 
computer’s IP Address.   For  example, if the 
computer’s IP Address was set to 
192.168.0.15, the camera should be set to 
192.168.0.10.  The Subnet Mask and the 
Default Gateway should match that of the 
computer.  Press ‘

OK

’ to accept the new 

settings.  The camera will maintain the 

network configuration assigned to it unless the user switches the NIC to acquire IP address 
dynamically.  In this case, the camera will revert back to its factory network settings.  To search 
for a camera on the network with unknown network settings, select the ‘

Show unreachable GigE 

Vision Devices

’ box. 

Select the camera to open the connection with the GUI.  The GUI will show all camera control 
buttons as active once the camera has been connected.   

The GUI will also display the features of the camera connected under ‘Camera Info’ and the 
status of the camera.  The ‘Probe’ will display the current intensity value in counts (on an 8- (

2

8

or 12-bit (

2

12

) scale depending on which is selected) and the x- and y-location on the array.  This 

should be utilized in preview mode when setting the exposure and iris for the experiment.   


The toolbar at the top of the GUI contains the control features for the camera.  Connect and 
disconnect cameras via the button.  The camera can be set up to be externally triggered here as 
well.  By selecting ‘Ext. Trig’ the ‘Pulse width’ box will become useable.  Externally triggering 

10 


Содержание PSP-CCD-C

Страница 1: ...Innovative Scientific Solutions Inc 2 megapixel CCD Camera Product ID PSP CCD C PSP CCD M 1...

Страница 2: ...nimizes image alignment errors This single chip system also accomplishes a second goal all data is acquired simultaneously and thus the stability of the illumination source is a less significant issue...

Страница 3: ...ovative Scientific Solutions Inc Operating Temperature 40 C to 85 C Weight 210g Size 46 x 46 x 66 mm Spectral plots of the array Spectral plot of IR Blocking filter in the camera Software Installation...

Страница 4: ...is compiled for 32 and 64 bit Window operating systems XP Vista and 7 Locate the appropriate installation file to begin installation The setup page will open and prompt the user to continue with the...

Страница 5: ...Innovative Scientific Solutions Inc Navigate to the destination where the software will be stored on the computer and proceed with the installation 5...

Страница 6: ...ver The driver will be installed on the network interface card on the computer If the eBUS driver is already installed as pictured below select the action Do Nothing and close the window If it is not...

Страница 7: ...t FE is limited to 100 megabits per second Using a computer with a GigE NIC will enable the camera to collect data at its maximum frame rate of 35 44 normal overclocked frames per second All other Gig...

Страница 8: ...ect the user requirements on the PC To change the IP settings on the computer navigate to the Local Area Network connections page on the computer Select the network connection where the camera is conn...

Страница 9: ...connected to the computer This will open a new window and display all cameras currently connected to the computer To change the IP address of the camera selected click the Set IP Address button This w...

Страница 10: ...switches the NIC to acquire IP address dynamically In this case the camera will revert back to its factory network settings To search for a camera on the network with unknown network settings select...

Страница 11: ...e also known as radiometric mode captures a single image per trigger Lifetime mode acquires two images sequentially per pulse of the illumination source Lifetime data acquisition is described in more...

Страница 12: ...he target in the preview window without saving frames in separate images For lifetime measurements the two gates can be compared to one another using memory mode Images stored in the RAM can be displa...

Страница 13: ...camera is nominally 12 bit Binning can also be done from here but should only be done on monochrome cameras NEVER use pixel binning on a color camera The PSP CCD also has a built in pulse generator V...

Страница 14: ...n changed to output the Pulse Generator signals to the Trigger input via a BNC connector The image above shows the trigger connected over a BNC T which also splits the signal and also sends it out to...

Страница 15: ...e accessed from the settings tab to track the camera events in case of errors in operation License Activation Procedure Open ProAcquire GigE 32 64 bit version click About menu and choose License updat...

Страница 16: ...has an internet connection after 2 3 seconds you will see this message Now you can start to work with camera The license information can be found in About About ProAcquire GigE In this example the so...

Страница 17: ...ng with all trade regulations and laws both foreign and domestic Except as authorized by law or distributor agreement with ISSI you agree and warrant not to export or re export the information to any...

Отзывы: