MEASUREMENT AND ASSEMBLY MANUAL
Instruction validity: as of 1 August 2013
7
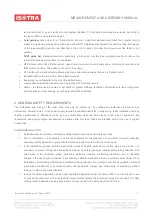
Note: The places for the installation of the brackets must be selected before ordering the roller blinds, as this position
determines the cord length.
If brackets are installed upwards (b), leave at least 20 mm of space between the bracket and the floor or window sill.
Attach the brackets to the wall using screws and components suitable for the type of structure onto which they are to be
attached (metallic structure, cement, brick, etc.). A gap of 1
–2 mm should be left between the lower section and the
wall/window to prevent mutual damage during operation. If necessary, increase the bracket
distance from the wall by washers. Always tighten the cord and hold it to prevent twisting.
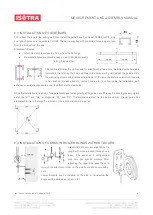
NOTE
Check parallelism and rectangularity of the four attachment points. This can be done by measuring
two distances “S1” and “S2” or diagonals “D1” and “D2”. The dimensions must be the same ±1 mm.
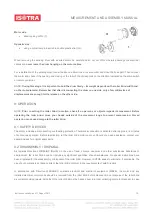
6.5 EXTERIOR INSTALLATION WITH SLEEVE PASSING THROUGH WALL
For exterior roller blinds installed with a sleeve passing through a wall and with a crank rod in the interior, it is necessary to
calculate the exact position of the hole for a 30-cm angular rod (15).
Attach the brackets to a wall or ceiling and install the roller blind in its place. Use a pencil to mark the position of
the box lower corner on the wall or window frame. Remove the roller blind from the brackets and measure the
distance from the box lower corner to the centre of the hole (A) in the rear part of the box (which serves for
inserting the angular rod to control the transmission system). Mark the same distance on the wall, thus marking
the centre of the hole to be drilled.
Carefully drill a hole through the wall using an 8-mm drill bit. The hole must be as level as possible.
Install the roller blind back and insert a sleeve from the interior to check accuracy of the hole position. Then cut
the angular rod to size using a hack-saw. The rod size depends on the wall thickness.


