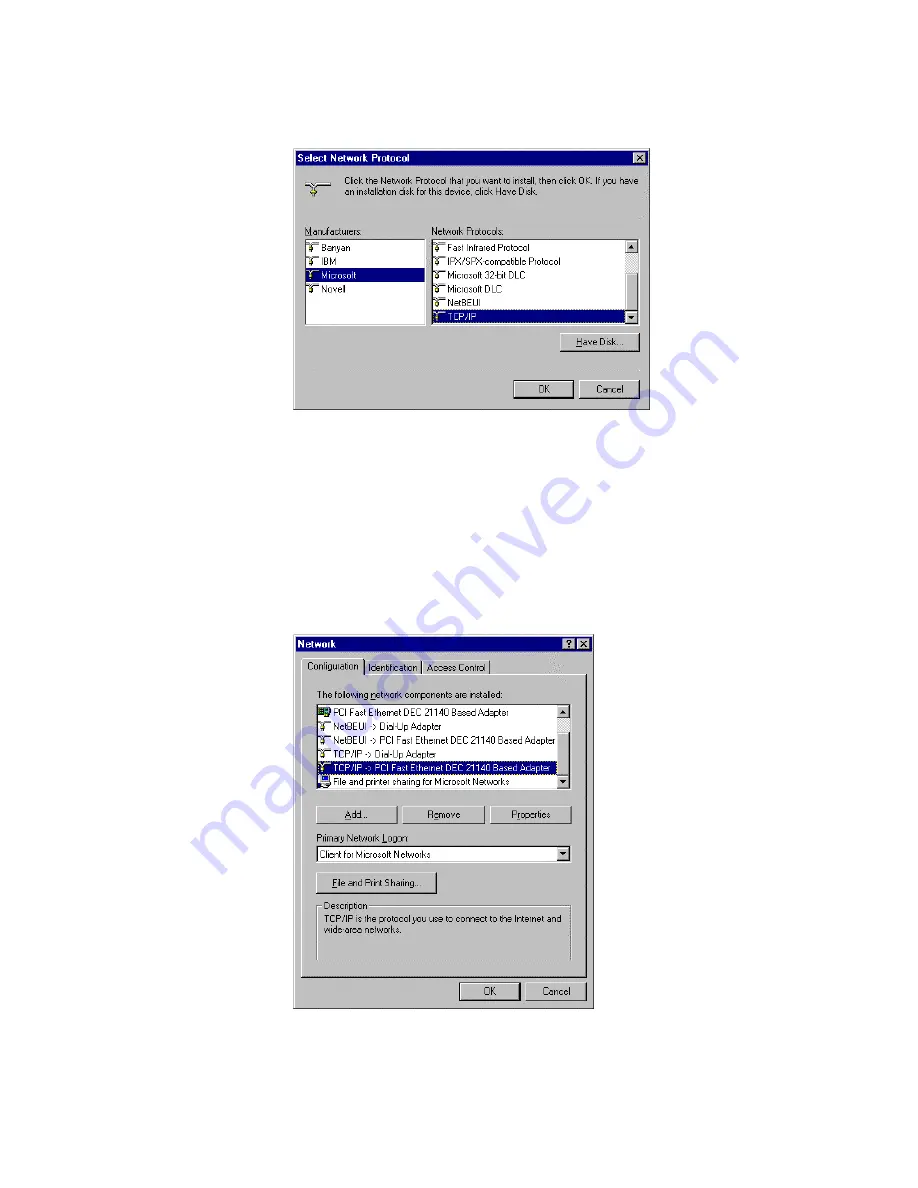
iso-9001 Wireless Bridge Скачать руководство пользователя страница 25


Network Protocols 

list. Click 

OK

 button to return to Network window. 


7.  The TCP/IP protocol shall be listed in the Network window. Click 

OK

 to 

complete the install procedure and restart your PC to enable the TCP/IP 
protocol. 

8. After rebooting, click 

Start

 button and choose 

Settings

, then click 

Control 

Panel

9. Double click 

Network

 icon. Select the TCP/IP line that has been associated to 

your network card in the 

Configuration

 tab of the Network window. 

10. Click 

Properties

 button to set the TCP/IP protocol for this device. 


11. Select 

Specify an IP address

 in the 

IP Address

 tab. The default IP address of 

 22

Содержание Wireless Bridge

Страница 1: ...rmful interference to radio communications Operation of this equipment in a residential area is likely to cause interference in which case the user at his own expense will be required to take whatever...

Страница 2: ...manual may cause harmful interference to radio communications Operation of this equipment in a residential area is likely to cause interference in which case the user at his own expense will be requir...

Страница 3: ...6 3 2 Inspect System Information 6 3 3 Tool Box 7 3 4 Primary Setup 8 CHAPTER 4 CONFIGURE AS A BRIDGE 11 4 1 Bridge Configuration 11 4 2 Create a Bridge Network Environment 12 CHAPTER 5 DHCP SERVER 13...

Страница 4: ...ions of this product 1 1 Functions and Features 2 in 1 wireless bridge or access point 2 in 1 integrated function flexibility and cost effective Point to point Multipoint to multipoint connectivity Le...

Страница 5: ...gh any networked computer s web browser MAC Address Access Control supported Allows you to assign different access right for different users Firmware Upgradable Provides firmware upgrade via Web Brows...

Страница 6: ...ss On An active station is connected to the corresponding LAN port Link Act 1 2 Link status Green Blinking The corresponding LAN port is sending or receiving data 10 100 Data Rate Green On Data is tra...

Страница 7: ...and bookshelves do not obstruct the signal to and from the antenna The antenna should be located for the direct line of sight space 2 Connecting the Antenna This product provides a TNC antenna connec...

Страница 8: ...to the printer port of this product Optional 5 Power Connect the power code to the power outlet and turn on the power switch This product will enter the self testing status automatically In this phra...

Страница 9: ...will see the web user interface after the connection is established To log in as an administrator enter the system password the default setting is admin in the System Password field and click on the L...

Страница 10: ...system logs Reboot Reboot this device Backup Setting You can backup your settings by clicking this button and save it as a bin file Once you want to restore these settings please click Firmware Upgra...

Страница 11: ...as a wireless access point Figure 3 4 3 Network ID SSID Network ID is used for identifying the Wireless LAN WLAN Client stations can roam freely over this product and other Access Points that have the...

Страница 12: ...and this device or connect to this device Figure 3 5 MAC Address Control allows only client devices with specified MAC addresses to associate and pass data through this device MAC Address Control Che...

Страница 13: ...dicates a specific client IP Address Expected IP address of the corresponding client Keep it empty if you don t care its IP address C When Connection control is checked check C will allow deny the cor...

Страница 14: ...ted as a wireless bridge This means there is no wireless client can make the connection to this device when it s in the Bridge mode 4 1 Bridge Configuration 1 Login this device with the administrator...

Страница 15: ...ge is inversely proportional to data rates The maximum radio range is achieved at the lowest workable data throughput Antenna type and placement The coverage range is increasing by the antenna s heigh...

Страница 16: ...nfigurations For TCP IP based networks DHCP reduces the complexity and amount of administrator work involved in reconfiguring computers This product supports the function of DHCP server If you enable...

Страница 17: ...Fixed Mapping In general DHCP server assigns an IP address chosen from the IP addresses pool randomly Fixed Mapping allows you to assign a specific IP address to the specified MAC address 14...

Страница 18: ...ter has ability to print via this product For convenience we call the printer connected to the printer port of this product as printer server To configure this printer server on a Windows 95 98 ME pla...

Страница 19: ...wing port item Ensure that the Print using the following driver item is configured to the correct driver of this printer server 5 Click Port Settings Type the IP address of this product and then click...

Страница 20: ...ilar to that of Windows 95 98 ME except of the printer Properties Compare to the procedure for the setting of windows 95 98 ME the selection of Details windows 95 98 ME is equivalent to the selection...

Страница 21: ...nstallation CD ROM into the CD ROM device The following window will be shown automatically If it isn t please run install exe in the CD ROM 2 Click the INSTALL button Wait until the following Welcome...

Страница 22: ...xt button Then the setup program will begin to install this program into the computer 4 When the following window is displayed click the Finish button 5 Select the item to restart the computer and the...

Страница 23: ...6 After rebooting your computer you can configure this device refer to Chapter 4 and setup the Print Server refer to Chapter 6 20...

Страница 24: ...orms for working with this device 1 Connect this device to a computer by general network cable 2 On the Windows 95 98 ME Platforms click Start button and choose Settings then click Control Panel 3 Dou...

Страница 25: ...the TCP IP protocol 8 After rebooting click Start button and choose Settings then click Control Panel 9 Double click Network icon Select the TCP IP line that has been associated to your network card...

Страница 26: ...ease use 192 168 123 xxx xxx is between 1 and 253 for IP Address field and 255 255 255 0 for Subnet Mask field 12 In the Gateway and DNS tab do not put anything 13 Click OK button to finish the TCP IP...

Страница 27: ...tomatically install the TCP IP protocol 2 Connect this device to a computer by general network cable 3 On the Windows 2000 XP platform right click My Network Places on the desktop then select Properti...

Страница 28: ...ties button 6 In the General tab select Use the following IP address and set a IP address which is in the same subnet with this product default is 192 168 123 254 7 Do not put anything in the Default...

Отзывы: