background image


23 


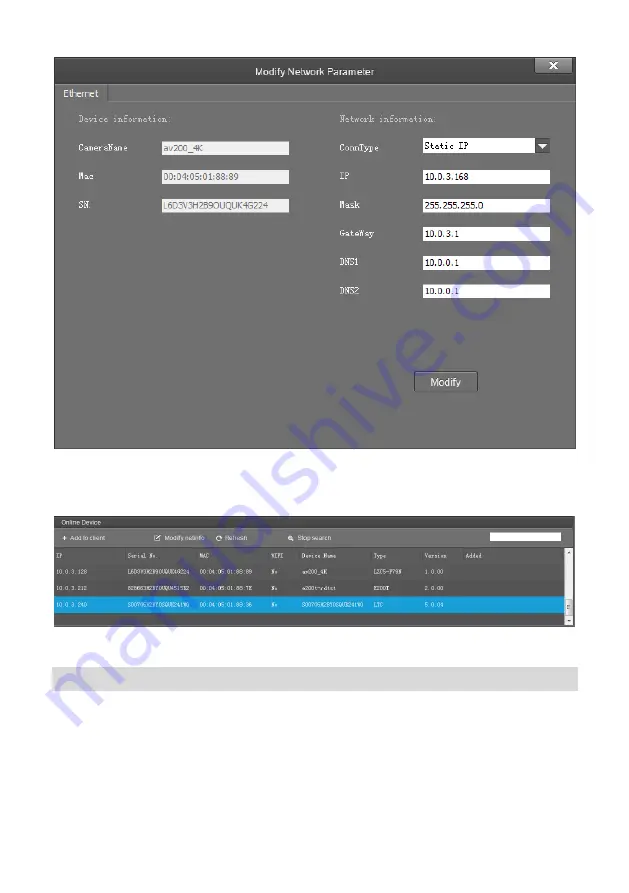
To control and preview a camera, first choose the device, modify its IP address as the IP address 

of the same 

LAN, then click “Add to Client” as the picture shown below. 


Please check that all IP addresses are in the same LAN. 

Remote Configuration 

Choose the came

ra in the device list, click “Remote Configuration” in the column to upgrade or 

configure IP address of the camera. 

Содержание LTC-A2001NV2

Страница 1: ...Lecturer Tracking System V2 User Manual V1 0 ...

Страница 2: ......

Страница 3: ...ble in safe place Do not operate the camera beyond the specified temperature and humidity Working temperature range of the camera is between 0 and 40 The ambient humidity range is less than 90 During transporting avoid violent shake or force to the camera To prevent electric shock do not remove screws or housing of the camera There are no self serviceable parts inside Refer to qualified service pe...

Страница 4: ... you need to extend the power cable please extend the power cable from the part 1 on below picture 220V 110V do not extend from part 2 on below picture DC12V otherwise it will cause unexpected damage to the device ...

Страница 5: ...S 3 ACCESSORIES 3 MAIN PARTS INTERFACES 4 DIMENSIONS 6 INSTALLATION INSTRUCTIONS 7 SETTING 8 SOFTWARE CONNECTION 8 LECTURER TRACKING CAMERA 9 BLACKBOARD WRITING SENSOR 16 ISMART CMS APPLICATION SOFTWARE GUIDE 19 NETWORK CONNECTION 19 CLIENT SOFTWARE INSTRUCTION 22 MENU SETTINGS 33 MENU CONFIGURATION 33 MENU EXPLANATION 37 VIDEO 38 ...

Страница 6: ...EXPOSURE 38 COLOR 39 PAN TILT ZOOM 40 SYSTEM 40 STATUS 41 RESTORE DEFAULTS 41 ANNEX 1 TECHNICAL SPECIFICATIONS 42 ANNEX 2 SIZE AND DIMENSION 45 TROUBLESHOOTING 46 ...

Страница 7: ...m tracking camera image 2 4 stream full view camera image 3 IP address is acquirable through iSmartCMS default rtsp port is 554 IE 1 Make sure PC and the camera are in the same LAN 2 Input IP address port number 88 default port is 88 in the IE address bar http IP 88 such as http 192 168 18 229 88 3 Install plug in s 4 Name admin Password Null 5 Support Windows 7 or above operation system whereas W...

Страница 8: ...thernet or RS232 RS485 Both network video and SDI video can be achieved simultaneously Characteristics Functions Lecturer Tracking Camera Featured Advantages Integrated with HD full view camera and HD tracking camera Both HD videos can be outputted up to 1080P60 simultaneously No geometric distortion of full view camera Tracking camera and full view camera have the same color and brightness The ca...

Страница 9: ...ion Priority zone and blocking zones can be easily set through control software installed on PC User friendly interface simple parameter settings easy installation and use Blackboard Writing Sensor Built in image algorithm to detect wiring actions on blackboard easy installation but provides excellent accuracy and reliability Avoid shadow disturbance only detects board writing actions Direct recta...

Страница 10: ...dapter 1 CD 1 Main Parts Interfaces Lecturer Tracking Camera Front View 1 Tracking Camera 2 Full View Camera Rear View 3 Audio Input 4 Ethernet 5 HD SDI 1 Interface Tracking Camera 6 HD SDI 2 Interface Full view Camera 7 Control Interfaces RS 485 RS 232 8 Power Input DC12V ...

Страница 11: ...Pin Definition of Control Port Blackboard Writing Sensor 1 Camera head 2 Adjusting ring 3 Power 4 POE module RJ45 Pin Definition of Control Port No Definition 1 2 3 232 TX 4 GND 5 232 RX 6 GND 7 485 8 485 ...

Страница 12: ...6 Dimensions Lecturer Tracking Camera Front View Side View Bottom View Blackboard Writing Sensor Installation hole ...

Страница 13: ...eiling right above the blackboard with a distance of 80 110cm to the blackboard The FOV is 90 Use the client software to capture video and adjust angle to make sure the camera view fully covers the blackboard and the black board covers the half upper image shown as follows Wall Mounts Optional 1 According to diameter and position of the 4 installation holes as shown below on the bracket fix the br...

Страница 14: ...ith the camera package install iSmart CMS from the disc on your PC turn on iSmart CMS connect and add camera to the management device list and enter into the main interface Select one of a camera to do the following tracking settings Tracking Settings Start turn on tracking using controller or software to call preset 80 can also turn on tracking Stop turn off tracking using controller or software ...

Страница 15: ...e image then set it as preset 1 In some other cases the preset 1 is also useful after camera finishes calibration it will sit at preset 1 once tracking object gets lost the camera can be configured to move to preset 1 when the camera starts auto zooming its zooming times is also based on preset 1 s zooming times Preset 0 It is a position that can be configured to have the camera move to once track...

Страница 16: ...10 Tracking Setting ...

Страница 17: ...11 ...

Страница 18: ...tection of full view camera Zone Setting Recommended to set the platform or podium as priority zone the camera will detect object from this zone to start tracking accordingly Set other interference sources like projector digital whiteboard TV screen and etc near the platform or podium as blocking zones so the camera will not track these sources The blocking zones must be inside the priority zone o...

Страница 19: ... permanent tracking and the camera will not track at an extreme low tilt angle Auto zoom when it s enabled during tracking the camera will auto zoom in or out When it s disabled the zoom during tracking will be according to preset 1 Keep tracking outside tracking zone When it s enabled the camera will still track if the object is outside the tracking zone Tracking Parameters Track Sens Set sensiti...

Страница 20: ...s not detecting the network stream will automatically switch output between full view camera video and tracking camera video according to object s showing up or disappearing When the movement of step onto walk down the podium was selected as detecting network stream will auto switch output between the full view camera video and tracking camera video based on the object s movement of step onto walk...

Страница 21: ...rning codes send only once and always send Director rules camera has built in switching rules the blackboard writing sensor does not send out switching code then when internal switching rule is selected it will do internal communication finally lecturer tracking camera sends out codes according to internally switched sequence In the internal switching regulation the blackboard has the highest prio...

Страница 22: ...de choose Client to actively communicate with recorder choose Server to await to be communicated from recorder Director IP and Port once Network is chosen as Mode configure recorder s IP address and Port at these two frames Blackboard Writing Sensor After it is installed please capture the camera view and adjust the installation position till the camera view is fully covered the whole blackboard s...

Страница 23: ...gle to avoid interference to trigger they can be configured independently The moving objects inside the blocking zones of the full view camera will not be detected and tracked while the tracking camera still tracks the lecturer head Interval Before Action Used to define the interval that the sensor confirms writing action is completed after no one writes on the board For example if it is set as 3 ...

Страница 24: ...ng camera s IP address then after the sensor detects writing action on the board it will command the tracking camera to move to pre defined position Network Test to test if the blackboard writing sensor and the lecturer tracking camera is connected in the network ...

Страница 25: ...N Connection Please refer to the above diagram user1 and user 2 are in the same router they are considered as in the same LAN connect the camera to the same LAN as where the PC is and refer to below instructions as how to use the application software then the camera can be found and connected from the online device list WAN Connection ...

Страница 26: ...to manage then set camera s IP address in the same network segment as the router 1 Camera s gateway is usually set at Router 1 s LAN IP address for example 192 168 1 1 then camera s IP address can be set as for example 192 168 1 179 or 192 168 1 180 as long as they are in the same network segment Steps Two Route Mapping User PC logs into router configuration menu gets into Port Mapping router mana...

Страница 27: ...31 100 port 10200 Then in WAN the mapping of camera 1 and IP 115 200 31 100 port 10200 is established Camera 2 can use another external port such as 10320 so mapping of camera 2 with IP 115 200 31 100 port 10320 is established In the Managed Device of the client software iSmart CMS click Add enter the IP address 115 200 31 100 and port 10200 and other information then the camera 1 can be accessed ...

Страница 28: ...nt software in PC enter the main interface If the camera and PC are in the same LAN click Start Search then searching starts and all online devices will be listed as the picture shown below To modify the device IP address input the IP address mask gateway in the Modify Network column ...

Страница 29: ...the IP address of the same LAN then click Add to Client as the picture shown below Please check that all IP addresses are in the same LAN Remote Configuration Choose the camera in the device list click Remote Configuration in the column to upgrade or configure IP address of the camera ...

Страница 30: ...to enter the main interface as the picture shown above Click to search and load the updating firmware then click Upgrade to start upgrading do not power off the camera during upgrading after upgrading is completed camera will reboot ...

Страница 31: ...or input DNS address for the device DNS 1 server spare it will be used in case DNS1 server is not working Port streaming port RTSP and application port SDK connection can be configured The range of stream ports is 3479 7999 and 554 default is 554 The range of application ports is 3479 7999 default is 5002 Click the Save button after setting is completed Camera will connect to internet after above ...

Страница 32: ...eded Max rate configure max stream rate or adjustable stream rate Frame rate choose from different frame per second Key frame interval configure the number of frames between the two key frames The larger the key frame interval is the smaller the fluctuation of the byte will be but the image quality is relatively poor Vice versa the larger the fluctuation of the byte will be the higher the image qu...

Страница 33: ...27 RTMP In RTMP1 and RTMP2 main stream sub stream third stream fourth stream can be chosen to stream ...

Страница 34: ...28 Control Password setting if password is used it is only after correct password is put that the camera can be accessed Reboot reboot the camera ...

Страница 35: ...ocol choose from TCP UDP protocols Camera as choose from Client or Server IP if set camera as Client the IP address of the transmitted device should be inputted if set camera as Server there is no need to set IP address Port choose from 1 65535 as transparent transmission port ...

Страница 36: ...lick Main View to get into camera control and preview part as below This interface includes three main parts Device List Device Control Video Preview Device It displays all online cameras added to Device Management ...

Страница 37: ... stream will be displayed in the preview frame or right click the selected camera from the left column to get its main or substream video Video preview mode can be single video or four video s when in four video s mode select one of the four video s then choose the bottom right icon to enlarge this selected video to a big single frame ...

Страница 38: ...32 ...

Страница 39: ...PNESS 0 1 2 3 4 5 6 7 8 9 10 11 12 13 14 15 Refer to Page 38 BRIGHTNESS 0 1 2 3 4 5 6 7 8 9 10 11 12 13 14 CONTRAST 0 1 2 3 4 5 6 7 8 9 10 11 12 13 14 GAMMA MODE 0 1 2 3 4 2DNR LEVEL 1 2 3 4 5 OFF 3DNR LEVEL 1 2 3 4 5 OFF WIDE DYNAMIC 1 2 3 4 5 OFF ...

Страница 40: ... F2 8 F2 4 F2 F1 6 CLOSE SHUTTER PRI SPEED 1 1 1 2 1 3 1 6 1 12 1 25 1 50 1 75 1 100 1 120 1 150 1 215 1 300 1 425 1 600 1 1000 1 1250 1 1750 1 2500 1 3500 1 6000 1 10000 IRIS PRI IRIS F14 F11 F9 6 F8 F6 8 F5 6 F4 8 F4 F3 4 F2 8 F2 4 F2 F1 6 CLOSE BRIGHT PRI BRIGHT 0 1 2 3 4 5 6 7 8 9 10 11 12 13 14 15 16 17 18 19 20 21 22 23 24 25 26 27 EX COMP ON OFF LEVEL 7 6 5 4 3 2 1 0 1 2 3 4 5 6 7 BLC ON OF...

Страница 41: ... LAMP SATURATION 0 1 2 3 4 5 6 7 8 9 10 11 12 13 14 HUE 0 1 2 3 4 5 6 7 8 9 10 11 12 13 14 PAN TILT ZOOM Refer to Page 40 PAN TILT SPEED 1 2 3 4 5 6 7 8 PTZ TRIG AF ON OFF RATIO SPEED ON OFF POWER UP ACTION PRESET 1 PRESET 2 PRESET 3 PRESET 4 PRESET 5 PRESET 6 PRESET 7 PRESET 8 PRESET 9 HOME ...

Страница 42: ...P60 1080P50 1080I60 1080I50 1080P30 1080P25 720P60 720P50 MOUNT MODE STAND CEILING RS485 PORT HALF DUPLEX 1 HALF DUPLEX 2 DISPLAY INFO ON OFF LANGUAGE ENGLISH STATUS Refer to Page 41 ADDRESS 1 PROTOCOL VISCA BAUDRATE 9600 VIDEO FORMAT 1080P25 MOUNT MODE STAND IMAGE VER V6629 FIRMWARE VER V1 0 0 RESTORE DEFAULTS Refer to Page41 ...

Страница 43: ... menu Submenus From main menu navigate to select EXPOSURE menu press OK to enter Menu Hint It displays currently selected menu option Menu Options It displays options under current menu hint Press or button to select among menu options once font of options turned from white color to yellow color it indicates the menu has been elected press OK button to get into this menu Manual Exposure Press or b...

Страница 44: ...onment MANUAL manually adjust Gain Shutter Speed and Iris GAIN 0 2 4 6 8 10 12 14 16 18 20 22 24 26 28 29 30 SPEED 1 1 1 2 1 3 1 6 1 12 1 25 1 50 1 75 1 100 1 120 1 150 1 215 1 300 1 425 1 600 1 1000 1 1250 1 1750 1 2500 1 3500 1 6000 1 10000s IRIS F14 F11 F9 6 F8 F6 8 F5 6 F4 8 F4 F3 4 F2 8 F2 4 F2 F1 6 CLOSE SHUTTER PRI Gain and Iris value are adjusted automatically according to working environm...

Страница 45: ... value for dark BLC ON OFF Backlight compensation BLC is video gain done automatically to correct the exposure of subjects that are in front of a bright light source ANTI FLICKER OFF 50Hz 60Hz To avoid video flicker at power systems of different frequency FV BRIGHTNESS 0 1 2 3 4 5 6 7 8 9 10 11 12 13 14 COLOR COLOR menu is used to adjust color related values Available options WB MODE AUTO ATW auto...

Страница 46: ...PRESET 8 PRESET 9 HOME System ADDRESS 1 2 3 4 5 6 7 PROTOCOL VISCA PELCO D PELCO P BAUD RATE 2400 4800 9600 38400 IR ADDRESS 1 2 3 4 set camera address to be controlled by remote controller VIDEO FORMAT 1080P60 1080P50 1080P30 1080P25 1080I60 1080I50 720P60 720P50 MOUNT MODE STAND CEILING RS485 PORT HALF DUPLEX 1 the camera will not return ACK FINISH FAULT msg HALF DUPLEX 2 the camera will return ...

Страница 47: ...t camera Restore Defaults RESTORE DEFAULTS option is used to reset all menus to default value Press OK to confirm or press to cancel and return to previous menu RESTORE DEFAULTS PRESS OK CONFIRM PRESS BACK CANCEL BACK STATUS ADDRESS 1 PROTOCOL VISCA BAUD RATE 9600 IR ADDRESS 1 VIDEO FORMAT 1080P50 MOUNT MODE STAND FIRMWARE VER V3 0 00 BACK ...

Страница 48: ...nce Auto Indoor Outdoor One push Manual Exposure Auto Manual Shutter Priority Iris Priority S N Ratio 50dB Full view Camera Image Sensor 1 2 8 CMOS Effective Pixels 2 14MP White Balance Auto Exposure Auto Focus Manual Focal Length 3 4mm Angle of view Horizontal 72 Vertical 40 Network Resolution Max Support 1920 1080 60fps Video Compression H 265 H 264 Audio Compression AAC Network Protocol ONVIF R...

Страница 49: ...ideo Format 1080p60 1080p50 1080p30 1080p25 1080i60 1080i50 720p60 720p50 General OSD Yes Power Input DC12V Power Consumption 20W Working Temp 0 40 Storage Temp 20 C 60 Dimensions 225mm 163mm 212mm Weight 1 96KG Color Grey Blackboard Writing Sensor Sensor 1 3 CMOS Effective Pixel 400 mega pixel Min Illumination 1Lux S N Ratio 50dB Gain Control Auto E Shutter 1 30 1 10000 White Balance Auto Focal L...

Страница 50: ...ps 8Mbps Video Resolution 720p30 1080p30 Network Interface 10 100M Ethernet POE optional Power Supply DC12V POE Power Consumption 5W Working Temperature 0 40 Working Humidity 95 Dimensions φ93mm 81mm Net Weight 0 33KG ...

Страница 51: ...45 ANNEX 2 SIZE AND DIMENSION Front Side Bottom Blackboard Writing Sensor supplied separately Mounting Hole ...

Страница 52: ... After power on self test successfully but not controllable Wrong address protocol baud rate Check set again Wrong connection or short circuit of RS 485 RS422 or RS 232 cable Check reconnect Video loss when pans tilts zooms Not enough power supply Check reconnect power cable Video cable not properly connected Replace with a good video cable Video captured after connected to digital video interface...

Страница 53: ......

Страница 54: ......

Страница 55: ......

Страница 56: ...CA YF LTCA2001NV2 ZD 010 Y06020900040 This user manual is only for reference it is subject to change please ask for the latest version from your supplier ...

Отзывы: