15. Install the replacement chassis into the rack cabinet.
For more information, see
Install a node chassis in a rack cabinet
on page 40.
16. Install the hard drives into the replacement chassis.
Important: Make sure to install each hard drive into the same bay number in the replacement chassis that
the hard drive was removed from in the failed node.
17. Install the front panel from the failed node on the replacement chassis.
18. Power on the replacement chassis.
19. Update the new node SKU from a replacement SKU to a product SKU.
For more information, see
Update a replacement chassis SKU to a product SKU
on page 37.
20. Gather information about the cluster and send the information to Isilon Technical Support for a failure analysis.
For more information, see
Gather information about a cluster
on page 37.
21. Return the failed node to Isilon Technical Support.
For more information, see
on page 38.
Test a file system journal
After a node replacement, test the integrity of the file system journal to verify that the journal information was correctly
transferred.
1. Power on and log in to the replacement node.
2. Run the
grep IFS /var/log/messages | tail -n1
command to verify that the file system mounted
correctly.
When the file system mounts correctly, a message similar to the following message appears in the console log.
Sep 10 19:02:15 <24.3> (id1) root[2254]: IFS mounted successfully.
3. Run the
isi_checkjournal
command to check the file system journal.
isi_checkjournal finished successfully
4. Run the
isi_testjournal
command to verify the journal integrity.
If the journal integrity is good, the node returns the following output:
Checking Isilon Journal integrity: good
If the node returns any errors, transfer the file system journal manually from the failed node to the replacement node,
and then re-run the
isi_testjournal
command. If you have already performed a manual transfer, contact Isilon
Technical Support.
Transfer the file system journal from a failed node
Manually transfer the file system journal stored on the IB/NVRAM card from a failed node to a replacement chassis to
resolve a mismatched journal after replacing a failed node. During the transfer process, the IB/NVRAM card containing
the journal information must be continuously supplied with power to retain the journal information.
Prerequisite: Both the failed node and a replacement node should be disconnected and removed from the rack cabinet
and placed on a clean, flat work surface. Both nodes must be connected to power during this operation.
1. Allow the batteries in the failed node and the replacement node to charge for at least 30 minutes before proceeding
to the next step.
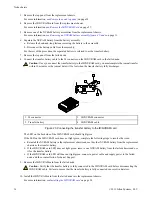
2. Press the Power button on the rear panel of the replacement node to power off the replacement chassis.
©
2011 Isilon Systems, LLC.
35
Node chassis


