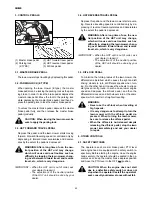
background image

SXG

50

9. FAN BELT

WARNING:
 •  Before checking the fan belt, stop the engine 

and remove the key from the starter switch.

 •  Wait until the engine and accessories cool 

down completely to prevent burns.

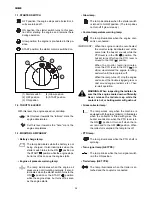
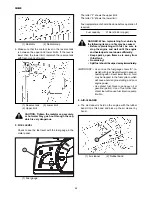
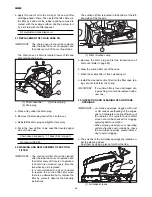
The fan belt is accessible from the right rear of the en-
gine room by opening the engine hood. Check the belt 
for tension and damage.

Push down the belt with a finger at the intermediate 
point between the alternator and crankshaft pulley 
with a force of 10 kgf (22 lb) and see its deflection. 
If it deflects by about 13.8 mm (0.54 in.) ~ 14.8 mm 
(0.58 in.), the tension is proper.


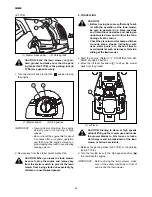
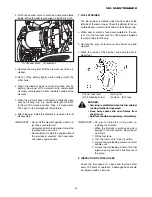
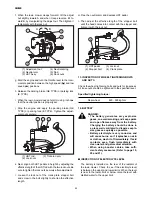
(1) Fan belt   


(4) Lock bolt


(2) Crankshaft pulley 

(5) Adjustment bolt

 (3) 

Alternator

When the belt deflection is improper, correct in the fol-
lowing procedure:

a. Loosen the lock bolt and the adjustment bolt of the al-

ternator.

b. Pull the alternator outward to apply more tension to 

the belt. Tighten the lock bolt and the adjustment bolt 
temporarily while pulling the alternator.

c. Check for the belt deflection to see if the tension is 

proper. If so, tighten the lock bolt and adjustment bolt 
securely.

IMPORTANT:  When the belt is found to be defective, 

ask your dealer for replacing it.

10. FRONT PTO

After a long period of operation, the front PTO belt 
could be expanded and the tension of the belt could 
be deteriorated. It is necessary to adjust the belt. Be 
sure to inspect the tension of the belt before opera-
tion and correct the tension if required. Operation with 
loose belt will result not only in lower efficiency but 
also damage to the belt.

WARNING: Inspection of the front PTO 
should be done while the engine is cold. 
Otherwise it may cause burns.

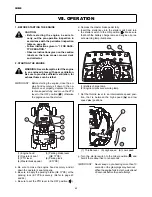
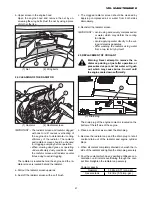
a. Open the engine hood.

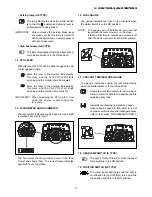
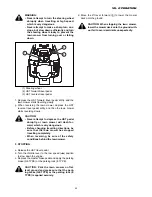
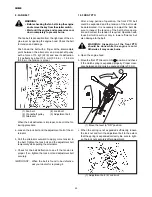
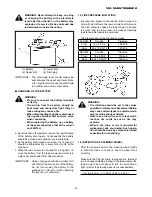
b. Move the front PTO lever to ON ( ) position, and check 

if the clutch spring is expanded properly. Proper clear-
ance between spring coils in expanded state is 0.3 mm.


(1) Move the lever to “ON” position.

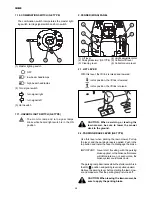
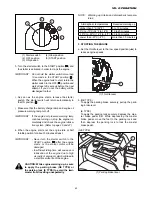
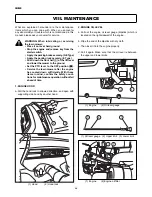
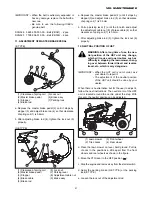
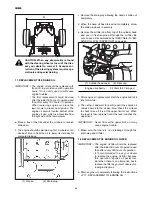
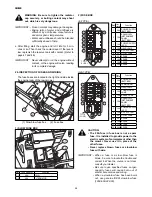
c. When the spring is not expanded sufficiently, loosen 

the lock nut and turn the adjustment bolt to the extent 
that the spring is expanded correctly. Be sure to tight-
en the lock nuts securely after adjustment.


(1) Adjustment bolt  (2) Lock nut

1

Содержание SBC550X

Страница 1: ...I S E K I L A W N M O W E R S LAWN MOWERS MOWER DECKS COLLECTORS SXG323 326 SCMB48 SCMA54 SBC550X 600X ...

Страница 2: ...rovide instructions or advice in order to let the lawn mower provide the optimum performance NOTE The word NOTE is used to indicate points of particular interest for more efficient and convenient repair or operation Before starting to operate the lawn mower for the first time you should read this operation manual thoroughly and carefully until you are sufficiently familiar with the operation of th...

Страница 3: ...NTROLS AND METERS 34 1 CONTROL PANEL 34 1 1 STARTER SWITCH 36 1 2 THROTTLE LEVER 36 1 3 MONITOR LAMP ARRAY 36 1 4 PTO LEVER 37 1 5 TACHOMETER AND HOURMETER 37 1 6 FUEL GAUGE 37 1 7 COOLANT TEMPERATURE GAUGE 37 1 8 HEADLAMP SWITCH E TYPE 38 1 9 POSITION SWITCH GE TYPE 38 1 10 COMBINATION SWITCH GE TYPE 38 1 11 HAZARD LIGHT SWITCH GE TYPE 38 2 FENDER WING PANEL 38 2 1 LIFT LEVER 38 2 2 PARKING BRAKE...

Страница 4: ...IL 55 20 REPLACEMENT OF HYDRAULIC OIL FILTER 55 21 REPLACEMENT OF CHAIN CASE OIL 56 22 WASHING AND REPLACEMENT OF SUCTION FILTER 56 23 INSPECTION AND CLEANING OF AIR INTAKE OPENINGS 56 24 CLEANING OF THE RADIATOR 57 25 REPLACEMENT OF COOLANT 57 26 INSPECTION OF FUSES AND WIRING 58 27 HYDRAULIC SYSTEM PARTS 59 28 INSPECTION OF SAFETY SWITCHES 59 29 WASHING OF THE MACHINE 60 30 MAJOR CONSUMABLES LIS...

Страница 5: ... OPERATION 95 1 BEFORE OPERATION 95 2 ADJUSTMENT OF THE GRASS LIMIT SENSOR 95 3 INSPECTION BEFORE OPERATION 95 4 CLEANING A COLLECTOR 96 5 EFFICIENT COLLECTING 96 IV INSPECTION AND MAINTAINANCE OF MAJOR PARTS 97 1 INSPECTION OF CYLINDER SBC550X L 97 2 INSPECTION OF HYDRAULIC HOSES 97 3 FILLING DIAGRAM 98 4 PERIODICAL INSPECTION TABLE 99 V STORAGE OF COLLECTOR 100 VI TROUBLESHOOTING 101 This manual...

Страница 6: ...safely enough to protect themselves and others from serious injury Do not operate the lawn mower while you are under the influence of alcohol or drugs 1 5 Understand how to properly and safely operate and maintain the lawn mower Seek and obtain practical instruction on how to operate and main tain the lawn mower properly 1 6 Be sure to use necessary protective devices such as headgear safety glass...

Страница 7: ... periodically If not this may not only shorten the lawn mower s service life but also make safe and efficient operation impossible 1 10 Never use the lawn mower out of normal usage even if it is not mentioned at this operation manual ...

Страница 8: ... and functioning properly 2 6 Start the engine from the operating or designated starting position 2 7 Before starting the engine make sure that every thing is safe around the lawn mower and put the traction drive in neutral apply the parking brake or parking lock and disengage the cutting unit s Otherwise unexpected accidents may occur 2 8 Start the engine with the starter switch only Never attemp...

Страница 9: ... deck and collector never fail to ask your dealer about ma chine balance Always follow their advice 2 15 Keep in mind that the operator or user is respon sible for the accidents or hazards caused by the lawn mower to other people or their property 2 16 Inspect the lawn mower for wear or damage Replace any worn or damaged parts 2 17 Especially before starting the mower be sure to perform advised pr...

Страница 10: ...rass The lawn mower may slide 3 7 Slow down before turning the lawn mower Turn ing at high speed may cause the lawn mower to turn over 3 8 Never attempt to depress the dif lock pedal while turning around the lawn mower Turning with the dif lock on may cause the lawn mower to turn over 3 9 Look down and behind you and ensure a clear path before you move the lawn mower backward 3 10 Do not mow while...

Страница 11: ...n A clogged discharging part may cause the dis charge cover to open resulting in scattering of grass and stones which is very dangerous 3 21 Never allow grass or leaves to accumulate around heated parts such as the engine and the muffler or this may cause a fire 3 22 Before moving the lawn mower to another place be sure to stop the mower blades and lift up the mower deck Otherwise they may hit sto...

Страница 12: ... appear in the mowing area for an other ride and be run over or backed over by the lawn mower 3 30 Before stopping the engine be sure to lower the mower deck onto the ground apply the parking brake or parking lock and move the PTO lever to the OFF position 3 31 Before leaving the operating position of the lawn mower for any reason always do the following Stop the lawn mower on level ground Stop th...

Страница 13: ...ow ing instructions A slope angle of 12 s specified with the lawn mowers equipped with the attachments mentioned respectively The lawn mower is not equipped with any attachments or a cabin than a standard mower deck and collector The lawn mower is equipped with a standard mower deck and collector Grass catchers and other attachments can change the stability of the lawn mower Follow the instruction...

Страница 14: ...ot apply the brake on the lawn mower that is sliding down a slope Always keep the lawn mower in gear especially when travelling downhill 4 11 Do not use the grass catcher s while you are mowing a steep slope 4 12 Do not try to stabilize the lawn mower by putting your foot on the ground 4 13 Avoid stopping the lawn mower on a slope 5 DRIVING ON PUBLIC ROADS 5 1 This lawn mower cannot be driven on a...

Страница 15: ...rake pedals immediately and roll the lawn mower to the ground by releasing the brake gradually Then start the engine and try again 6 5 Use ramps with the same or better specifica tions mentioned below When the lawn mower is equipped with the attachments other than those included in the specifications mentioned below ask your dealer for advice Specifications of the ramps for the SXG 323 and SXG 326...

Страница 16: ... may develop and ignite the fuel 7 6 Use only an approved fuel container to store fuel 7 7 Do not store the lawn mower or the fuel container near a source of open flame such as a water heater 7 8 Replace all fuel tank and container caps securely 7 9 To prevent personal injury and property damage do the following Always place fuel containers on the ground and away from the vehicle before fuelling D...

Страница 17: ...ctedly the shaft will be swung around and damage the lawn mower or cause serious accidents 9 LAWN MOWER MAINTENANCE 9 1 Never start the engine in a closed place Exhaust fumes contain poisonous carbon monoxide so sufficient ventilation should be provided when starting the engine indoors 9 2 Be sure to wear safety glasses and gloves when servicing the lawn mower 9 3 When servicing the lawn mower or ...

Страница 18: ...ected acci dents during operation 9 12 When removing a tire chock other tires and sup port the lawn mower securely When installing tires be sure to tighten the wheel nuts to the specified torque Loose nuts may cause serious accidents 9 13 The mower blades are sharp and can cut you Wrap the mower blades or wear leather gloves when you service them On the lawn mower with two or more mower blades rot...

Страница 19: ...25 The grass catcher components are subject to wear and damage exposing you to moving parts or thrown objects Frequently check and replace them with the manufacturer s recommended parts when necessary 9 26 Be sure to reinstall the removed parts in place Never attempt to start the engine with any parts removed 9 27 Never attempt unauthorized modification of the lawn mower as this could be very haza...

Страница 20: ...e battery away from sparks or open flames 2 The battery should be inspected before starting the engine Be careful not to touch the electrolyte makes contact with the skin or clothing wash it off immediately with water and then consult a doctor 3 When replacing or inspection the battery stop the engine and turn the main switch off or electrical parts may be damaged or unexpected accident may occur ...

Страница 21: ...emove the key from the starter switch to prevent unexpected accidents caused by en gine starting by untrained persons or children 12 4 When storing the lawn mower with the mower deck attached be sure to lower the mower deck on the ground Otherwise manipulation of the lift lever by untrained person or children may cause unexpected accidents 12 5 Store the lawn mower in a place provided with suffici...

Страница 22: ...l before storing the lawn mower in any enclosure 13 4 Before storing the lawn mower for long period of time disconnect the battery cables to prevent them in case they are gnaw by rats from caus ing a short circuit which may lead to a fire When disconnecting the battery disconnect the nega tive cable first while connecting the positive cable first when connecting the battery Wrong order of disconne...

Страница 23: ... mower mower deck and collector You should of course read the caution instructions in the manual But never fail to read the labels on the lawn mower mower deck and collector as well Their respective code numbers are also mentioned below so order them from your dealer if any of them are lost or damaged On the lawn mower A B A B 8 10 4 5 1 2 9 7 5 6 3 ...

Страница 24: ...tip over 3 Battery label Code No 1705 904 002 10 a Avoid sparks and flames b Wear a eye protection gear c Keep battery out of reach of children d Beware of sulphuric acid e Beware of explosion f Read the manual thoroughly Handle the battery carefully Improper handling of the battery may lead to explosion Never short the poles Keep away from sparks or flames When charging or using provide sufficien...

Страница 25: ...t is running 8 Starter caution label Code No 1705 902 007 00 Start engine only with key from seat 9 Radiator caution label Code No 1705 902 008 00 Hot pressurized system Do not open cap while radiator is hot 10 Battery disposal label Code No 1728 903 003 00 NOTE Disposal of battery Do not throw away a battery to the garbage can Recycle it with observing the law of your community ...

Страница 26: ...ile it is moving 2 Hot part caution label Code No 8595 901 007 00 Stay clear of the heated parts while they are hot 3 Danger label Code No 2500 901 014 30 Stay clear of the mower blades while the engine running 4 PTO label Code No 8654 901 002 00 Stay clear of the PTO shaft while the engine running 5 2 1 4 2 3 3 ...

Страница 27: ...SXG 26 5 Maintenance label Code No 1593 901 015 00 Stop the engine and remove key from the starter switch before performing maintenance or repair work ...

Страница 28: ...I FOR SAFE OPERATION 27 On the collector SBC600X HQE4 High dump collector SBC550X LE4 Low dump collector 1 2 2 3 3 1 5 4 4 6 5 1 B C A A B C 5 6 1 ...

Страница 29: ...om the mower may hit you 6 Maintenance label Code No 1593 901 015 00 Stop the engine and remove key from the starter switch before performing maintenance or repair work Maintenance of the caution labels The labels should always be clearly seen that is nothing should obscure them When they have become dirty wash them with soapy water and wipe off with soft cloth If any of them are torn or lost orde...

Страница 30: ... the lawn mower mower deck and collector consult with your dealer identifying the model and serial number of your machine Lawn mower 1 Model name and serial number 2 Engine model name and serial number Model Type Secondary braking device SXG323H E42 GE42 SXG326H E42 GE42 Mower deck 3 Model name and serial number Model Cutting width Suitable machine 1220 mm 48 in 1372 mm 54 in SXG323 SXG326 SCMB48 ...

Страница 31: ...SXG 30 Collector 4 Model name and serial number SBC600X H 5 Model name and serial number SBC550X L Model Type Dump system Low High SBC550 LE4M SBC600 HQE4 4 5 ...

Страница 32: ... 0 10 km h 0 6 3 mph Wheel base 1450 mm 57 1 in 1365 mm 53 7 in Wheel Tread Front 930 mm 36 6 in 910 mm 35 8 in Rear 860 mm 33 9 in Driving system 2WD Steering system Power steering Brake system Dry internal shoe expanding No of Brake 1 Before dif 2 After dif 1 Before dif 2 After dif Tyre size Front 18 x 8 50 8 16 x 6 5 8 Rear 26 x 10 50 12 23 x 10 50 12 PTO Front 1750 min 1 rpm PTO Clutch Belt te...

Страница 33: ...mm 36 2 in Overall height 1400 mm 55 1in 1000 mm 39 4 in Weight 185 kg 408 lb 70 kg 154 lb Container capacity 620 liters 550 liters Height of lift 1970 mm 77 6 in Height of dump 1940 mm 76 4 in 890 mm 35 in Lift system Hydro Dump system Hydro Hydro No of lift cylinder 2 No of dump cylinder 2 1 Piston cylinder Dia x stroke Lift 25 x 35 x 450 mm Dump 20 x 30 x 135 mm 30 x 65 x 115 mm Full censor sys...

Страница 34: ... lever 7 Collector dump lever 8 HST forward travel pedal Forward control 9 HST reverse travel pedal Reverse control 10 Front PTO shaft OPTION 11 Master brake pedal 12 Throttle lever 13 Chute 14 Headlamp 15 Dif lock pedal 16 Fuel tank cap 17 Parking lock E TYPE 18 Cleaning lever 19 Height adjustment dial 20 Hood lock 14 20 15 5 2 19 4 1 7 6 10 8 17 9 11 12 3 18 16 13 ...

Страница 35: ... temperature warning lamp 2 Throttle lever 9 Hourmeter 3 PTO lever 10 Glow lamp 4 Fuel gauge 11 Grass collector lamp 5 Headlamp switch 12 PTO lamp 6 Battery charge lamp 13 Coolant temperature gauge 7 Engine oil pressure warning lamp 14 Tachometer 3 5 4 8 10 11 14 7 12 6 13 9 1 2 ...

Страница 36: ...ombination Switch 15 Trailer lamp Master lighting Switch Turn Signal Switch Horn Switch 16 Grass collector lamp 6 Position switch 17 Parking lamp 7 Battery charge lamp 18 PTO lamp 8 Engine oil pressure warning lamp 19 Coolant temperature gauge 9 Coolant temperature warning lamp 20 Tachometer 10 Turn signal lamp 3 6 5 10 20 12 1 2 4 9 14 13 16 15 17 11 8 18 7 19 ...

Страница 37: ...The lamp does not turn off if glow is ready Coolant temperature warning lamp The lamp illuminates when the engine cool ant is over heated IMPORTANT When the engine coolant is over heated the monitor lamp illuminates and at the same time the buzzer sounds while the PTO lever is in the ON position The buzzer turns off when the PTO lever is moved to the OFF position When the monitor lamp illuminates ...

Страница 38: ...crank shaft revolutions per minute rpm The hourmeter counts operation hours of the lawn mower and shows them The lowest figure indicates one tenth hour of operation 1 6 FUEL GAUGE The gauge indicates fuel level in the fuel tank when the starter switch is in the ON position NOTE The gauge can not indicate an accurate fuel level when the lawn mower is on the slope It takes a little time to indicate ...

Страница 39: ...the parking brake applied or the brake performance will deteriorate soon or even worse the brake system could break down The parking lamp illuminates while the starter switch is in the ON position and parking lever is pulled upward Relieve the parking lever before starting the lawn mow er and make sure that the parking lamp is turned off CAUTION When leaving the lawn mower be sure to apply the par...

Страница 40: ...ump the container SBC550X L when the mower deck is operating 2 3 CLEANING LEVER With this lever the clogged grass in the chute can be removed Pull up this lever to open the chute and the clogged grass in the chute can be removed Lower this lever to close the chute 2 4 HEIGHT ADJUSTMENT DIAL Height adjustment dial could adjust the height of low est position of mower deck Turn the dial forward the c...

Страница 41: ...re spectively Before starting the engine close the engine hood securely the operator should be seated in the op erator s seat keep the master brake depress position and move the PTO lever to the OFF position CAUTION When the engine does not start due to a defective safety switch or does not stop when the operator has left the operator s seat consult your dealer at once without fail 3 CONTROL PEDAL...

Страница 42: ...TEMS 1 Anything that was abnormal in the previous operation 2 While walking around the lawn mower Tire inflation Exterior parts broken or deformed covers or the like Oil leakage engine oil transmission oil fuel etc Inspection and cleaning of air intake port Inspection of engine oil level Inspection of coolant level Inspection of fan belt Inspection of fuel level Inspection of fuel filter Inspectio...

Страница 43: ... operation inspection in accordance with the periodical inspection table on page 64 Follow instructions given in I FOR SAFE TY OPERATION Observe instructions given on the caution labels on the lawn mower mower deck and collector 2 STARTING THE ENGINE WARNING Never attempt to start the engine in an enclosed place with poor ventilation Be sure to provide sufficient ventilation for exhaust fumes can ...

Страница 44: ...ANT Never turn the starter switch to the START position after the engine starts or the starter motor will be damaged Insufficient idling time will cause poor lubrication of the engine due to high viscosity of engine oil which will lead to a shorter service life of the engine CAUTION While engine warming up be sure to apply the parking brake GE TYPE or the parking lock E TYPE to avoid the lawn mowe...

Страница 45: ...ving become sufficiently famil iar with the operation of the lawn mower be sure to operate it in a place spacious and flat without obstacles and having an unobstructed view and confirm the func tioning of each control Check the place to mow for bumps ditches mounds steps slopes inclination soft ness water pools etc ahead of time to avoid accidents such as turnover fall side sliding of the lawn mow...

Страница 46: ...press the HST pedal abruptly or lawn mower will dash for ward which is very dangerous Before changing travelling directions be sure that the lawn mower has stopped travelling completely When reversing be sure of the safety conditions behind the lawn mower 5 STOPPING a Release the HST travel pedal b Turn the throttle lever to the low speed t position to slow down the engine c Depress the master bra...

Страница 47: ... trouble which is not mentioned in this manual please ask your dealer for service WARNING When lubricating or servicing the lawn mower Place it on level hard ground Stop the engine and remove key from the starter switch Apply the parking brake securely GE Type Apply the parking lock securely E Type Push down the front half d of the lift lever and lower the mower to the ground Set the PTO lever to ...

Страница 48: ...on oil level gauge dipstick on the transmission case by removing the centre cover on step 1 Transmission case 3 Oil level gauge Dipstick 2 Transmission oil filler b Pull out the dipstick c Wipe the tip with dry cloth d Insert the dipstick into the gauge insert completely 1 Dipstick 3 Lower limit 2 Upper limit 4 Unload lever e Remove it again Make sure that the oil level is be tween the upper and l...

Страница 49: ...p gal DANGER When replenishing fuel abide by the following items or a fire may be caused Before replenishing with fuel be sure to stop the engine and wait until the engine and heated parts cool down sufficiently Keep sparks open flames etc away from th fuel tank No smoking Spilt fuel should be wiped away immediately IMPORTANT As soon as the fuel gauge shows E re plenish with fuel Never attempt to ...

Страница 50: ...rainer is located under the floor step of the left side of the lawn mower Check the strainer for accu mulated dust or water in the bottom of the strainer cup a When dust or water is found accumulated in the bot tom turn the fuel cock lever by 180 degrees towards the bolt to stop fuel flowing b Remove the ring nut to remove the strainer cup and element c Wash the inside of the strainer cup and elem...

Страница 51: ...c Check for the belt deflection to see if the tension is proper If so tighten the lock bolt and adjustment bolt securely IMPORTANT When the belt is found to be defective ask your dealer for replacing it 10 FRONT PTO After a long period of operation the front PTO belt could be expanded and the tension of the belt could be deteriorated It is necessary to adjust the belt Be sure to inspect the tensio...

Страница 52: ... so that clearance of spring coil 1 is 0 3mm c After adjusting brake rod 5 tighten the lock nut 6 properly 12 NEUTRAL POSITION OF HST WARNING After a long time of use the neu tral position of the HST unit may change which will cause various troubles such as difficulty in stopping the lawn mower chang ing over between forward travel and reverse travel etc which is very dangerous IMPORTANT When the ...

Страница 53: ...dal n Then adjust the effective length of the stopper bolt until the head comes into contact with the stopper and tighten it with the lock nut 1 HST pedal 3 Lock nut 2 Stopper bolt 4 Crank plate 13 INSPECTION OF WHEEL TIGHTENING BOLTS AND NUTS Check the wheel tightening bolts and nuts for looseness All loose nuts should be tightened to the specified level Specified tightening torque Rear wheel 460...

Страница 54: ...RTANT Quick charging should be avoided for it will shorten the service life of the battery Do not throw away the battery to the garbage can Recycle it with observing the law of your community 15 TIRE PRESSURE INFLATION Improper tire pressure causes the tires to wear ab normally and affects the lawn mower performance Too high pressure causes the lawn mower to bounce too much and too low pressure in...

Страница 55: ...plug back in securely e Remove the oil filler cap from top of the cylinder head and pour in fresh engine oil through the oil filler Be sure to use oil recommended by ISEKI Refer to EN GINE OIL LEVEL INSPECTION on page 46 1 Cylinder head cover 2 Filler cap Engine oil capacity 2 6 liters 0 57 imp gal f After engine oil replacement start the engine and let it idle for a while g Then stop it and wait ...

Страница 56: ...einstall the drain plug and tighten it securely d Pour fresh transmission oil through the oil filler Re fer to page 47 and 48 on top of the transmission case until the level reaches the upper limit on the level gauge dipstick Transmission oil capacity Type H U 8 liters 1 76 imp gal e After replacing engine oil start the engine and let it idle for a while Then stop it and wait for a while until the...

Страница 57: ...cleaned every time the transmission oil is replaced It is recommended to ask your dealer to replace the suction filter But when there is no alternative but to replace the filter by yourself observe the following instructions The suction oil filter is located in the bottom of the left hand side of the chassis 1 Filter Suction comp a Remove the drain plug and let the transmission oil drain out Refer...

Страница 58: ...tively d Re install the radiator screen IMPORTANT Avoid using excessively compressed air or water which may deform the cooling fan blades Avoid applying water directly to the wir ing and electric apparatus After washing the radiator using water from a tap let it dry by itself 25 REPLACEMENT OF COOLANT Warning Never attempt to remove the ra diator cap during or just after operation or pressurized v...

Страница 59: ...Y BATTERY 2 10A SOLENOID INSTRUMENT PANEL BATTERY 3 15A POWER SUPPLY ACC 4 15A HEAD LAMP 5 10A ACC SYSTEM 6 5A GLOW LAMP 7 5A SPARE 8 10A SPARE 9 15A SPARE 10 20A SPARE Ref Fuse capacity Function 1 20A POWER SUPPLY BATTERY 2 15A LAMP HORN 3 15A HEAD LAMP 4 15A TURN SIGNAL LAMP 5 10A BRAKE LAMP 6 10A SOLENOID INSTRUMENT PANEL BATTERY 7 15A POWER SUPPLY ACC 8 10A ACC SYSTEM 9 5A GLOW LAMP 10 5A SPAR...

Страница 60: ...ing the next procedures CAUTION When the engine does not start due to a defective safety switch or does not stop even when the operator leaves his seat ask your dealer for repair immediately INSPECTION 1 a Be seated in the operator s seat b Move the PTO lever to the OFF position c Do not depress the brake pedal d Turn the starter switch to the START f position Make sure that the engine is not cran...

Страница 61: ... the machine Especially be care for not to hit the water to electrical parts and label Unsuitable washing may cause the following accidents 1 Fire as a result of short circuit or the damage to the electrical parts 2 Oil leakage as a result of the damage to the hydraulic hose 3 Damage to the machine 1 Label is came off 2 Accident occurs by the damaged electrical parts engine radiator and interior 3...

Страница 62: ... 10 11 FRONT PTO BELT BELT VB039 SXG323 BELT VB041 SXG326 3 CARTRIDGE OIL FILTER 12 13 14 15 BLADE 60X666 A SCMB48 LEFT BLADE 60X666 B SCMB48 RIGHT BLADE 60X716 C SCMA54 LEFT BLADE 60X716 D SCMA54 RIGHT 4 5 6 7 FUSE 5A FUSE 10A FUSE 15A FUSE 20A 16 17 PULLEY BELT BELT VC0GB035 SCMB48 BELT VB038 SCMA54 8 SLOW BLOW FUSE 40A 18 19 PIN 08X16 SCMB48 PIN 08X18 SCMA54 ...

Страница 63: ... 00 8 FUSE SLOW BLOW 1650 650 222 00 9 BULB 12V 45 40W 1674 652 202 10 10 BELT VB039 SXG323 1728 334 013 00 11 BELT VB041 SXG326 3695 303 003 00 12 BLADE 60X666 A SCMB48 LEFT 8674 306 001 00 13 BLADE 60X666 B SCMB48 RIGHT 8674 306 002 20 14 BLADE 60X716 C SCMA54 LEFT 8665 306 001 10 15 BLADE 60X716 D SCMA54 RIGHT 8665 306 002 10 16 BELT VC0GB035 SCMB48 8674 203 200 00 17 BELT VB038 SCMA54 8665 201...

Страница 64: ...1 1 0 24 5 Chain case LH Gear oil SAE80 1 1 0 24 6 Centre pivot Grease As required 7 Knuckle arms Grease As required 8 Cylinder ball end Grease As required 9 HST pedal hub Grease As required 10 Brake shaft Grease As required 11 HST link hub Grease As required 12 Brake shaft Only G type Grease As required 13 Mower link Grease As required 14 Fuel tank Diesel fuel 21 4 62 Oil fillers Oil drains Greas...

Страница 65: ...ery 200h 55 Suction filter Clean after initial 50h and then replace after every 200h 56 Chain case Replace after initial 50h and then after every 200h maintain the specified level 56 Brake pedal play 20 to 30 mm 0 8 to 1 2h Steering wheel Check after every 300h There should be no abnormality 53 Ball joints of steering system linkage Check after every 300h Loose ball joints should be re tightened T...

Страница 66: ... pre operation inspection without fail b Let the engine idle for about 30 minutes before applying any load to ensure maximum engine performance and service life WARNING Provide sufficient ventilation for exhaust fumes when starting the engine because such fumes are very poisonous DAILY AND SHORT TERM STORAGE a Clean the lawn mower IMPORTANT When washing the lawn mower avoid applying compressed wat...

Страница 67: ...air cleaner Insufficient compression Incorrect injection timing Clogged injection nozzles Replenish with fuel Drain trapped water from fuel strainer Bleed injection pump Clean fuel hose inside Wash or replace it Charge battery Preheat for specified time Turn it to the intermediate position Replace it with one of lower viscosity Clean element Consult your dealer Consult your dealer Consult your dea...

Страница 68: ...ting height or slow down lawn mower Ask your dealer to replace it with a new one Consult your dealer Engine oil pressure warning lamp illuminates Low engine oil level Low engine oil viscosity Clogged engine oil filter Defective oil pump Defective oil pressure switch Add oil to upper limit Replace with oil of higher viscosity Ask your dealer to replace it with a new one Consult your dealer Consult ...

Страница 69: ...ication points 3 LIFT SYSTEM Troubles Presumable causes Remedies Lift does not rise Low transmission oil level Air trapped inside hydraulic piping Clogged hydraulic oil filter Clogged suction oil filter Defective hydraulic pump Defective control valve Defective hydraulic cylinder Fill up to upper limit Consult your dealer Consult your dealer Consult your dealer Consult your dealer Consult your dea...

Страница 70: ...RIES Troubles Presumable causes Remedies Battery is not charged Melted slow blow fuse Defective wiring Loose fan belt Defective battery Defective alternator Defective regulator Locate and repair cause of trouble and install a new slow blow fuse Check wiring for loose terminals and earth and short circuit Repair defective parts Tighten belt as specified Correct loose terminals corroded parts and el...

Страница 71: ...SXG 70 ...

Страница 72: ...XI ELECTRIC WIRING 71 XI ELECTRIC WIRING E TYPE ...

Страница 73: ...72 SXG GE TYPE ...

Страница 74: ...r hose plug 7 Carry handle with step 8 V belt 9 Input bearing case 10 Output bearing case 11 Tension pulley 12 Coupling 13 Bevel gear case LH 14 Bevel gear case RH 15 Discharge cover 16 Blade LH 17 Blade RH 18 Gauge wheel 19 Roller 20 Shaft cover 21 Air intake cover 2 1 9 11 8 10 3 19 19 19 16 4 5 20 15 13 7 6 18 17 14 7 21 6 18 12 12 ...

Страница 75: ... the parking lock securely E TYPE Move the PTO lever to the STOP position Do not start the engine except for operating the lift 1 ATTACHING THE MOWER DECK Attach the mower deck first to the lawn mower and then connect the drive shaft 1 9 2 4 3 5 11 8 6 7 10 1 Lift lever 4 Ring clip 7 Front link 10 PTO cover 2 Lower chute 5 Rear link 8 Lock nut 11 Joint cover 3 Gauge wheel 6 Drive shaft 9 Height ad...

Страница 76: ...e the lift lever 1 backward u to raise the mower deck and then stop the engine o Set the gauge wheels 3 of the mower deck straightly p Return the lower chute 2 by removing the ring clip 4 IMPORTANT When installing and removing the mower deck turn clockwise the height adjust ment dial 9 fully to lower the mower deck When installing the mower deck be sure that the ground clearance of the bottom surf...

Страница 77: ...PERATION CAUTION Before starting the mower operation be sure to eguip ISEKI standard grass col lector Never mow grass without the col lector or the lawn mower scatters grass stone and other flying debris which is very dangerous Become familiar with the operation of the lawn mower and understand safety in structions by reading this manual carefully Make sure that all safety covers and guards are in...

Страница 78: ... the lawn mower f Move the lift lever 2 forward d to lower the mower deck on the ground g Move the PTO lever to the ON position IMPORTANT When engaging the PTO clutch slow down the engine speed sufficiently for safety CAUTION Whenever you encounter with any trouble of the mower ask your dealer for repair immediately WARNING As soon as the PTO lever is set to the ON position the mower blades start ...

Страница 79: ...ert the lock pin 7 to right and left frame of collec tor to prevent the collector from falling SBC600X H d Stop the engine e Pull up the cleaning lever 4 and remove the clogged grass 9 in the chute 3 f When grass is clogged in the mower deck under plate 1 and discharge cover 2 remove it with the clean ing stick 8 DANGER When removing the clogged grass with raised container insert the lock pin 7 to...

Страница 80: ...ever to the low speed position t to reduce engine speeds 1 Throttle lever c To apply the parking brake securely pull up the park ing brake lever GE TYPE To apply the parking lock securely depress the mas ter brake pedal first While depressing the master brake pedal move the foot to the parking lock and then depress the parking lock to lock the master brake pedal E TYPE CAUTION Park the lawn mower ...

Страница 81: ...w the grass to a height low enough for the next finishing pass Then finish to the desired grass height The second travelling pass should be shifted sideways by 20 cm 8 in or so or travel perpendicular to the first passes which will result in a beautiful even finish ii When trying to finish in one pass select a sufficiently slow travelling speed It may also be required to set the cutting width to h...

Страница 82: ...air circulation In order to increase air circulation unfastening the knob nut 3 and rotate the air intake cover 2 to OPEN position c After opening the air intake screen 1 tighten the knob nut 3 firmly The air intake screen when opening 1 Air intake screen The air intake screen when closing 2 Air intake cover 3 Knob nut 1 OPEN CLOSE OPEN CLOSE 2 3 OPEN OPEN OPEN CLOSE CLOSE CLOSE OPEN OPEN OPEN CLO...

Страница 83: ...ing tape and re install it IMPORTANT All oil spilt on the gear case mount should be wiped off completely with cloth If it is not the belt may be smeared with oil and become slippery d Re install the belt covers CAUTION When servicing the lawn mower place it on level hard ground Stop the engine and remove key from the starter switch Apply the parking brake securely GE TYPE Apply the parking lock se...

Страница 84: ...dry cloth When damaged install a new belt CAUTION Never forget to replace all the re moved covers Replacement of the front belt a Remove the pulley cover 1 installed on the mower deck b Loosen the nuts 8 of the tension rod and loosen the tension rod 7 c Remove the front belt 4 and install a new belt IMPORTANT Be sure to install the belt as illustrated An improperly installed belt will not work as ...

Страница 85: ...ce between blades leave uncut grass behind The blade should be checked timely and worn ones should be replaced immediately Low cutting height or the operation just after soil has been applied will wear blades rapidly The blades should be checked more frequently a New Blade b Blade with rounded edge c Excessively worm blades are very dangerous So replace such blades with new ones at once c The blad...

Страница 86: ...ly be sure to grease them sufficiently 6 CLEANING OF MOWER DECK a Remove belt cover and clear the grass and dust ac cumulated under the cover before operation or short er service life of the belts and damage to bearings and oil seals will be caused CAUTION Be sure to replace the removed cover after cleaning 1 Water hose plug b Pour the water into mower deck from water hose plugs 1 and turn the bla...

Страница 87: ...nt and replacement Ref No Filling points Lubricants Quantity 1 Bevel gear case LH ASSY Gear oil SAE 80 300 cc 0 07 imp gal 2 Bevel gear case RH ASSY Gear oil SAE 80 300 cc 0 07 imp gal 3 Coupling Grease As required 4 Gauge wheel ASSY 5 Wheel fork ASSY Inject until grease overflows 6 Universal joint ASSY 7 Front arm SET As required 8 Tension arm ASSY Inject until grease overflows 5 4 4 7 1 8 6 3 2 ...

Страница 88: ...ified level 82 Belt tension Spring coil clearance 83 Roller and gauge wheels They should turn smoothly 85 Pulley cover inside Clean after every 50 h There should be no grass or dust accumulated 83 Belt Clean after every 50 h Criteria for replacement Deep crack over half the thickness of belt Worn out side wall canvas 83 Greasing points Grease up after every 50 h 86 Bolts and nuts There should be n...

Страница 89: ... up where paint bas peeled off with touch up paint supplied by ISEKI f Be sure to replace all the removed parts g Lost pins and clips should be replaced with new ones h Check each part for damage and repair or replace damaged ones with new ones for the next operation IMPORTANT Insist on ISEKI genuine parts when replacing i Grease up all grease points j All loose bolts and nuts should be tightened ...

Страница 90: ...des Clogged grass inside of mower deck Improperly adjusted gauge wheels Too tall grass Two blades are not installed on the same level and correct angle Deformed blades Adjust mower mounting Slow down Replace them with new ones Clean Adjust them properly Mow it in two steps Correct by shimming and set the blades properly Replace them with new ones Turf is peeled off Too low cutting height Mower is ...

Страница 91: ...ng bolts Foreign matter caught in blades or lade supports Broken pulley Broken belt Broken gears Front PTO belt is slipping or broken Re tighten them to 1000 kgf cm Clean Replace it with a new one Replace it with a new one Consult your dealer Adjust PTO cable or replace belt with a new one Mower does not rise Inside of the mower deck is clogged with too much grass or mud Defective hydraulic system...

Страница 92: ...p cylinder 7 Lift hose 8 Dump hose 9 Container limit sensor 10 Container cover 11 Side cover 12 Rear cover 13 Cleaning stick 14 Cylinder guard 2 SBC550X LE4 Low dump collector 1 Collector frame 2 Container 3 Dump cylinder 4 Dump hose 5 Container limit sensor 6 Container cover 7 Rear cover 8 Cleaning stick 9 Cylinder hook 9 13 7 1 2 14 4 6 3 5 8 10 11 12 4 3 8 9 6 5 1 2 7 ...

Страница 93: ... Collector frame 8 Hairpin i Release four hydraulic pressure hoses from the hose guide 11 WARNING When attaching or detaching the collector to the lawn mower Place the lawn mower on level hard ground Apply the parking brake securely GE TYPE Apply the parking lock securely E TYPE Move the PTO lever to the STOP position Do not start the engine except for operating the lift 1 DETACHING THE HIGH DUMP ...

Страница 94: ...er 12 11 Hose guide 13 Quick coupler 12 Grass limit sensor coupler l Remove four hairpins 8 and four pin 16x65 COMP 14 NOTE If it is difficult to remove pin 16x65 COMP 14 insert the stick or screw driver in the guide bar 15 of collector frame 10 and then try to re move the pin 16x65 COMP 14 while shaking the stick or screw driver m Move the container ASSY 2 which is put on the col lector base ASSY...

Страница 95: ...th wood and stand b Remove pin 16x65 COMP 6 and split pin 7 from the cylinder ASSY 5 and then separate the cylinder ASSY 5 from the frame collector 4 c Remove Nut M8 3 and pin 20x410 COMP 2 and hook plate 1 from the collector frame 4 1 Hook plate 5 Cylinder ASSY 2 Pin 20x410 COMP 6 Pin 16x55 COMP 3 Nut M8 7 Split pin 4 Collector frame d After removing the collector ASSY 4 insert pin 2 and pin COMP...

Страница 96: ... moves the collector dump lever backward before moving the collector lift lever backward with container located at the lowest position container SBC600X H may hit the lawn mower 1 BEFORE OPERATION CAUTION Become familiar with the operation of the lawn mower and understand safety instruc tions by reading this manual carefully Make sure that all safety covers and guards are installed in position pro...

Страница 97: ... rear net Repair it or replace it with a new one 5 EFFICIENT COLLECTING IMPORTANT Keep rear net of container clean always When mowing the wet or long grass filling rate of container would go down Slow down the lawn mower Adjust the grass limit sensor as a nec essary refer to page 95 Stop operating the lawn mower as soon as the buzzer sounds and dump grass of container DANGER Dump grass of containe...

Страница 98: ...1 Lock nut 2 Adjustment adapter CAUTION Container would be damaged by making length of cylinder too longer Be care ful to adjust its length 2 INSPECTION OF HYDRAULIC HOSES a When operating the collector make sure that the hy draulic hose is not pulled and interfered b When the hydraulic hose is damaged replace it as soon as possible DANGER It is danger to operate the lawn mower with damaged hydrau...

Страница 99: ...lector Ref No Filling points Lubricants Quantity 1 Lift link Grease Inject until grease overflows 2 Dump link 3 Lift cylinder As required 4 Dump cylinder SBC550X LE4 Low dump collector Ref No Filling points Lubricants Quantity 1 Dump link Grease Inject until grease overflows 2 Dump cylinder As required 4 3 1 2 1 1 2 ...

Страница 100: ...d servicing intervals hours of operation Intervals after that Judgement criteria Ref page 50 100 150 200 250 Greasing points Grease up after every 50hrs 98 Bolts and nuts Pins and clips Rear net IMPORTANT Above mentioned service intervals should be used as reference creteria If working conditions are harder earlier service is recommended When special technology and special tools are required consu...

Страница 101: ... parts e Lost pins and clips should be replaced with new ones f Check each part for damage and repair or replace damaged ones with new ones for the next operation IMPORTANT Insist on ISEKI genuine parts when replacing g Grease up all grease points h All loose bolts and nuts should be tightened properly and lost ones should be replaced with new ones i Store the collector in a dry place with wooden ...

Страница 102: ...ector link is poor Cramp of hydraulic hose is loosen Short of grease with collector link Retighten them properly Check and consult your dealer as necessary Cramp it properly Inject grease with collector link Collector does not move Short of grease with collector link Install hydraulic hose by mistake Too low engine speed Defective hydraulic system Inject grease with collector link Check and correc...

Страница 103: ...SBC600XH SBC550XL 102 ...

Страница 104: ... Reference to harmonized standards declare under our sole responsibility that the products described below DECLARATION OF CONFORMITY Engine Engine type Engine power ISEKI 14 0kw E3112 G06 at 2600 min 1 Guaranteed sound power level 105 db A whose technical file compiled by N V ISEKI EUROPE S A Sterrebeekstraat 179 D4 B 1930 Zaventem Belgium Notified Body TÜV Rheinland Luxemburg GmbH EN836 Engine En...

Страница 105: ...XG323 SXG326 SCMB48 SCMA54 SBC550X SBC600X OM SXG323 EN 10 1111 01 XXX Printed in Japan Overseas Business Division 5 3 14 Nishi Nippori Arakawa ku Tokyo 116 8541 Japan Phone 03 5604 7658 Fax 03 5604 7703 ...

Отзывы: