background image


14 

Quick User Guide – IRIScan

TM

 Pro 5 


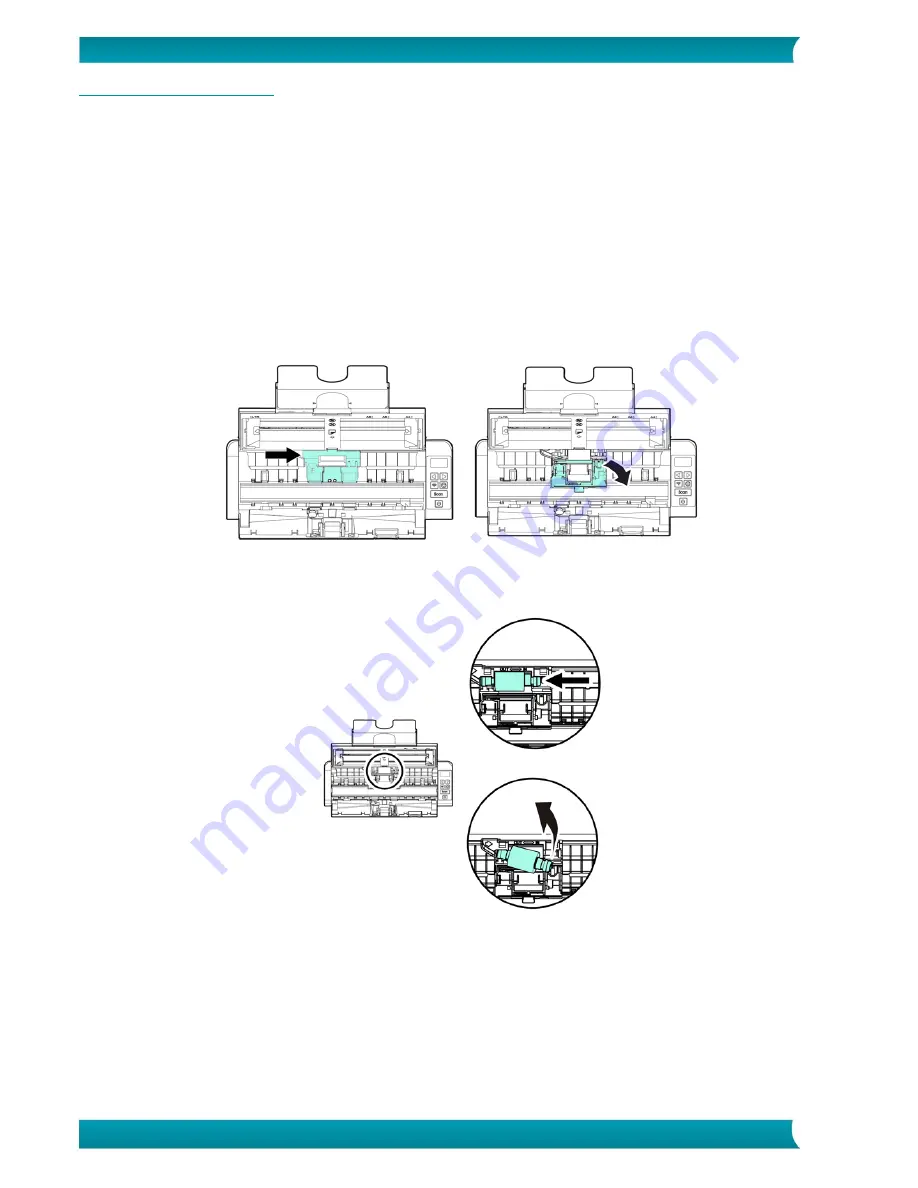
8.2 Replace the Feed Roller 

The feed roller and separation pad inside the scanner wear with scanning. If the feed roller and separation 
pad are worn, documents may not feed correctly and paper jams may occur. When document feed 
performance deteriorates, replace the feed roller and separation pad. 

It is recommended to replace the feed roller or separation pad when the total number of pages of 
documents fed in the scanner exceeds one of the following quantities: 
Feed Roller: 100,000 sheets 
Separation Pad: 30,000 sheets 

To replace the Feed Roller: 

1.


Open the feed tray. 

2.


Press the ADF Release button to open the feeder cover. 

3.


Open the roller cover. 


4.


Slide the feed rollers to the left as indicated below. 

5.


Remove the feed rollers. 


6.


Attach the new feed rollers. Insert the left end of the shaft to the notch and slide the feed roller to 
the right. 

7.


Completely close the roller cover so that it clicks into place. 

8.


Close the feeder cover. 


Содержание IRIScan Pro 5

Страница 1: ...Be Smart Automate Your Scans for Windows and Mac Portable scanner OCR software IRIScan Pro 5 PDF ...

Страница 2: ... the Automatic Document Feeder 8 7 2 Using the Front Feed Tray 11 7 3 Using the Rear Feed Tray 12 7 4 Ejecting Documents from the Opposite Tray 12 8 Maintenance 13 8 1 Clean the Scanner Glass Separation Pad and Rollers 13 8 2 Replace the Feed Roller 14 8 3 Replace the Separation Pad 15 9 Troubleshooting 15 9 1 Clearing a Paper Jam 15 9 2 Error conditions 16 9 3 Questions and Answers 16 9 4 Product...

Страница 3: ...indows Readiris Corporate 15 Cardiris Corporate 5 7 IRISCompressor Button Manager Capture Tool Mac OS Readiris Corporate 15 Cardiris 4 IRISCompressor Capture Tool Windows IRISmart File Readiris Corporate 15 Cardiris Corporate 5 7 IRISCompressor Button Manager Capture Tool Windows IRISmart Invoice Readiris Corporate 15 Cardiris Corporate 5 7 IRISCompressor Button Manager Capture Tool For detailed i...

Страница 4: ...d or uneven surfaces may cause mechanical or paper feeding problems Retain the scanner box and packing materials for shipping purposes Installation 1 Go to www irislink com start 2 Scroll down to IRIScan Pro 5 3 Select the version you acquired and click Getting Started 4 Then click Start now 5 Complete the form and click Register now 6 Select the required Operating System 7 Click Download to downl...

Страница 5: ...e warranty 13 Return to the setup screen and click IRIScan Pro Driver to install the scanner driver 14 Click Next and follow the on screen instructions 15 When the installation is done click Finish and return to the setup screen 16 Click Button Manager to install the Button Manager A language selection window appears 17 Choose the language you wish to install The InstallShield wizard guides you th...

Страница 6: ...worn Documents should be free of curl wrinkle tears wet ink or punch holes Documents should be free of staples paper clips sticky notes 4 Scanner Overview 4 1 Top View 1 LCD Display Displays the function button 2 Right Left arrow Press to switch between the different function buttons 3 Cancel button Press to cancel an ongoing scanning job 4 Scan button Press to start scanning to the configured sof...

Страница 7: ...hen loading a document and then align them to the edges of the document to be scanned 3 Front Feed Tray Insert a document to scan from the front feed tray 1 Kensington Security Slot Attach to a lock to secure the scanner 2 Rear Feed Tray Insert a document to scan from the rear feed tray 1 Power Jack Connect the AC adapter to the scanner 2 Micro USB port Plug the micro end of the USB cable in this ...

Страница 8: ... scan documents directly to Readiris for text recognition scan them to other applications of your choice to multiple Cloud destinations etc From within IRISmart File Invoice Readiris or Cardiris From within the Capture Tool In section 7 Scanning Documents of this Quick User Guide we only describe the basics how to scan For more information on how to scan from within IRISmart File Invoice Readiris ...

Страница 9: ...asional paper jams please fan your documents and align the top edges before feeding them into the scanner Hold both ends of the documents and fan them a few times Rotate the documents by 90 degrees and fan them in the same manner Align the edges of the documents in a step like pattern as indicated below Important the document feeder of the IRIScan Pro 5 is L shaped meaning your documents will be b...

Страница 10: ...nt feeder and its extension 2 Adjust the paper guide to hold your documents 3 Load the stack of documents top edge first and text facing up 4 Verify that the paper guides are aligned with the edges of the stack 5 Verify that the front feed tray is closed 6 Press the Scan button to start scanning ...

Страница 11: ...ewed image or a paper jam 1 Align the documents top edge first and arrange the pages from large to small 2 If two pages are of the same size but of different weight arrange these pages from heavy to light 3 Align the edges of the documents by tapping the bottom of the stack against a table top 4 Center these pages in the document feeder and make sure that the edges of the largest page slightly tou...

Страница 12: ... want the scanner to stop scanning next time a Multi Feed occurs go to the Multi Feed Detection tab in the Scanner Properties window and select Stop Scanning after Multi Feed This way you need to rescan all the documents you tried to scan 7 2 Using the Front Feed Tray Attention the Front Feed Tray scans one page at a time Do not insert multiple pages 1 Open the cover of the front feed tray 2 Use t...

Страница 13: ...he feed tray as indicated The rear feed tray does not automatically grab and secure the document 4 Press the Scan button to start scanning 7 4 Ejecting Documents from the Opposite Tray If you are feeding paper from the front or rear feed tray the scanner provides two eject paths documents are by default ejected from the same side of the feed tray but they can also be ejected from the opposite side...

Страница 14: ...nly the recommended or supplied tool to clean the scanner and feeder dock Cleaning steps 1 Open the feed tray 2 Press the ADF Release button to open the feeder cover 3 Wipe the separation pad rollers and the glass with the cleaning cloth Note Adding some isopropyl alcohol 95 on the cleaning cloth is more efficient when cleaning the rollers Do not use any solvents or corrosive liquid i e alcohol ke...

Страница 15: ...ation pad when the total number of pages of documents fed in the scanner exceeds one of the following quantities Feed Roller 100 000 sheets Separation Pad 30 000 sheets To replace the Feed Roller 1 Open the feed tray 2 Press the ADF Release button to open the feeder cover 3 Open the roller cover 4 Slide the feed rollers to the left as indicated below 5 Remove the feed rollers 6 Attach the new feed...

Страница 16: ...e two arms of the separation pad with two fingers and attach the new separation pad to the scanner 9 Troubleshooting 9 1 Clearing a Paper Jam In the event of a paper jam follow the instructions below to remove the paper 1 Press the document feeder release button to open the feeder cover 2 Carefully pull the paper out of the feed tray 3 Close the feeder cover 4 Place the paper correctly in the docu...

Страница 17: ...because of static electricity 3 Reduce the number of pages that you simultaneously load into the scanner Question Paper becomes skewed in the scanner Answer 1 Align the document guides to fit the documents as closely as possible and place the documents so that they feed in straight 2 Check the condition of the feeding roller If necessary follow the cleaning directions in Section 8 1 and perform th...

Страница 18: ...t Size Min 50 x 50 mm 1 9 x 1 9 in Max 216 x 356 mm 8 5 x 14 in Scanning Speed 20 PPM 40 IPM Color A4 200 dpi 15 PPM 30 IPM Color A4 300 dpi Paper Thickness 30 413 g m2 Front Feed Tray 30 160 g m2 ADF ID Card Thickness Up to 1 25 mm 0 05 in Embossed side face up landscape feeding Front Tray Long Page Mode 3000 mm 118 in Optical Resolution 600 dpi Output Resolution 75 100 150 200 300 400 and 600 dp...

Страница 19: ...cument is subject to change without notice I R I S makes no warranty of any kind with regard to this material including but not limited to the implied warranties of fitness for a particular purpose I R I S shall not be liable for errors contained herein or for incidental or consequential damages in connection with the furnishing performance or use of this material Safety Instructions Follow these ...

Страница 20: ... interference in a residential installation This equipment generates uses and can radiate radio frequency energy and if not installed and used in accordance with the instruction manual available at www irislink com start that may cause harmful interference to radio communications However there is no guarantee that interference will not occur in a particular installation If this equipment does caus...

Страница 21: ...N55022 EN55024 safety requirements of EN 60950 and ROHS requirements of EN50581 This product is certified as Class 1 LED product Disposal of Waste Equipment by Users in Private Households in the European Union This symbol on the product or on its packaging indicates that the product can not be disposed of with your other household waste Instead it should be sent to appropriate facilities for recov...

Отзывы: