background image

D I G I TA L   R E C O R D E R   C O N T R O L   PA N E L  

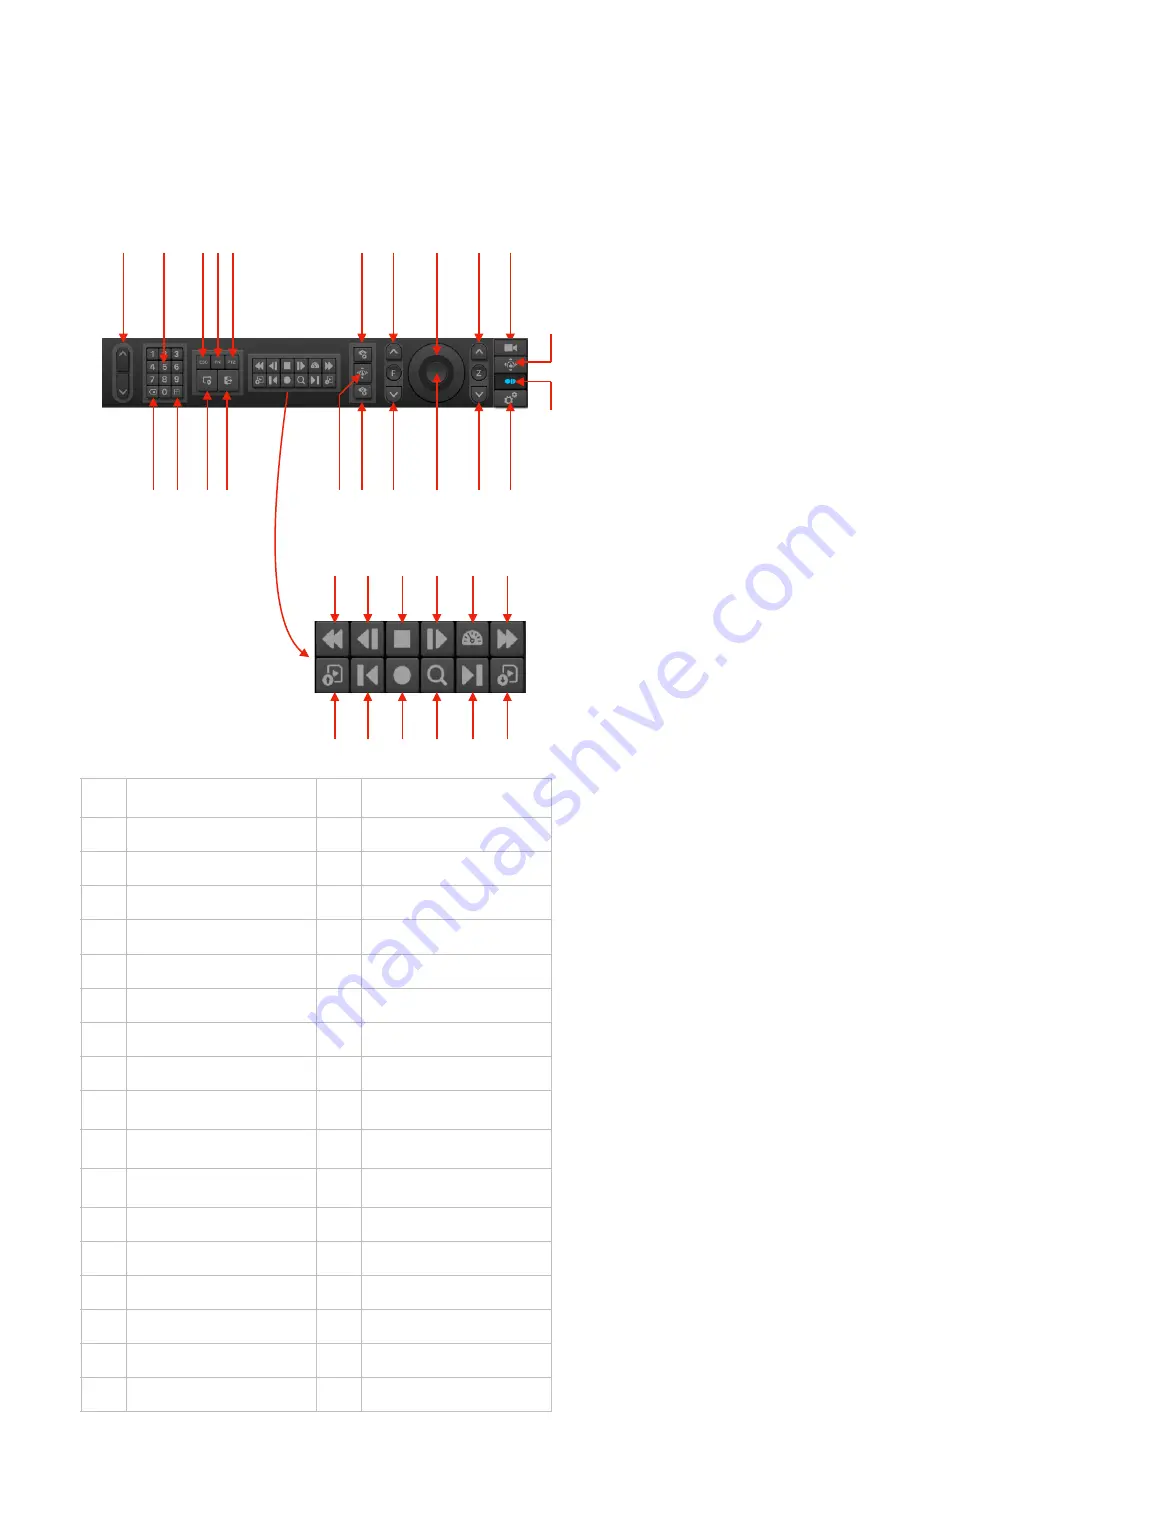
Mimics the controls of the integrated NVR:

N O T E S   O N   R E C O R D E R   C O N T R O L S   /  

O P E R AT I O N  

The Digital Recorder control panel within CMAC mimics 
the front panel operation of a hardware DVR / NVR. 

Navigating set-up menus is achieved by using the Up 
Down Left Right controls (

8

) to work your way through the 

menu trees, the iris controls (

6 & 17

) to increase and 

decrease selected values and the enter button (

15

) to 

confirm your selection. 

U S I N G   T H E   N V R   T O   C O N T R O L   I P   P T Z  

C A M E R A S    

IP PTZ Cameras can be controlled from the DVR Control 
Panel page. Like a hardware recorder however, Pan & Tilt 
control is limited to transmit Up, Down, Left and Right 
controls independently. It is not possible to pan and tilt 
simultaneously.  

For optimum control we recommend using the RS485 
serial data control interface to Iris PTZ cameras. Iris 
Sentinel cameras support IP and RS485 connections so 
the video stream can be transmitted via your IP network 
whilst serial control from CMAC is transmitted across an 
RS485 data network. 

V 1 . 0 4

1 2

10

11

12

13

1

2

3

6

7

8

9

14

16

17

20

21

22

A

B

C

D

E

F

G

H

I

J

K

L

1

Panel Navigation Controls. Links 
to additional control panels

19

Log Out

2

Numeric Keypad 

20

Close All

3

Escape

21

Split Screen Toggle

4

Function

22

Delete

5

PTZ Control (Via NVR)

6

Iris Open

A

Fast Reverse

7

Focus Far

B

Reverse

8

Up, Down, Left, Right Controls

C

Stop

9

Zoom Tele

D

Play / Pause

10

Camera Selection Page 
Navigation Button

E

Slow

11

Camera Controls Page 
Navigation Button

F

Fast Forward

12

Recorder Page Navigation 
Button

G

Previous File

13

Setup Navigation Button

H

Previous Frame

14

Zoom Wide

I

Record

15

Enter / Confirm

J

Search

16

Focus Near

K

Next Frame

17

Iris Close

L

Next File

18

PTZ Control (Via NVR)

4 5

19

18

15

Содержание CMAC-H16-xTB-x

Страница 1: ...V 1 0 4 1 cmac User Guide Installation Manual ...

Страница 2: ...ontrol Panel 12 Notes on Recorder Controls Operation 12 Using the NVR to Control IP PTZ Cameras 12 Setup Mode 13 Notes on Setup 13 Home Screen Setup 13 Image Flip Controls 13 Device Setup 13 Set Home Position 13 Set Presets 13 Automation Setup 13 Device Setup 14 Upload Deck plan photo process 14 Notes on Device Setup 14 Upload Deck Plans Photos 14 Upload Specifications 14 Iris Control Feature Guid...

Страница 3: ... model which supports multiple camera types IP CVBS AHD TVI CVI and as an IP only model CMAC can also be supplied without IrisControl support and used as a standalone digital video recorder for your on board cameras CMAC Key Features Hosts IrisControl HTML5 App for Garmin OneHelm Platform Build in Digital Video Recording Integrated Network Video Server for Remote Connectivity Available in IP only ...

Страница 4: ...ng the equipment off an on the user is encouraged to try to correct the interference by one of the following measures Reorientate or relocate the receiving antenna Connect the equipment to a different power circuit to the device consult the dealer or an experienced radio tv technician for help Servicing This product does not contain any user serviceable parts and repairs should only be made by Iri...

Страница 5: ...urchase price SUCH REMEDY SHALL BE YOUR SOLE AND EXCLUSIVE REMEDY FOR ANY BREACH OF WARRANTY Repaired or replaced devices have a 90 day warranty If the unit sent in is still under its original warranty then the new warranty is 90 days or to the end of the original 1 year warranty whichever is longer Iris will not accept responsibility for the retrieval or return shipping of the device If goods are...

Страница 6: ... not connect or disconnect the product with the power supply switched on Never disconnect the DC ground with the power supply on This could result in the DC power being grounded through the common video ground which could in turn damage the video output circuit of the unit or attached cameras Wiring Terminations Where the products video power and data terminations are extended ensure that suitable...

Страница 7: ...or connect USB drive via USB hub to remove footage 10 Vibration Proof Hard Disk Drive HDD Caddy Use Key supplied to lock unlock Accepts 2 5 SATAII HDD Drive max capacity 4TB IP Camera Only Model CMAC N16 xTB x 1 HDMI Video Output 2 USB port to processor board Use for uploading files software deck plans photos etc Also used to connected USB touch check MFD compatibility 3 HTML5 Network Connection C...

Страница 8: ...g a mix of IP cameras in this case 4 x IRIS S460 mini IP dome cameras and an anlalogue camera in this case an IRIS S295 Dual Payload thermal imaging daylight analogue camera Both the front and rear face also feature USB ports so space needs to be considered to allow access The USB socket on the front face is used primarily to connect a mouse in order to configure the recorder element of CMAC It ca...

Страница 9: ... two network connections so your camera system can be set up and configured separately to your chart plotter network This reduces overall system latency by keeping the bandwidth heavy video away from your onboard network traffic A L T E R N A T E C O N N E C T I O N S Using CMAC with TE01 Controller IRIS580 Keypad CMAC systems can be supplied without the IrisControl App host and can be controlled ...

Страница 10: ...is automatically displayed in the top portion of the screen and the control panel is displayed in the lower portion Iris control can be configured to launch into the camera control page ideal for systems which include controllable PTZ cameras or the camera selection page ideal for larger systems with multiple cameras or for systems which feature fixed cameras only and therefore camera controls are...

Страница 11: ...ce Select List Mode see below 7 Camera Selection Page Navigation Button 8 Camera Control Page Navigation Button 9 Recorder Page Navigation Button 10 Setup Navigation Button 11 Quad PiP Display Mode Toggle 12 Device Select Plan Photo Mode 1 Panel Navigation Controls Links to main control panels 15 Setup Navigation Button 2 Automatic Scan Controls 16 Zoom Wide 3 Set Scan Start Position 17 Auto Zoom ...

Страница 12: ...r optimum control we recommend using the RS485 serial data control interface to Iris PTZ cameras Iris Sentinel cameras support IP and RS485 connections so the video stream can be transmitted via your IP network whilst serial control from CMAC is transmitted across an RS485 data network V 1 0 4 12 10 11 12 13 1 2 3 6 7 8 9 14 16 17 20 21 22 A B C D E F G H I J K L 1 Panel Navigation Controls Links ...

Страница 13: ...ion of the currently selected PTZ camera move the camera to the desired position then press button 19 to store Presets are used to automatically send a camera to a pre determined position at the touch of a button or as part of an Automation A U T O M AT I O N S E T U P Input automation instructions Automation can be used to trigger simple or complex instructions automatically when manually activat...

Страница 14: ... indicators Then by placing an Automation icon over the area you can trigger the camera to spin round and zoom in on the indicator at the touch of a button Similarly for larger vessels you can configure automation icons to send multiple cameras to specific preset positions so that by touching the Port Side Automation icon for example cameras will automatically spin around to cover the port side du...

Страница 15: ...ic changes to a compass style indicator with the bow of the boat at the 0 straight up position Now you can send the camera to a specific position instantly by just touching the corresponding place on the dial of the indicator or you can pan your camera by dragging your finger around the dial rather than by moving the joystick This feature is extremely useful for moving the camera quickly to a spec...

Страница 16: ...tern Scan Feature There are four pattern scans available A pattern scan allows you to define a start position and then record the movement of the camera until you define the stop position Then on activation the camera will play back through the user defined pattern thus providing a patrol feature Good for security applications Lock Button Press the Lock button to prevent scans from being accidenta...

Страница 17: ... your system When the system has initialised you will be presented with a blank split screen image Right click the mouse button and a drop down menu appears Click on the Main Menu option and you will be presented with the Log In box The default user name is admin and the default password is either left blank or set to Password1234 2 Once you have logged in you will be presented with the Main Setup...

Страница 18: ...type for a camera should be set to IPC IP Camera Once you have entered the appropriate information select OK and if the camera is connected to the network in the same address range as the NVR and powered up the NVR should find the camera and the details will automatically update in the Device Window Press OK to add the camera to the NVR Repeat this step until all desired cameras are added A D D I ...

Страница 19: ...SETUP page and you will see the current software revision displayed in the bottom left hand corner of the panel see below Take a note of this version number 3 Connect your USB drive to the USB socket on the rear panel of your CMAC labelled TOUCH DRIVE 4 The IrisControl software will automatically detect the drive and look for a valid update file If the file is found it will automatically upgrade y...

Страница 20: ...l and switch your cameras from your chart plotter Connection details for CMAC INT 001 Models To install the CMAC INT box lift the flaps at either end of the enclosure lid to reveal fixing positions Ensure sufficient distance is allowed to neatly dress in the cables to the box making room for a suitable cable bite so as not to put stress on the connectors V 1 0 4 2 0 280mm 60mm 1 7 0 m m ...

Страница 21: ...V 1 0 4 21 ...

Отзывы: