background image

Chapter 5 Wireless MIC

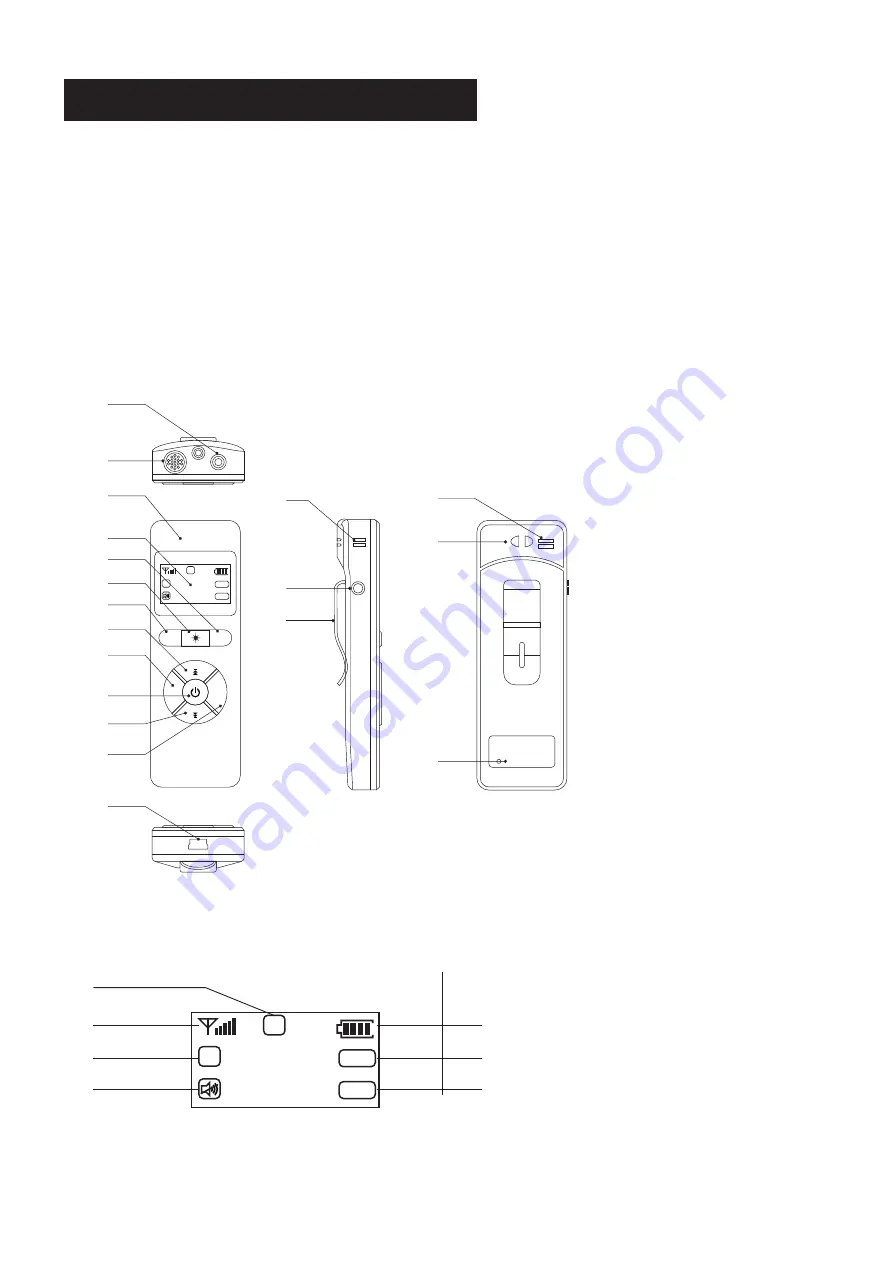
5.1 Operation Guide

5.2 Device Overview

· Start the MIC Receiver and then press the power button for two seconds to power Wireless MIC on. Please make sure the distance is within 5 
meters. The signal and the PPT icon in the screen will flash. Press switch keys to choose 2.4G (2.4G frequency), IF (infrared frequency) or PPT (PPT 
alone). The icon stops flashing if the pairing is successful. The PPT icon will display when the PPT module is turned on.
· After the pairing is finished successfully, press the audio button to switch into AGC or None. Short press the power button to mute, and shut 
down the machine by long pressing the power button. 
· The laser pointer can be used directly without opening the microphone. And it is automatically switched from the built-in microphone to the 
external microphone when the external microphone is connected.

1. Infrared head
2. laser head
3. Built-in MIC input port
4. Built-in MIC input port
5. LCD
6. AGC button
7. Press laser pen button to open the 
    laser pointer
8. RF button for 2.4G frequency or 
    infrared frequency
9. Turn up the page
10. Volume down
11. Power on/off by press for 2 seconds   
    and mute by short press
12. Turn a page down
13. Volume up
14. MICRO USB charge port
15. Built-in MIC input port
16. 3.5 audio external input port
17. Toggle clip
18. Built-in MIC input port
19. Hanging hole
20. RESET button

1

2

3

4

5
6
7

15

16

17

18

19

20

9

8

10

11

13

12

13

MIC

RF

AGC

VOL-

VOL+

MIC

USB

PPT

AGC

CH

RF

2.4

15

32

5.2.1 LCD Display 

1. Optional 2.4G, IR and PPT frequency mode. 
2. Signal indicator after the frequency is successful
3. Working channel 
4. Volume
5. Power 
6. Optional AGC and None to adjust volume
7. Turn PPT pages up/down

1

2

3

4

5

6

7

PPT

AGC

CH

RF

2.4

15

32

05

Содержание IQAiO GR511

Страница 1: ...Returnstar Interactive Technology Group Co Ltd User Manual...

Страница 2: ...device 03 3 2 Disable the device 03 Chapter4 Digital Code and Card Setting 04 4 1 Digital code 04 4 2 IC Card 04 Chapter5 Wireless MIC 05 5 1 Operation Guide 05 5 2 Device Overview 05 Chapter6 Docume...

Страница 3: ...2 25W Speakers 2 Central Control Panel 3 Document Camera 4 Interactive Whiteboard 5 Built in Computer Central Control 6 AC OUT 1 7 AC IN 1 8 VGA 1 9 RS232 1 10 HDMI 1 11 Audio OUT 1 AC OUT VGA RJ45 RS...

Страница 4: ...estart the PC adjust the volume and etc 1 Card response area Boot up the device with the card 2 Power Power on off the device 3 Computer Power on off the PC 4 Lock Freeze the functions on the panel 5...

Страница 5: ...w password only blue light will flash After inputting press OK key to confirm or C key to clear it After press OK key to confirm new password the red light will flash only User should input the new pa...

Страница 6: ...ed from the built in microphone to the external microphone when the external microphone is connected 1 Infrared head 2 laser head 3 Built in MIC input port 4 Built in MIC input port 5 LCD 6 AGC button...

Страница 7: ...f the code isn t available please set the code correctly Take the EPSON projector as example please refer to the operation as below After setting the serial number configuration and commands please cl...

Страница 8: ...r board front VGA front HDMI number keys and other indicators showing working status to avoid maloperation Number keys to control power and other functions PC on off projector on off ECO mode 3 kinds...

Страница 9: ...ht after the device is power on Please check whether the fuse is damaged and refer to the picture below Reversed display of the projector Select the reverse projection in the menu of the projector to...

Страница 10: ...tive Technology Group CO LTD 6th Bldg High Tech Base Fuzhou Fujian Prov China 0086 591 38202660 0086 591 38203003 www IQBoard net Master IQBoard net Kd045EN IQAiO 20181213 Returnstar Interactive Techn...

Отзывы: