background image

w

w

w

.i

p

e

le

ctr

o

n

ix.c

o

m


 IPEX 

(IP Electronix)


PH232Ex1Plus

User’s Manual


Page 23 of 25 

                                                                 Doc No. : PH232Ex1Plus-UM-001  

                                                                                                                                                                    1 September 2019 

11.


Redirecting  

All the Terminal Servers produced by 

IP Electronix

 have Redirecting ability. It means you can re-transmit all the 

received data from one serial port input (RxD) to any other serial port[s] output (TxD). 

For example, if your device has more than two ports and you redirect one port to two other ports, you can 
simply make an Y-Switch. 

If one serial port is redirected to itself, you have a LOOP line that is very useful for testing a communication line. 

There are two ways to set redirect for each port, setting in main configuration webpage of the device by a web-
browser or sending network command line via UDP packets. 

11.1


Setting Redirect by Web-Browser 

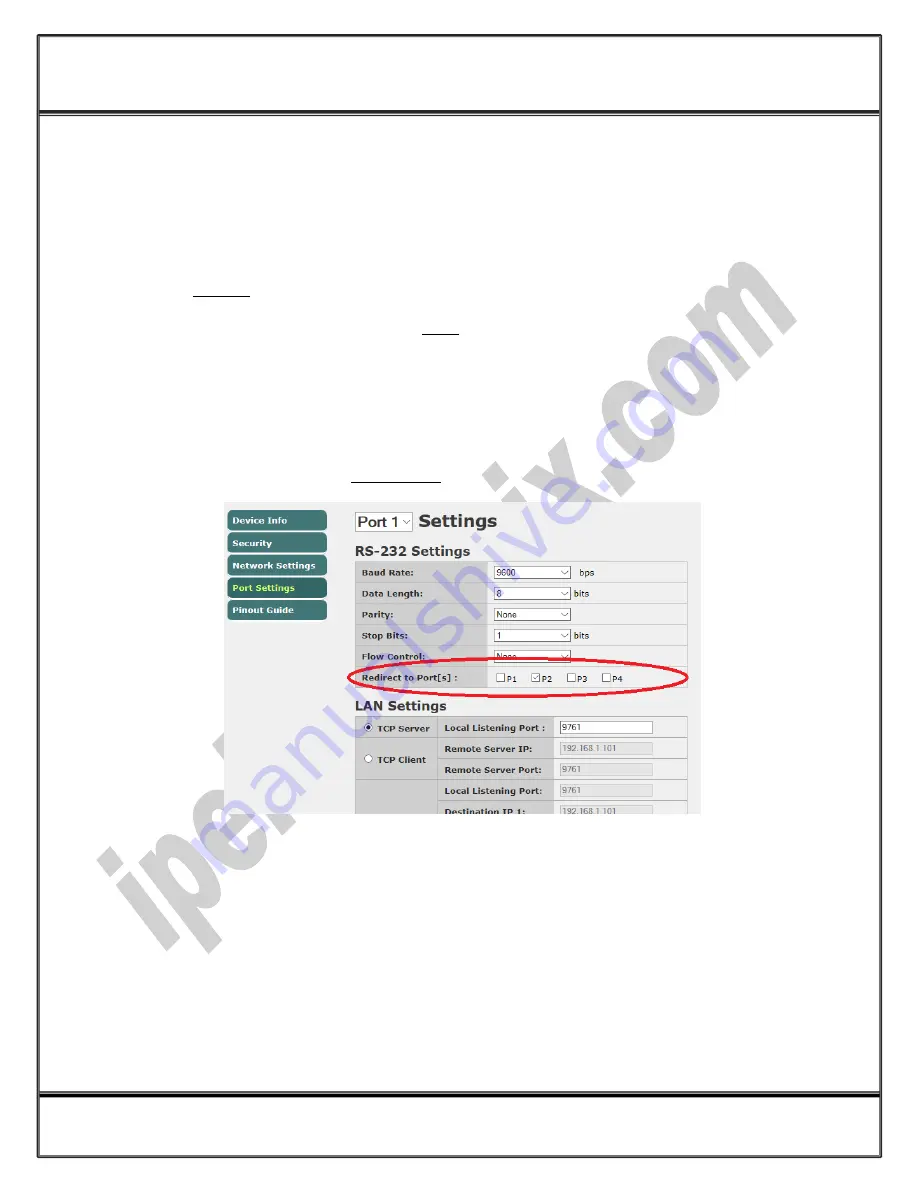
As it is shown in the picture below, go to the device configuration page by means of a web-browser such as 
Google-Chrome or Fire-Fox and choose Port Settings: 


Now select destination port which you want to redirect current port to it. You can select more than one port for 
redirecting and also can redirect a port to itself. 

11.2


Setting Redirect by UDP Network Command 

To send redirect command from a remote workstation or software to the device, we need IP number or Host-
Name and the UDP Port-Number. The default UDP Port-Number is 9765 and you can change this port number if 
necessary. We also need to know the device Remote Command Password which is a Four-Digit number that you 
can see it in Network Settings and also can change it there if necessary. 

Содержание PH232Ex1Plus

Страница 1: ...Doc No PH232Ex1Plus UM 001 USER S MANUAL IPEX IP Electronix 1 September 2019 PH232Ex1Plus 1 RS 232 Serial Port to Ethernet Terminal Server Client...

Страница 2: ...1 INTRODUCTION 3 2 SPECIFICATIONS 3 3 PACKAGE CHECKLIST 4 4 TOP PANEL 5 5 RS 232 SERIAL PORT PIN CONFIGURATION 6 6 RS 232 CONNECTING METHODS 7 7 CONNECTION DIAGRAM 10 8 DEVICE CONFIGURATION WEBPAGE 12...

Страница 3: ...stems Protection against Surge ESD and EMI is implemented in its design and there is 3kV isolation between Ethernet and RS 232 sides 2 Specifications Number of Ports 1 RS 232 Serial Port 1 Ethernet RJ...

Страница 4: ...PH232Ex1Plus UM 001 1 September 2019 3 Package Checklist Before installing the PH232Ex1Plus verify that the package contains the following items 1 PH232Ex1Plus 2 12V DC Adaptor 3 Installation CD ROM...

Страница 5: ...device connects to a client then this LED turns on continuously TCP Client LED Green Blinking this LED shows that the TCP Client mode for this port is selected and device is trying to connect in this...

Страница 6: ...1 1 September 2019 Device Power Supply VDC IMPORTANT To working properly you should connect a DC Power Supply to PH232Ex1Plus The voltage of the Power Supply should be from 8V to 48V For example this...

Страница 7: ...evices Modem or other DCE devices DB9 Female Pin Number PH232Ex1Plus Port 1 as DTE DB9 Male Pin Number Pin 1 DCD Output Pin 1 DCD Input Pin 2 RxD Output Pin 2 RxD Input Pin 3 TxD Input Pin 3 TxD Outpu...

Страница 8: ...or other DTE devices DB9 Male Pin Number PH232Ex1Plus Port as DTE DB9 Male Pin Number Pin 7 RTS Output Pin 1 DCD Input Pin 3 TxD Output Pin 2 RxD Input Pin 2 RxD Input Pin 3 TxD Output Pin 6 DSR Inpu...

Страница 9: ...19 7 3 Simple Null Modem Connection to PC PLC Without Hardware Handshaking PC PLC or other DTE devices DB9 Male Pin Number PH232Ex1Plus Port as DTE DB9 Male Pin Number Pin 3 TxD Output Pin 2 RxD Input...

Страница 10: ...onnect a device with a RS 232 serial port to RS 232 serial port of the PH232Ex1Plus then you can connect to the device behind the network by any application software you want by opening a TCP or UDP S...

Страница 11: ...ing Remote Server IP and Port Number on it These two converters are connecting automatically via network to each other so RS 232 PORT of Server connects to RS 232 PORT of Client via network Now you ca...

Страница 12: ...open device configuration webpage enter the device IP on your web browser address bar like this figure The device Default IP Address is 192 168 1 100 and the default Subnet Mask is 255 255 255 0 Now...

Страница 13: ...x PH232Ex1Plus User s Manual Page 13 of 25 Doc No PH232Ex1Plus UM 001 1 September 2019 8 1 Device Information Webpage You can see some general information about the device such as MAC address Firmware...

Страница 14: ...ctronix com IPEX IP Electronix PH232Ex1Plus User s Manual Page 14 of 25 Doc No PH232Ex1Plus UM 001 1 September 2019 8 2 Security You can change device configuration webpage user name and password in t...

Страница 15: ...r 2019 8 3 Network Settings You can change all the network settings such as device IP Address in this page It is important to enter valid data in this section If you are not sure about your network se...

Страница 16: ...www ipelectronix com IPEX IP Electronix PH232Ex1Plus User s Manual Page 16 of 25 Doc No PH232Ex1Plus UM 001 1 September 2019 8 4 PORT Settings You can see and change all the port settings in this page...

Страница 17: ...www ipelectronix com IPEX IP Electronix PH232Ex1Plus User s Manual Page 17 of 25 Doc No PH232Ex1Plus UM 001 1 September 2019 8 5 Pinout Guide RS 232 Port pinout is seen in this page...

Страница 18: ...RTANT NOTICE If you change the device IP and forget it you can see the new IP Address on the serial port Whenever you turn on the device it sends its IP Address and Subnet Mask to the RS 232 Port The...

Страница 19: ...If everything is set properly the green and yellow LEDs on the PH232Ex1Plus s RJ45 socket will blink Now it is important to check the network wiring topology and testing all the cables routers switche...

Страница 20: ...001 1 September 2019 Now you should see the ping response from the device If there are any problems in the network you could not see response from the device If you see this timeout window you can t c...

Страница 21: ...h Port The default port number is as follow Port 1 9761 For example we connect to RS 232 Port by means of Hyper Terminal Run Hyperterm exe and from properties dialog box select TCP IP Winsock Enter de...

Страница 22: ...www ipelectronix com IPEX IP Electronix PH232Ex1Plus User s Manual Page 22 of 25 Doc No PH232Ex1Plus UM 001 1 September 2019...

Страница 23: ...e of the device by a web browser or sending network command line via UDP packets 11 1 Setting Redirect by Web Browser As it is shown in the picture below go to the device configuration page by means o...

Страница 24: ...ODE LSB CODE MSB 0x01 These bytes are 0x01 constant binary value 0x01 CODE MSB Most Significant 8 bits of Security Code CODE LSB Least Significant 8 bits of Security Code W ASCII Character W Write Com...

Страница 25: ...ommand This command is same as change command but we should send character R instead of W and status byte is not required 5 4 3 2 1 Pn R CODE LSB CODE MSB 0x01 The device response is similar to the pr...

Отзывы: