LIP-9071
iPKTS
User Guide
7
2.9 Wall Mount
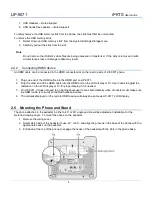
LIP-9071 phone can be wall mounted as needed. The following instructions describe how to perform a wall mount
installation.
1. Align the wall-mount bracket (not included) over the back of the phone, then press the bracket forward
applying steady pressure until it clicks into place.
2. Mark and drill two 7mm holes for plastic wall anchors (not included).
3. Insert the two anchors into the holes and insert and tighten the two screws (not included) leaving about 2.5
mm (1/8-inch) exposed.
4. Slide LIP-9071 phone over the screws and assure the phone is secure.
5. Reverse the handset hook and re-install in the phone so that the hook catches the groove in the handset
receiver.
6. Hang the handset up on the handset hook.
Note
It may be necessary to remove the phone and tighten or loosen the screws for a secure mounting.
2.10 Connecting expansion module
The button kit for LIP-9071 phone provides the following additional line/programmable feature keys. You can place the
phone and button kit on your desktop or you can wall-mount them.
Up to three different types of button kits are supported on a single phone.
The available button kit is as follows:
•
LIP-9012DSS: 12 flexible button with 3 colors LED
•
LIP-9024DSS: 24 flexible button with 3 colors LED
•
LIP-9048DSS: 48 flexible button with 3 colors LED
Note) for more information about LIP-9000 Series DSS, refer to Quick Installation Guide.
2.10.1 LIP-9012DSS & LIP-9024DSS
For LIP-9012DSS & 24DSS, connect power to the phone. The phone and button kit will power up. The button kit uses
the electrical connection of the phone for power.
LIP-9012DSS LIP-9024DSS

