IOtech Personal Daq/3000 Скачать руководство пользователя страница 6


IG-6  

957593


Personal Daq/3000 Series Installation Guide 


LEDs

-2 


:    

Personal Daq/3000 Series modules have 2 LEDs located just right of their USB2 connector.  
The LEDs function as follows: 

Power LED

:


The “Power” LED blinks during device detection and initialization; then remains on solid as 

long as the module has power.  If there is insufficient power the LED will go off and a TR
power adapter will be needed. 

Active LED

:   This LED is on whenever active USB communication is taking place between the Personal 

Daq/3000 Series module and the host PC.  Note that the Active LED will be on solid during a 
data acquisition.  


If you need to 

ur device, for example, if you are writing a custom program for multiple 

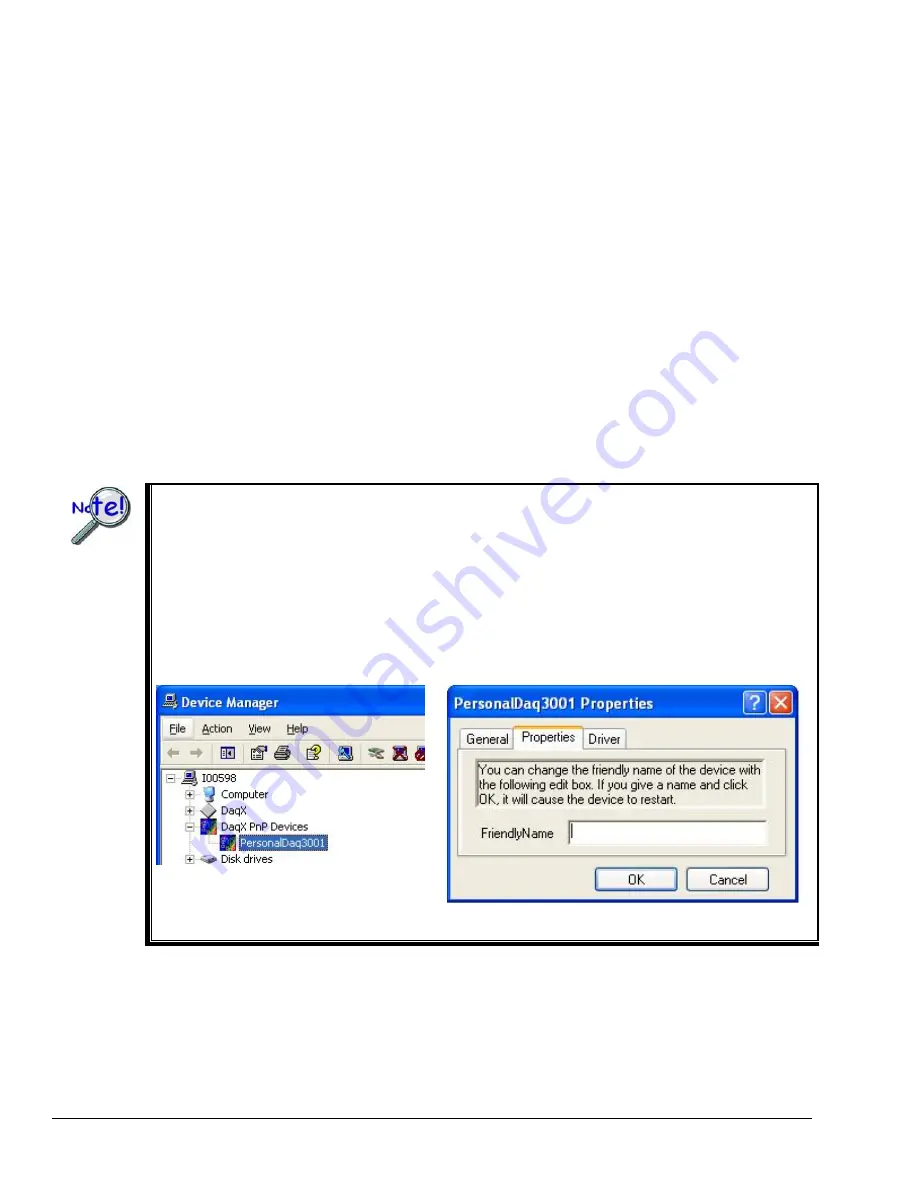
ces, navigate from the Windows Desktop to the Device Manager.  The navigation path is: 


tart

Ö

Settings

Ö

Control Panel

Ö

System

Ö

Hardware(Tab)


Ö

Device Manager

Ö

Daqx PnP Devices


You will see the device listed in the format of PersonalDaq3000 (see first figure, below). 

You can change the name of the device by doing a 

right-click

 on the device name to open its properties 

d alog box, then clicking on the Properties tab (see second figure).  You can then change the 
“FriendlyName” of the device.  

find the name of yo

devi

S

i


Locating DaqXPnP Devices 

Properties Dialog Box 


Содержание Personal Daq/3000

Страница 1: ...tion Modules Personal Daq 3000 Series p n 1136 0940 rev 2 1 324400C 01 324400C 01 IOtech 25971 Cannon Road Cleveland OH 44146 1833 440 439 4091 Fax 440 439 4093 sales iotech com productsupport iotech com www iotech com Personal Daq 3000 Personal Daq 3001 Personal Daq 3005 ...

Страница 2: ...bers Serial numbers and module model e g 3000 3005 are clearly visible on the units Model 3000 3001 3005 Serial Number User Notes Module 1 Module 2 Module 3 Module 4 CAUTION Take ESD precautions packaging proper handling grounded wrist strap etc Use care to avoid touching onboard components Keep the modules clear of foreign elements such as oils water and industrial particulate Reference Note Adob...

Страница 3: ...iate ESD controlled area Such guidelines include the use of properly grounded mats and wrist straps ESD bags and cartons and related procedures a Connect signal lines to the removable screw terminal blocks ethod In the following figure voltage source V1 is connected to Channel 0 and to analog common and voltage source V2 is Single Ended V1 and V2 and Differential V3 Connections to Analog Input Cha...

Страница 4: ...tly via mating DB25 connectors as indicat n the following figure or indirectly via a CA 96A cable as indicated in the second old PDQ30 is n optional analog expansion module that can be used to add an additional 48 SE analog inputs Daq ed i figure When connected directly i e DB25 to DB25 two small clips included are used to h the modules together Direct Connection of Personal Daq 3000 and PDQ30 Do ...

Страница 5: ... t expansion m 2 r be required port cannot supply adequate power by ndards requi ply 2500 mW nominal at 5V 500 mA The po ption listed e Persona device o a PDQ30 odule A power adapte TR 2 will if the USB USB2 ports are USB2 sta red to sup computer upon connection of the USB cable that the unit requires minimal power from th computer s USB port If using a TR 2 be sure to supply power from it to the ...

Страница 6: ...e and the host PC Note that the Active LED will be on solid during a data acquisition If you need to ur device for example if you are writing a custom program for multiple ces navigate from the Windows Desktop to the Device Manager The navigation path is tartÖSettingsÖControl PanelÖSystemÖHardware Tab ÖDevice ManagerÖDaqx PnP Devices You will see the device listed in the format of PersonalDaq3000 ...

Страница 7: ...dentifies your Personal Daq 3000 Series device and ndow is discussed briefly in the following text and in more n the installation CD The Channel Setup window first tab on lo digital to configure them wer portion of main window displays the analog and scanned input channels and allows you Channel Setup Tab Selected Selecting the second tab of the main window displays the Acquisition Setup window us...

Страница 8: ...indow of the available DAC channels 9 Digital I O Displays the Digital I O window 10 Counter Timer Displays the Counter Timer window 11 Output Waveform Pattern Displays the Arbitrary Waveform and Streamed Output windows 12 Acquire Activates an acquisition of data to a file 13 Show all channels whether ALL Channels Expands Analog Scanned Digital Inputs spreadsheet to show active or not 14 Hide Chan...

Страница 9: ...mage In addit e above information please be sure to include rn authorizat s number after you contact us e structions regardi lesho s IOtech Inc Fax 440 439 4093 ch com port pr eive support call your service representative Before calling for assistance of the Personal Daq 3000 User s Manua he manual exists in A e Acrobat PDF format and ut n that appears data acquisition CD s install ou PC during so...

Страница 10: ...lect the L line frequency a 10 Click the A 11 Click OK to exit out of the Hardware Configuration window 12 Create an A D module in the DASYLab worksheet type pDaq3000 Direct AI 13 Double click on the module to open its Prop 14 Click on the Channel Setup button 15 Select the applicable thermocouple type and temperature units 16 Click the Apply and OK buttons Note 1 The maximum sampling rate is redu...

Страница 11: ...Personal Daq 3000 Series Installation Guide 957593 IG 11 Notes ...

Страница 12: ...ies Installation Guide IOtech Inc 25971 Cannon Road Cleveland OH 44146 1833 Phone 440 439 4091 Fax 440 439 4093 e mail Product Information sales iotech com e mail Technical Support productsupport iotech com Internet http www iotech com ...

Отзывы: