


EN-2
(The diagram is for illustration purposes only)
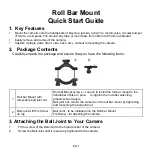
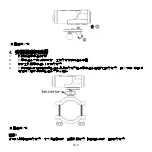
4. Mounting on the Handlebar or Pole
1.
Loosen both roll bar mount screws.
2.
Attach the roll bar mount to the handlebar or pole and tighten the screws until the mount is firmly
secured.
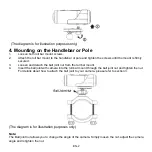
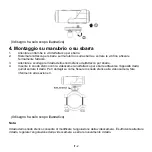
3.
Loosen and detach the ball joint nut from the roll bar mount.
4.
Insert the ball joint with camera into the roll bar mount through the ball joint nut and tighten the nut.
For details about how to attach the ball joint to your camera, please refer to section 3.
(The diagram is for illustration purposes only)
Note:
The Ball joint nut allows you to change the angle of the camera. Simply loosen the nut, adjust the camera
angle and retighten the nut.
Содержание Roll Bar Mount
Страница 1: ...Roll Bar Mount Quick Start Guide...
Страница 2: ......
Страница 15: ...RU 1 Roll Bar Mount 1 30 65 2 3 1 2 1 Roll bar Mount 2 Roll bar Mount...
Страница 16: ...RU 2 4 1 roll bar mount 2 3 roll bar mount 4 roll bar mount 3...
Страница 17: ...1 1 4x4 ATVs SUVs 30mm 65mm 2 3 1 2 1 2...
Страница 18: ...2 4 1 2 3 4 3...
Страница 19: ...1 1 4x4 ATVs SUVs 30mm 65mm 2 3 1 2 1 2...
Страница 20: ...2 4 1 2 3 4 3...
Страница 21: ......
Страница 22: ...AM QG ROLL 9L EU1...


