background image

16

MSK-101 | Advanced configuration manual v1.5 MAY 2018 | msk-101_advanced-config_en_wo v1.5 | © 2017-2018 Inxpect SpA

Installation and
configuration

Necessary components and tools

l

Wi-Fi dongle (product code: WSYNC-RJ-WIFI or
WSYNC-RJ-WIFI-US).

l

Android or iOS device with Wi-Fi enabled and the
Inxpect Security application installed (see
"Download the application" on page 7).

IMPORTANT: to ensure correct
functioning, allow all requested
permissions for the application.

l

Only for barrier applications and if necessary,
adapter for assembly (product code: MSK-101-
BM) (see "Barrier configuration" on page 11).

l

Two screws up to M4 (No.6) for fastening to the
wall or to the junction box.

l

Screwdriver, wire stripper and fastening tools not
provided.

Before installation

NOTICE: to ensure effective functioning, the
sensor must be installed in the best possible
position and configured correctly. Carefully
follow the instructions below.

Before installing the sensor, perform the following
operations:

1. Define the sensor application type (see

"Applications" on page 9).

2. Define the installation position, considering

possible interferences (see "Interferences" on
page 13
).

3. Define the height of installation for the sensor to

obtain the desired field of vision (see "Field of
vision" on page 11)
.

4. Run a shielded cable with the necessary

conductors from the alarm control unit to connect
the sensor (power supply and relay outputs).

5. Only for installations with MSK-101-BM adapter,

define the direction of the sensor (see "Barrier
configuration" on page 11)
.

Warnings

NOTICE: damage to the device. Do not let dust
or water near the sensor during installation.

Install MSK-101

1. Assemble the sensor:

For...

And...

See...

barrier
applications
with
adapter
MSK-101-
BM

sensor
directed
to the
right

"Assemble the sensor
with the MSK-101-BM
adapter (sensor directed
to the right)" on the
facing page

barrier
applications
with
adapter
MSK-101-
BM

sensor
directed
to the
left

"Assemble the sensor
with the MSK-101-BM
adapter (sensor directed
to the left)" on page 18

all other
cases

-

"Assemble the sensor"
below

2. "Connect the sensor to the alarm control unit" on

page 19.

3. " Direct the sensor and connect the dongle " on

page 19.

4. "Configure the sensor" on page 20
5. "Fasten the sensor" on page 21.

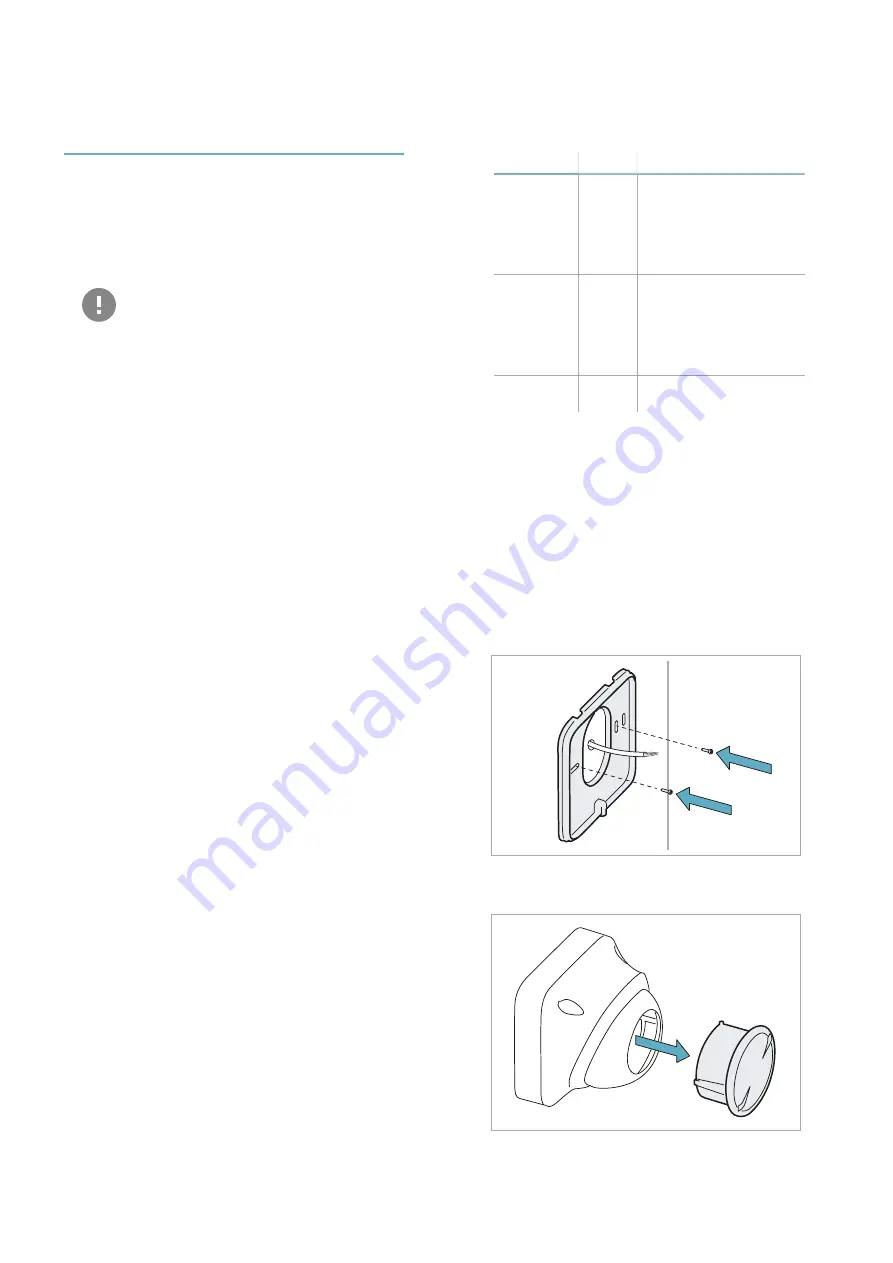
Assemble the sensor

1. Using the prepared holes, fasten the base to the

wall or to the junction box with two screws (not
provided). See "Perforated base dimensions" on
page 32
.

2. Extract the sensor from the adjustable support.

Installation and use

Содержание MSK-101

Страница 1: ...ual v1 5 EN Intelligent motion sensor Exclusive distributor for Europe Carefully read this manualin its entirety You willfind usefulinformation to take fulladvantage of the product s potential use it...

Страница 2: ...ginal format totally or partially l Transferring the document on websites or other electronic systems l Copying contents without any modification and stating Inxpect SpA as copyright owner Inxpect SpA...

Страница 3: ...rance level for animals 23 Manage semi static objects 23 Other operations 24 Maintenance and diagnostics 25 Diagnostics and troubleshooting 26 Updates 26 Maintenance 27 Appendix 28 Technical data 29 D...

Страница 4: ...advanced_config_en_ wo v1 2 Added flashing blue LED status sensor initialization phase Added tampering and masking signal levels Added configurable relay 4 Added barrier assembly accessory MSK 101 BM...

Страница 5: ...o know MSK 101 Contents This section includes the following topics MSK 101 6 Relay outputs 7 1 MSK 101 Advanced configuration manual v1 5 MAY 2018 msk 101_advanced config_en_wo v1 5 2017 2018 Inxpect...

Страница 6: ...alarms from the monitored area Main components Part Description A Perforated housing base for adaptation to the main junction boxes IMPORTANT the base of the container is together with the two fasteni...

Страница 7: ...l fault relay 4 l masking relay 1 relay 4 Note through the application it is possible to configure relay 4 to also signal sensor tampering With this configuration the sensor no longer complies with st...

Страница 8: ...nts This section includes the following topics Applications 9 Barrier configuration 11 Field of vision 11 Interferences 13 8 MSK 101 Advanced configuration manual v1 5 MAY 2018 msk 101_advanced config...

Страница 9: ...zontal direction l barrier sensor to monitor a perimeter area creating a protective barrier against access along a wall or gate vertical direction Examples of volumetric sensor installation Figure 1 I...

Страница 10: ...anced config_en_wo v1 5 2017 2018 Inxpect SpA Examples of barrier sensor installation Figure 4 Indoor wall installation Figure 5 Indoor ceiling installation Figure 6 Indoor hallway installation Figure...

Страница 11: ...sor directed towards the right Field of vision Range of the field with horizontal sensor direction volumetric In this installation the visual field of the sensor is approximately 90 along the horizont...

Страница 12: ...reported values may slightly vary based on the installation conditions Note only some heights are reported but every intermediate value is allowed and guarantees optimum performance Height h Inclinati...

Страница 13: ...sensor behind objects may impact the sensor performance even significantly in these cases checking correct functioning is completely the responsibility of the installer l Do not install it in the pre...

Страница 14: ...age 23 How to install several sensors Three possible combinations of sensor installation and the minimum distances to maintain between the sensors with the sensors aligned are presented as follows Res...

Страница 15: ...topics Installation and configuration 16 Use the application 22 Set the tolerance level for animals 23 Manage semi static objects 23 Other operations 24 3 MSK 101 Advanced configuration manual v1 5 MA...

Страница 16: ...on page 13 3 Define the height of installation for the sensor to obtain the desired field of vision see Field of vision on page 11 4 Run a shielded cable with the necessary conductors from the alarm c...

Страница 17: ...n the figure and fasten it to the wall or to the junction box with two screws not provided See Perforated base dimensions on page 32 2 Assemble the adapter to the base passing the cable with the wires...

Страница 18: ...e base of the sensor as shown in the figure and fasten it to the wall or to the junction box with two screws not provided See Perforated base dimensions on page 32 2 Assemble the adapter to the base p...

Страница 19: ...y outputs It is recommended to connect relay 3 tampering and 4 fault to a 24 h line from the alarm control unit Direct the sensor and connect the dongle 1 Insert the sensor into the adjustable support...

Страница 20: ...nclination below It can be fastened to the right or left of the sensor 45 downward inclination To make the connector for connecting the dongle accessible turn the adjustable support by 180 Configure t...

Страница 21: ...or adjust the area dimensions 11 To check correct functioning move around the set areas and check that the alarm and pre alarm LEDs turn on properly Note to disable the pre alarm area coincide the ala...

Страница 22: ...ct Calibration Channel after adding new sensors to the area 1 Connect the dongle to the sensor 2 Start the Inxpect Security application and connect the mobile device to the dongle the homepage with th...

Страница 23: ...vel homepage Pet tolerance level The tolerance for animals can be set in two ways l at three levels minimum medium maximum l fine tuning a value from 0 to 100 The maximum tolerance level is the recomm...

Страница 24: ...t and end of the object and pressing the button the field is automatically filled in with the current distance Check the setting of semi static objects 1 Display the homepage 2 Move near the semi stat...

Страница 25: ...Contents This section includes the following topics Diagnostics and troubleshooting 26 Updates 26 Maintenance 27 4 MSK 101 Advanced configuration manual v1 5 MAY 2018 msk 101_advanced config_en_wo v1...

Страница 26: ...ed area Adjust the tolerance level for animals applicationInxpect Security Pet tolerance level It is impossible to connect the application to the sensor Sensor not powered Check the electrical power s...

Страница 27: ...nce To guarantee compatibility between the application dongle and sensor perform updates in the following order 1 Application 2 Dongle 3 Sensor Maintenance Cleaning Remove any dust or dirt from the ou...

Страница 28: ...l data 29 Disposal 29 Conformity and restrictions 29 Service and warranty 30 Useful conventions for requesting assistance 31 Perforated base dimensions 32 28 MSK 101 Advanced configuration manual v1 5...

Страница 29: ...ions See Perforated base dimensions on page 32 Disposal The product must be disposed of at the relative recycling centers specified by the government or local public authorities Correct disposal and r...

Страница 30: ...trictions en FR il est strictement interdit d utiliser MSK 101 en France car la r partition nationale des fr quences ne permet pas la libre utilisation de la bande enti re 24 24 25 GHz Service and war...

Страница 31: ...municate with Inxpect SpA technical assistance are provided below Type of application Spatial direction Legend Icon Description Wall installation Ceiling installation Appendix MSK 101 Advanced configu...

Страница 32: ...32 MSK 101 Advanced configuration manual v1 5 MAY 2018 msk 101_advanced config_en_wo v1 5 2017 2018 Inxpect SpA Perforated base dimensions Appendix...

Страница 33: ......

Страница 34: ...pyright 2017 2018 Inxpect SpA Exclusive distributor for Europe TSec SpA Traversa di via Gavardina 74 25081 Bedizzole BS Italy www tsec it info tsec it 39 030 57 85 302 Manufacturer Inxpect SpA Via del...

Отзывы: