


SECTION 1—GENERAL GUIDELINES
Part No. 1141494
9
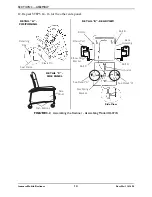
Invacare Mobile Recliners
Operation
of
recliner
with
missing
or
broken
footrest
or
recline
mechanism
guards
may
result
in
bodily
injury.
Periodic
inspection
of
the
footrest
guard
and
recline
mechanism
guard
MUST
be
made
four
times
a
year.
Torn,
cracked
or
otherwise
damaged
guards
MUST
be
replaced
prior
to
use.
Recliner
MUST
be
removed
from
service
until
replacement
guards
are
installed.
DO
NOT
lift
the
recliner
by
the
footrest.
Lifting
by
means
of
the
footrest
may
result
in
injury
to
the
user
and/or
damage
to
the
recliner.
DO
NOT
attempt
to
stop
the
recliner
with
the
wheel
locks,
while
in
motion.
Wheel
locks
are
not
brakes.
Before
attempting
to
transfer
in
or
out
of
the
recliner,
every
precaution
should
be
taken
to
reduce
the
gap
distance.
Turn
the
recliner
toward
the
object
you
are
transferring
onto.
When
transferring
to
and
from
the
recliner,
ALWAYS
engage
both
wheel
locks.
Special
care
MUST
BE
taken
with
people
that
have
physical
limitations
which
may
require
an
assistant.
DO
NOT
traverse,
climb
or
go
down
ramps
or
slopes
greater
than
9°.
Invacare
products
are
specifically
designed
and
manufactured
for
use
in
conjunction
with
Invacare
accessories.
Accessories
designed
by
other
manufacturers
have
not
been
tested
by
Invacare
and
are
not
recommended
for
use
with
Invacare
products.
Weight Limitation
The
weight
limitation
for
Invacare
Mobile
Recliners
is
250
lbs
(113.6
kg).
The
weight
limitation
for
model
IH6065WD
Wide
Recliner
is
400
lbs
(181.44
kg).
The
tray
for
models
IH6074A,
IH6065A,
and
IH6077A
has
a
weight
limitation
of
40
lbs
(18.2
kg).
Recline Option Operated by an Attendant
Test
the
recline
feature
of
the
recliner
first
without
an
occupant
to
ensure
the
gas
cylinder
is
operational.
DO
NOT
operate
the
recline
option
if
the
gas
cylinder
is
not
operational.
ALWAYS
make
sure
that
the
recliner
is
stable
before
using
the
recline
option.
Make
sure
the
patient
is
properly
positioned
in
the
recliner
before
reclining
or
inclining
to
maintain
maximum
stability
and
safety.
When
returning
the
occupant
of
the
recliner
to
the
full
upright
position,
more
body
strength
will
be
required
for
approximately
the
last
twenty
degrees
of
incline
(sitting
up).
Make
sure
to
use
proper
body
mechanics
(use
your
legs)
or
seek
assistance
to
avoid
injury.
Physical
limitations
of
a
user
and
larger
occupants
of
the
recliner
can
present
conditions
that
can
injure
the
assistant.
When
in
doubt,
assure
that
additional
assistants
are
present
before
operating
the
recline
feature.


