120
PO
SAVE THESE INSTRUCTIONS
(120PO)
ENGLISH 7.5” X 10.3” PANTONE 295U 10/10/2018
English
Page 11
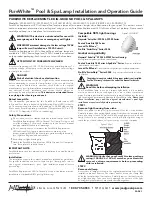
Unacceptable
Grade
Acceptable
Grade
Do not add
Remove
Remove
A
A
B
Always remove material from the top of the
slope rather than filling in the bottom.
2.1
GROUND PREPARATION
Select an outdoor location for the pool which should be on a level concrete pad. If there is no concrete pad
available, follow the instructions below to prepare the installation area. It is important you ask a professional
(builder or gardener) to perform the following ground preparation.
NOTE:
Tools are not included.
1.
Mark the installation area
• Once the location area is chosen, drive stake at
center point of where you wish pool to be located.
Attach string to center stake. Measure the length
A on string, and attach marking stick, paint marker,
or funnel with flour to string. Mark circumference of
pool area using string and marker (see drawing 1.1).
• For 15'8" (478 cm) pool, where
A = 8’3” (251.5 cm) = Radius of grass area need to
be removed and leveled.
For 16'8" (508 cm) pool, where
A = 8'9” (266.7 cm) = Radius of grass area need to
be removed and leveled.
For 18’8" (569 cm) pool, A = 9'9" (297.1 cm)
see drawing 1.2.
2. Clear the installation area
• Remove all grass, stones and sticks from marked area. Also remove center stake and string.
3. Leveling
• Establish lowest point in pool area. Level entire pool site by digging or scraping away uneven areas
to the level of the lowest point.
Always remove material from the top of the slope rather than
filling in the bottom
to ensure greater ground stability and firmness. When all the areas are level and
when excess ground is removed, you may fill any
small low areas
which are left to level (with fined
dirt). Always compact and level ground afterwards (see drawing 2.1).
POOL SETUP (continued)
1.1
A
A
B
1.2