background image

PEX-400111  


Interface Corporation 

34

 - 


8.3 Signals 

Signal Description 
Serial interface 

Signal


Pin Number 

Direction 

Description


CD


23 

Data carrier detect 


RD


27 

Input 

Receive data


SD


29 Transmit 

data


ER


31 

Output


Data terminal ready


DR


59 

Input 

Data set ready   

RS


61 Output


Request to send


CS


63 

Clear to send 


CI


65 

Input


Call indicator 


Parallel interface 

Signal


Pin Number 

Direction 

Description


nSTROBE


37 

Output 

This signal shows that valid data are output (on D0 

to D7). It is an active-low signal.


D0 to D7


3, 5, 7, 9, 11, 

13, 15, 17 

Input/output


These signals are data bus.


nACK


39 

This signal shows that the printer receives data 
correctly by negative pulses. It is an active high 
signal.


BUSY 

41 

This signal shows that the printer is not ready to 

receive data. It is an active-high signal.


PE 

43 

This signal shows paper-out condition. It is an 
active-high signal. 

SELECT 

45 

Input


This signal shows that the printer is selected. It is 
an active-high signal.


nAUTOFDX 

47 

Output


This signal is an auto line-feed signal. It is an 
active-low signal.


nERROR 

49 

Input


This signal shows that an error occurred. During 
error condition, the printer keeps low level. It is an 
active-low signal.


nINIT 

51 

This signal is an initialization signal. It is an 
active-low signal. 

nSELECTIN 

55 

Output 

This signal selects the printer. It is an active-low 
signal.


Содержание PEX-400111

Страница 1: ...Product Model PEX 400111 RS 232C Trasnfer rate 1 Mbps max 1 channel 1024 byte transmit receive FIFO Transmission length 15 m max Our original communications controller Serial IEEE 1284 Centronics comp...

Страница 2: ...This mark means that there is a possibility of death or serious injury if you ignore or do not follow the said instructions Caution This mark means that there is a possibility of injury or physical ha...

Страница 3: ...his product Interface module installation Device driver software installation Product summary Features External interface specifications Example connection of external equipment Technical Data Book Fr...

Страница 4: ...round the following label because of high temperature when using this product Do not remove the label from the product Do not touch around the following label because electric shock may occur when usi...

Страница 5: ...of this interface module Avoid the following conditions for storage and operation Extremely high temperature and humidity Exposure to the direct rays of the sun A lot of soot and dust Vibrations and m...

Страница 6: ...riodic Inspections The following inspections should be carried out on this product periodically Item Checkpoint Cable connections Be sure that all connectors and cables are installed correctly Card ed...

Страница 7: ...Software 12 Windows Server 2008 or Windows Vista 12 Windows Embedded Standard Windows XP Embedded Windows XP or Windows Server 2003 13 Windows 2000 15 4 1 2 Installation of Utility Disk 16 4 1 3 Unins...

Страница 8: ...Rates Bit Rate 28 7 3 2 Limitations on the Serial Interface Bit Rate Generator Programming 29 7 4 Interrupt Sources 30 7 5 Serial Interface Half duplex Control 30 7 6 AC Characteristics 31 Chapter 8 E...

Страница 9: ...rd parallel port The feature allows you to use the port as an expansion printer port and input from a peripheral device such as a printer or image film scanner 1 1 Features Serial interface Our origin...

Страница 10: ...five modes Byte Compatibility ECP EPP and Nibble The ECP mode does not support simultaneous operation of this product and a standard printer port Some of the modes may be unavailable due to your oper...

Страница 11: ...ule ID rotary switch RSW1 The rotary switch on each of our inteface modules identifies each interface module in cases where our multiple interface modules of the same type are installed in the same sy...

Страница 12: ...ence purpose only 1 Make sure that the system is turned off and unplug the power cord 2 Remove the PC case cover and a slot cover 3 Insert the interface module into an open slot Insert the interface m...

Страница 13: ...the device drivers Downloading procedure Download the Driver Disk of GPF 4150 for your operating system from our Web site Execute the downloaded program and then a folder is created Note Please refer...

Страница 14: ...ox will appear select Locate and install driver software recommended 3 Select Don t search online 4 Click I don t have the disc Show me other options 5 Click Browse my computer for driver software adv...

Страница 15: ...ROM for your operating system and specify your CD ROM drive to copy To verify you have successfully installed the software follow the instructions described below Restart your computer Click the Hard...

Страница 16: ...for its operating system from our Web site 2 Execute the downloaded program and then Win2000 folder is created How to install the driver 1 Start up the Component Database Manager of Windows Embedded S...

Страница 17: ...uccessfully installed the software follow the instructions described below Restart your computer Click the Hardware tab in the System Properties dialog box and click Device Manager The list of devices...

Страница 18: ...3 Uninstallation of Utility Disk Windows Server 2008 or Windows Vista 1 Click the Start button and Control Panel 2 Click the Programs Programs and Features and then Uninstall or Change a program 3 Cli...

Страница 19: ...as a super user su Password Password of root 2 Change the current directory to where you downloaded the file and then decompress the file cd tmp tar xvzf gph4141_ architecture name 1 _ version 2 tgz...

Страница 20: ...root Load a Real Time module for RTLinux rtlinux start 2 Load the driver modules for kernel Linux modprobe cp4141 RTLinux modprobe rcp4141 3 Confirm that the communications port is recognized by usin...

Страница 21: ...hen compile and install the modules cd usr src interface gph4141 architecture name 1 OS name 2 drivers src make make install Notes 1 Write i386 or sh4 depending on the architecture of your computer 2...

Страница 22: ...ory lgph8208 architecture name 1 tgz Driver software archive for Linux rgph8208 architecture name 1 tgz Driver software archive for RTLinux common tgz Common module archive readme txt Latest informati...

Страница 23: ...usr src interface gph8208 architecture name l rtl drivers sh insrtlpara sh 4 Create the program to control the device 5 Run the shell script for loading cancellation to cancel the loading of RTLinux...

Страница 24: ...lation 5 1 Interface Module Uninstallation 1 Make sure that your computer is turned off and unplug the power cord from the AC outlet Remove the PC case cover 2 Remove the screw from the interface modu...

Страница 25: ...nnels 1 channel Communications standards RS 232C EIA 574 compliant Isolation No isolation Control signals CD CI CS DR ER RD RS SD Base clock frequencies 8 192 MHz 12 288 MHz 14 7456 MHz 19 6608 MHz 32...

Страница 26: ...standard Centronics compatible Windows standard parallel port Standard parallel ports supported Isolation No isolation Parallel communications controller ST78C36 Exar Corporation or equivalent IEEE 1...

Страница 27: ...8 kV Contact discharge Surge protection voltage 15 kV 15 kV Air gap discharge 6 2 2 Parallel Interface Absolute Maximum Rating Parallel Item Min Max Condition 2 0 V 7 0 V 40 ns transient Input voltage...

Страница 28: ...face Corporation 26 Communications controller Base clock selection Bit rate generator Parallel communications controller ST78C36CJ44 Interrupt circuit RS 232C transceiver IEEE 1284 transceiver CN1 Par...

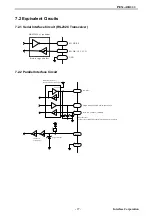
Страница 29: ...Built in surge absorber GND 7 2 2 Parallel Interface Circuit BUSY R GND 1 2 k 74VHC14 or equivalent Surge absorber VCC_cab Surge absorber 74F1071 Fairchild Semiconductor Incorporated or equivalent D0...

Страница 30: ...Bit Rate Generator Programming page 29 for more details The PEX 400111 supports only asynchronous communications Base Clock Frequency 8 192 MHz 12 288 MHz14 7456 MHz 19 6608 MHz 32 MHz 49 152 MHz 58 9...

Страница 31: ...aseClk BitRate 16 Select one of base clock frequencies from 8192000 Hz 12288000 Hz 14745600 Hz 19660800 Hz 32000000 Hz 49152000 Hz and 58982400 Hz If the divisor results in a decimal fraction the comb...

Страница 32: ...low control Parallel interface ACK signal ERROR signal in the ECP mode 7 5 Serial Interface Half duplex Control The PEX 400111 supports the half duplex transmission This function controls signals and...

Страница 33: ...200 ns T11 nSTROBE active to BUSY active 0 ns T12 BUSY active to nSTROBE inactive 80 ns 180 ns T13 D0 D7 BUSY setup to nACK active T14 D0 D7 data hold from nAUTOFDX active 0 ns T15 nACK inactive to n...

Страница 34: ...may lead to malfunctions product failure and or injury To achieve precise data acquisition we recommend you to use shielded or shorter cables as much as possible to eliminate interference caused by n...

Страница 35: ...ed Reserved nSELECTIN Reserved Reserved Reserved nINIT Reserved nERROR Reserved nAUTOFDX Reserved SELECT Reserved PE Reserved BUSY Reserved nACK Reserved nSTROBE GND GND GND Reserved Reserved ER Reser...

Страница 36: ...bus nACK 39 This signal shows that the printer receives data correctly by negative pulses It is an active high signal BUSY 41 This signal shows that the printer is not ready to receive data It is an a...

Страница 37: ...2 Cabling with Branch Cable CWB 9125RD 35 Interface Corporation CN1 CN2 CN3 25 pin D sub female connector Connector 17DE 13250 C DDK Ltd or equivalent Connector cover 17JE 25H 1C DDK Ltd or equivalent...

Страница 38: ...g our optional products the serial interface connector of the PEX 400111 will be converted to 9 pin D sub connector Do not open any input signals If input signals CD CI CS and DR are not used for comm...

Страница 39: ...using a cross cable Cross cable Function generator Optional terminal block TNS 6840 Cross cable Optional cable CWB 9125RD Function generator Function generator 9 pin D sub RD CS RS DR GND ER SD RD CS...

Страница 40: ...terface connector of the PEX 400111 will be converted to 1284 A connector 25 pin D sub connector 25 Pin D sub Connector 1284 A Connect our optional product to CN1 of the cable IEEE 1284 A A cable as s...

Страница 41: ...5 16 CN2 connector pin number 25 24 23 22 21 20 19 27 26 33 30 29 28 18 23 22 21 19 CN1 connector pin number 25 28 29 22 23 24 25 GL 25L Honda Tsushin Kogyo Co Ltd or equivalent Connector 1 57 30360 D...

Страница 42: ...1 15 6 CN2 connector pin number 13 12 11 10 9 8 7 1 3 16 14 4 17 2 5 1 6 5 4 3 2 CN1 connector pin number 9 8 7 10 11 12 15 14 13 16 17 33 24 CN1 connector pin number 31 30 29 28 27 26 25 22 19 20 18...

Страница 43: ...you want to use the product in a starndard slot replace the low profile panel with a standard panel that cames with this product 9 1 How to Exchange 1 Release the screws and hexagon nuts that hold the...

Страница 44: ...1 3 Assemble the standard panel to the product in the reverse procedure Standard panel Caution Use an appropriate driver bit not to strip the thread Fix the screws tightly not to loose Interface Corpo...

Страница 45: ...68 pin 0 8 mm Pitch Male Cable 1 5 m 4 92 ft CWB 9125RD Printer Branch Cable Serial 9 Pin D Sub Connector Parallel 25 Pin D Sub Connector Terminal Blocks Model Description TNS 6840 68 Pin 0 8 mm Pitc...

Страница 46: ...evice driver software a registered user ID is required Technical Support Frequently asked questions white papers glossary and so on Product Information What s new specifications product selection guid...

Страница 47: ...5 Interface Corporation Revision History Version Date Comments 1 0 November 2009 First Release Due to constant product improvements the information in this USER S MANUAL is subject to change without p...

Страница 48: ...nd part number of your product Those without internet access should contact the Customer Support Center Please refer to the insertion about repair replace and export of Interface products In principle...

Страница 49: ...If you would like to inquire our products please contact below Phone 0120 447213 in Japan Available from 9 00 a m to 5 00 p m Monday to Friday except for holidays and company holidays Customer Support...

Отзывы: