5
Interchange Brands Framing Nailers: Operator’s Manual
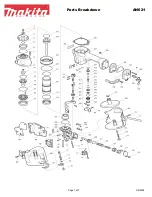
NSR83-21 TOOL USE:
USO DE LA HERRAMIENTA: NSR83-21
CHARGEMENT ET UTILISATION DE LA
CLOUEUSE NSR83-21
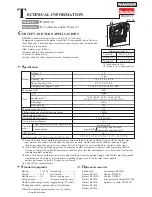
Pull the nail feeder back until it latches.
Jale el alimentador hacia atrás hasta que
enganche.
Tirez le poussoir jusqu’à ce qu’il s’enclenche.
Insert nail strips one by one into the slot from above
the magazine.
Inserte las tiras de clavo una por una en la
ranura de arriba del dispositivo.
Insérez les bandes de clous une à la fois, dans
la fente par le dessus du magasin.
Press the stop lever and slide the nail feeder forward
until it makes contact with the nail strip.
Oprima la palanca y abra el alimentador de clavo
hasta que haga contacto con la tira de clavo.
Appuyez sur le levier d’arrêt et faites glisser le
poussoir de clous par l’avant jusqu’à ce qu’il
entre en contact avec la bande de clous.
Notes:
Nota:
Notes :
Nail strips should include minimum 5 nails.
Las tiras de clavo deben incluir un mínimo de 5
clavos.
Une bande de clous devrait contenir un minimum
de cinq clous.
Attach the air supply. The nailer is now ready to
operate.
Juntar el suministro de aire. La clavadora esta
lista para ser utilizada.
Branchez l’alimentation d’air. La cloueuse est
maintenant prête à être utilisée.
4
3
Stop Lever
NSC83-28 and NSC83-34 TOOL USE:
USO DE LA HERRAMIENTA:
NSC83-28 y NSC83-34
CHARGEMENT ET UTILISATION DES
CLOUEUSES NSC83-28 ET NSC83-34
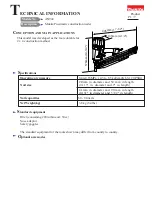
Load the nails in the magazine; insert the first of the
nails into the opening at the rear of the magazine.
Carge los clavos en el dispositivo; inserte los
primeros clavos en la ranura del dispositivo.
Chargez les clous dans le magasin ; insérez
le premier clou dans l’ouverture à l’arrière du
magasin.
Ensure the heads of the nails line up and slide on the
nail rail. Engage the last nail and release.
Asegurese que las cabezas de los clavos esten
alineados en el carril. Engrane el ultimo clavo y
suelte.
Assurez-vous que la tête des clous s’alignent
et glissent dans le rail des clous. Engagez le
dernier clou et libérez.
Pull the nail feeder from the front of the tool to the
rear and release it engaging the back of the nail strip.
Jale el alimentador de clavos de enfrente de la
herramienta ala ranura y suéltelo, engrane la tira
de clavos.
Tirez le poussoir de clous de l’avant de l’outil vers
l’arrière et relâchez-le, pour engager l’arrière de
la bande de clous.
Attach the hose to the Quick Connect Coupler on the
back of the nailer.
Unir la manguera a el Conector Rápido que se
encuentra detrás déla clavadora
Attachez le boyau d’air au raccord à l’arrière de
la cloueuse.
The nailer is now ready to operate.
La clavadora esta lista pra ser utilizada.
La cloueuse est maintenant prête à être utilisée.
7
8