Intelligent Home 2-Easy DT601 Fingerprint Скачать руководство пользователя страница 17

-15-

Present Master 

Fingerprint

 in

standby mode

 to enter 

Programming mode

LED 1         LED 2                  Buzzer

beep+,beep

(green)

(off)

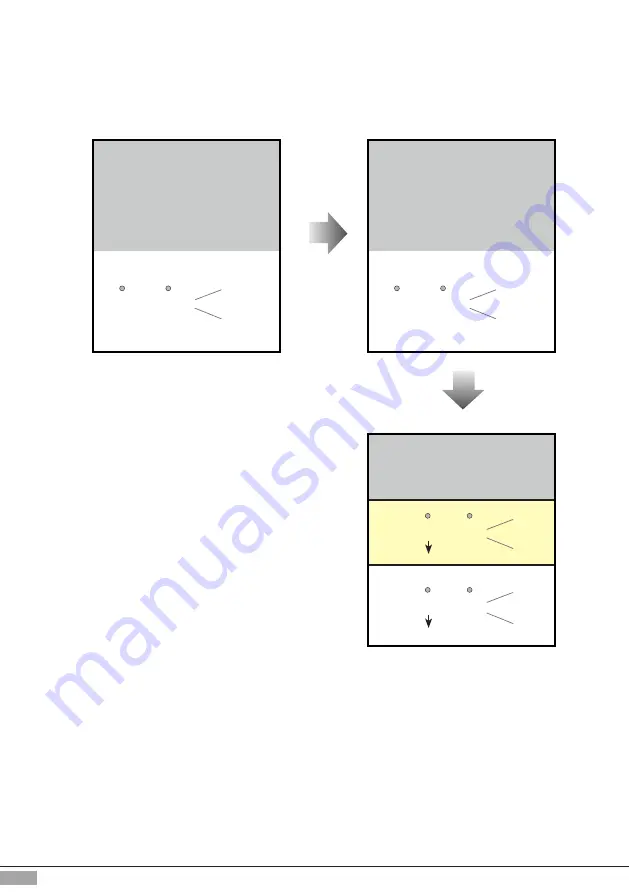
7.3 Delete All User Fingerprints

Present Master

 Fingerprint 

to 

delete all user fingerprints

 at 

once

LED 1        LED 2            Buzzer

beep+

(    green,

flash 3 times)

Success:       

(red)

LED 1        LED 2            Buzzer

beep+,beep,beep

(      red,

flash 3 times)

Failure:       

(off)

Press and hold "KEY1" and 

"KEY2" button at the same time

LED 1         LED 2                  Buzzer

beep+,beep

(off)

(double flash)

(on)

(double  

  flash

)

Note: 

After succ

e

s

s

ful

 second identifi

cation 

the system will exit 

Programming mode and

return to 

standby

.

 I

f

 it fails, the system will return to the 

first identifi

cation operation

Note: 

If there is

 no activity

 within 10


s

econds, system will exit Programming mode

Содержание 2-Easy DT601 Fingerprint

Страница 1: ...Surface mount Flush mount 2 Easy 2 wire series Door Station Mod DT601 Fingerprint www intelligenthomeonline com ...

Страница 2: ...t The door station facia is made of stainless steel There are both surface mount and flush mount versions Door station is equipped with built in Fingerprint Reader for up to 200 users Door station can be connected to one electric gate lock by default or to two locks with an additional DT RLC Lock Interface Key1 and Key2 location see drawing above Key1 and Key2 are used for programming so it is imp...

Страница 3: ...t Lock Control Jumper To program electric lock type Main Connect Port To connect the bus line and the electric lock BUS Connect to the bus line no polarity PL Additional power supply for the lock input connect to the power positive power S Lock power output S Lock power output ...

Страница 4: ... to the wall Attach the door station to the rain cover Secure with screws Connect the cable Surface Version Mounting 2 Surface mount version will be supplied with stainless steel rain mounting bracket Flush mount version will be supplied with wall mounting box Please use drawings below for installation tips ...

Страница 5: ... to match the size of the mounting box and install the wall box Attach the door station to the mounting box and secure with screws Connect the cable 1 Monitor Kit Connection Diagram BUS IM BUS DS PC6 AC L1 L2 PL S S Doorbell Button Switch 1 2 3 ON DIPS 3 ...

Страница 6: ...per position 2 3 1 2 3 LOCK Take off the Jumper POWER SUPPLY BUS PL S S Automated Gates and Magnetic Locks 1 Connect low voltage box of the gate according the diagram Use power supply for magnetic lock according lock specs 2 The inside relay contact is restricted to AC or DC 24V 1A 3 The jumper must be taken off The Unlock Mode parameter for Power on to unlock would be 0 default no need extra prog...

Страница 7: ...switch BUS IM BUS DS PC6 AC Notes 1 Door Station and Lock must be connected and powered up before programming 2 To find how to access Installer Setup menu refer to the monitor manual 3 New parameters will be synced automatically 1 Touch icon on main menu page 2 Touch UNLOCK button and hold for 2s 3 A digital keypad will be shown About Local Address 00 00 Video Standard AUTO System Verson 00 01 00 ...

Страница 8: ... 6 Multiple Monitors Connection via Daisy chain Door Station ID Address 0 default BUS IM BUS DS PC6 AC 100 240VAC Code 14 Code 15 Code 0 ...

Страница 9: ...DBC 4A distributor Door Station ID Address 0 default Code 0 OFF ON OFF ON DBC4A A B C D DBC4A A B C D Impedance switch Impedance switch 100 240VAC BUS IM BUS DS PC6 AC Code 2 Code 1 Code 3 Code 12 Code 14 Code 13 Code 15 7 ...

Страница 10: ... Door Station Address ID would be 0 default Second Door Station Address ID would be 1 Third Door Station Address ID would be 2 Forth Door Station Address ID would be 3 Followed by pressing the KEY2 button each time you press KEY2 to replace the ID Note The ID will cycle between ID0 ID1 ID2 ID3 LED 1 Buzzer beep one green flash one ID0 beep twice ID1 beep 3 times ID2 beep 4 times ID3 green flash tw...

Страница 11: ... time count starts release KEY2 to end The time of pressing and holding KEY2 equal to unlocking time Timing Unit 1s LED 1 Buzzer beep once per second green flash once per second Unlocking Time Settings The unlocking time can be set to 1 30 seconds The default is 1s Note any operation must be done within 10s of door station powered up Note If there is no activity within 10 seconds system will exit ...

Страница 12: ...ne ringtone B Continuous ringtone C No ringtone The default is A One ringtone Followed by pressing the KEY2 button each time you press KEY2 to replace the ringtone mode Note The ringtone mode will cycle between A B C LED 1 Buzzer beep one A beep twice B beep 3 times C green flash one green flash twice green flash 3 times Note any operation must be done within 10s of door station powered up Note If...

Страница 13: ...eep green flash 3 times on Success red LED 1 LED 2 Buzzer beep beep beep red flash 3 times off Failure off If second identification was suc cesfull the system will exit setting mode and return to the standby If it fails the system will return to the operation of first identified Repeat second identification once again Master Fingerprint enables you to register or delete user s fingerprints and pro...

Страница 14: ...ff Failure red Present new Master Fingerprint get it first time identified LED 1 LED 2 Buzzer beep beep green flash 3 times off Success blue LED 1 LED 2 Buzzer beep beep beep red flash 3 times off Failure off Touch new Master Fingerprint get it second time identified LED 1 LED 2 Buzzer beep green flash 3 times on Success red LED 1 LED 2 Buzzer beep beep beep red flash 3 times off Failure off Note ...

Страница 15: ...identified LED 1 LED 2 Buzzer beep green flash 3 times Success off LED 1 LED 2 Buzzer beep beep beep red flash 3 times Failure off Note After succsesful second identification the system will exit Programming mode and return to the standby When it fails the system will return to the operation of first identified Note any operation must be done within 10 seconds of the door station powering up The s...

Страница 16: ...ingerprint Present the fingerprint you need to delete LED 1 LED 2 Buzzer beep beep green flash 3 times Success off LED 1 LED 2 Buzzer beep beep beep red flash 3 times Failure off Press KEY2 LED 1 LED 2 Buzzer beep beep off flash quickly flash quickly flash quickly Note If there is no activity within 10 seconds system will exit Programming mode ...

Страница 17: ...imes Success red LED 1 LED 2 Buzzer beep beep beep red flash 3 times Failure off Press and hold KEY1 and KEY2 button at the same time LED 1 LED 2 Buzzer beep beep off double flash on double flash Note After successful second identification the system will exit Programming mode and return to standby If it fails the system will return to the first identification operation Note If there is no activit...

Страница 18: ... with the unit You must use the right adaptor which is supplied by the manufacture or approved by the manufacturer High voltage spikes will destroy the product Please get it serviced only by a trained and qualified professional Power Supply DC 24V Power Consumption Standby 34mA Working status 158mA Camera Color ARS 500 TV Lines Lock Power supply 12Vdc 280mA Internal Power Mounting Surface mount DT...

Страница 19: ...y connection Recommended cables twisted pair power flex multi cores stranded speaker cable CAT5 CAT6 Minimum requirements 0 5mm cable up to 2mm depends on distance When Monitor quantity 20 Cable Usage A B C Twisted cable 2x0 75 mm2 60 60 60 Twisted cable 2x1 mm2 150 1500 1000 When Monitor quantity 20 Cable Usage A B C Twisted cable 2x1 mm2 70 70 70 Twisted cable 2x1 5 mm2 100 100 100 ...

Страница 20: ...bling the device 4 Attempting to force the device to perform functions for which it is not intended 5 Attaching the device to power supplies other than thoserecommended by the manufacturer Distributor for Warranty purposes Intelligent Home Online Ltd 62 Hartley Old Road Purley Surrey CR8 4HJ 44 0 20 86170015 www intelligenthomeonline com Product _____________________________________________ Serial...

Страница 21: ...The design and specifications can be modified without notice to the user Right to interpret and copyright of this manual are reserved www intelligenthomeonline com ...

Отзывы: