background image

7

General Installation Process

12

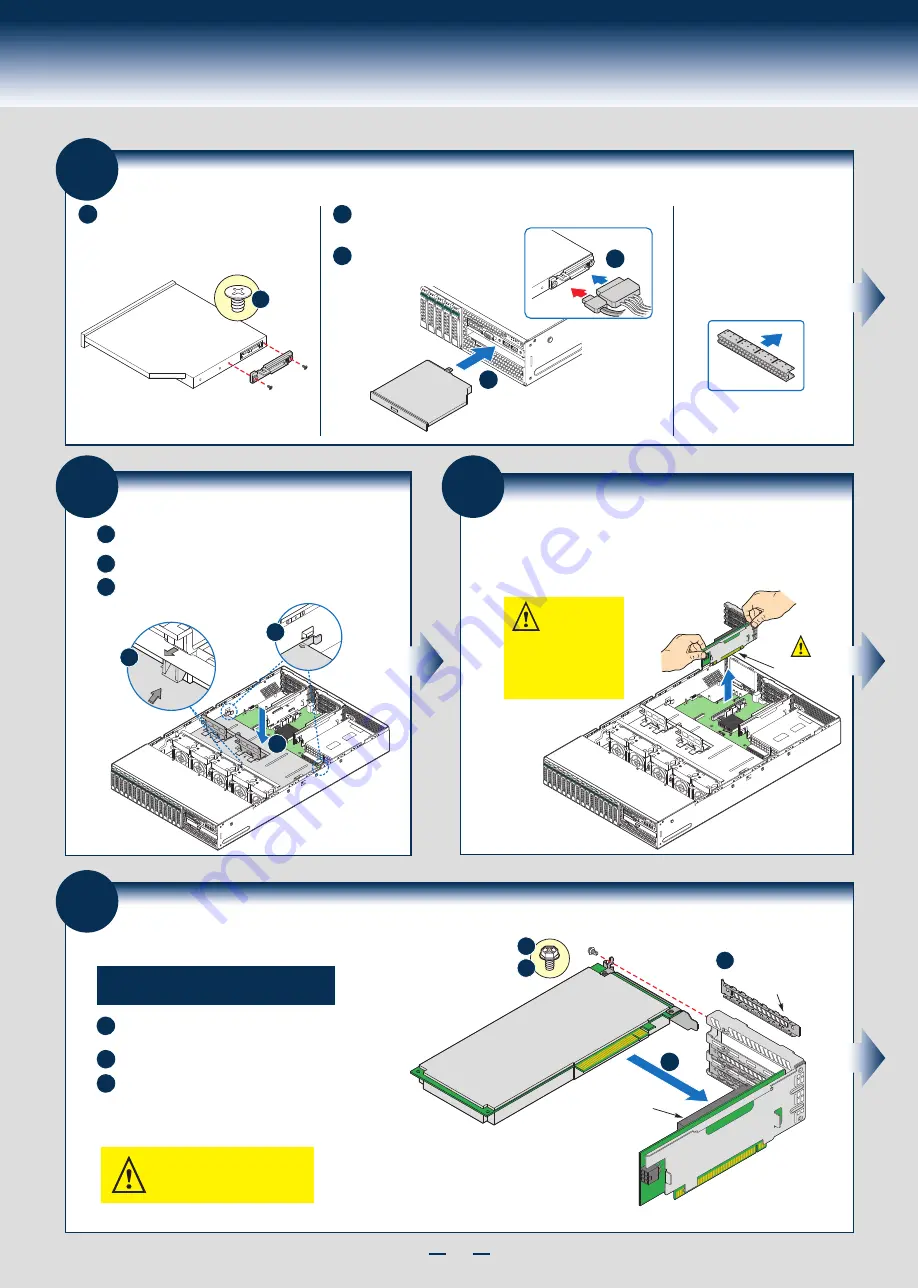
Install Add-in Card(s)

 Full-height PCIe Card Shown

Riser Connector

 REMOVE Filler Panel

A

B

Add-in Card

C

A

A

B
C

CAUTION:

Observe normal ESD precautions 

when installing add-in cards.

Remove the filler panel from the add-in card slot and 

remove the screw as shown.
Insert add-in card until it seats in the riser connector.
Secure add-in card with screw as shown.


NOTE: Make sure that all empty add-in card slots have 

filler panels installed.

NOTE: Add-in card install sequence for low-profile add-in 

cards is the same.

11

Remove 

Add-in Card

Riser Assembly

Grasp the riser assembly with both hands 

and pull up to remove from system.

          CAUTION:

Place the riser 

assembly upside down 

to avoid damage to the 

riser card connector.

Riser Card

Connector

10

Install the Air Duct

Use care to avoid pinching system cables.

Lower front edge of the air duct to engage the two tabs 

on the fan bulkhead.

A

Carefully push in the two latches on the air duct.

B

Push down the air duct into place.

C

C

A

B

9

Install Optical Drive

A

B

IMPORTANT NOTE: If you do not 

install a device at this location, 

install the optical device bay filler 

panel shown below.


This is 

required to maintain proper 

system cooling.

Rear View

of Optical

Drive

A

Install the plastic guide onto the back 

of the drive and attach with two screws 

as shown.

Insert the optical drive into chassis opening 

and push all the way until it stops.

C

Connect the cables as 

shown.

Optical

Device 

Assembly

B

Data

Power

Optical

Drive

C

Содержание R2000GL series

Страница 1: ...iar with ESD Electrostatic Discharge procedures used during system integration see the complete ESD procedures described in your Service Guide This guide and other supporting documents are located on...

Страница 2: ...This page is intentionally left blank...

Страница 3: ...ules 4 Install Hard Drives 5 Install Optical Drive 7 Install the Air Duct 7 Remove Add in Card Riser Assembly 7 Install Add in Card s 7 Install Add in Card Riser Assembly 8 Install Rack Handles 8 Inst...

Страница 4: ...ed memory slots can be populated with a DIMM or supplied DIMM Blank Memory population rules apply when installing DIMMs DIMM Population Rules on CPU 1 Install DIMMs in order Channels A B C and D Start...

Страница 5: ...essors installed The SCU1 4 7 port requires an Intel RAID C600 Upgrade Key installed to be functional System Features and Components 2 5 Hard Drive Bay system as shown Hot Swap Hard Drive Bays System...

Страница 6: ...cables and components that may have occurred during shipping 2 Remove the Top Cover B Remove the four screws Slide cover back and lift upward A A B B 3 Remove the Air Duct Carefully push in the two l...

Страница 7: ...ll the Processor s A Open the Socket Lever B Open the Load Plate A B Repeat step A to release the lever on the other side Push down the lever and slide away from the socket to release it A B Open the...

Страница 8: ...e screws 3 and 4 Repeat steps C and D by giving each screw two rotations each time until each screw is lightly tightened up to a maximum of 8 inch lbs torque Install Memory Modules Continued Memory Co...

Страница 9: ...ly Hard Drive Numbering Diagram Drive 0 Primary 24 x 2 5 hard drive bay as shown A A B Press the green latch to unlock Pull out the black lever and slide the carrier out B D C Remove the four screws f...

Страница 10: ...ews as shown Slide the 2 5 HDD into the bracket to align the screw holes with the right and left rail Break off the tab on the HDD interface bracket Install 2 5 Hard Drive as option Secure the hard di...

Страница 11: ...tem CAUTION Place the riser assembly upside down to avoid damage to the riser card connector Riser Card Connector 10 Install the Air Duct Use care to avoid pinching system cables Lower front edge of t...

Страница 12: ...Slide back the card guide on the air duct Pull up the blue plastic pin out of the card guide B C Position the riser card edge connector over the server board riser socket and align the two hooks on t...

Страница 13: ...provided with the rack mounting kit 3 Connect your USB keyboard mouse video and other I O cables devices as shown Then connect the power cord s CAUTION This system must be operated with the TOP COVER...

Страница 14: ...System R2000GZ GL Service Guide for more information Use the instructions provided with the RAID controller and with the operating system With the operating system running insert the Intel Server Depl...

Страница 15: ...systems integrated with Intel Server Board S2600GZ only ID LED RMM4 NIC Riser Slot 1 Riser Slot 2 Main Power 2 Main Power 1 I O Expansion Module Connector Serial B TPM Connector IPMB HSBP I2 C SATA 0...

Страница 16: ...12 Reference A complete list of accessories and spares can be found at http www intel com support System Fan Connection 1 2 3 4 5 Air Flow FAN 1 FAN 2 FAN 3 FAN 4 FAN 5...

Страница 17: ...ions see Intel RAID C600 Upgrade Key Installation Guide A second SSD is supported when the optical drive is NOT in use For cable routing please refer to Page 14 For system with 8 x 3 5 hard drive bay...

Страница 18: ...em with 12 x 3 5 hard drive bay 12 x 3 5 HSBP Server Board Power Supply SSD SSD BBU Intel Integrated RAID Module Intel RAID Expander Card RES2SV240 Installed into PCIe Riser Card Front Panel I 2 C 2 3...

Страница 19: ...rade Key must be installed For instructions see Intel RAID C600 Upgrade Key Installation Guide A second SSD is supported when the optical drive is NOT in use For cable routing please refer to Page 17...

Страница 20: ...s supported when the optical drive is NOT in use For cable routing please refer to Page 17 Server Board Power Supply Optical Drive SAS Expander BBU SSD Intel Integrated RAID Module 8 x 2 5 HSBP 8 x 2...

Страница 21: ...rd a proper Intel RAID C600 Upgrade Key must be installed For instructions see Intel RAID C600 Upgrade Key Installation Guide Server Board Power Supply SAS Expander BBU SSD SSD Intel Integrated RAID M...

Страница 22: ...G31061 004...

Отзывы: