background image


72


Controlling Other Components


—Continued


Remote Control Codes for Integra/Onkyo 


Components Connected via 


Integra/Onkyo components that are connected via 


are controlled by pointing the remote controller at the 
AV receiver, not the component. This allows you to con-
trol components that are out of view, in a rack, for exam-
ple.

If you want to control an Integra/Onkyo component by 
pointing the remote controller directly at it, or you want 
to control an Integra/Onkyo component that’s not con-
nected via 

, use the following remote control codes:

• [DVD] Remote Mode button


30627:


Integra/Onkyo DVD player without 


(default)

• [CD] Remote Mode button


71817:


Integra/Onkyo CD player without 


(default)

• Appropriate Remote Mode button


82990:


Onkyo RI Dock without 


Note:


• If you connect an 

-capable Onkyo MiniDisc 

recorder, CD recorder, or RI Dock to the TAPE 
IN/OUT jacks, or connect an RI Dock to the 
GAME/TV jacks, for 

 to work properly, you must 

set the Input Display accordingly (see page 41).


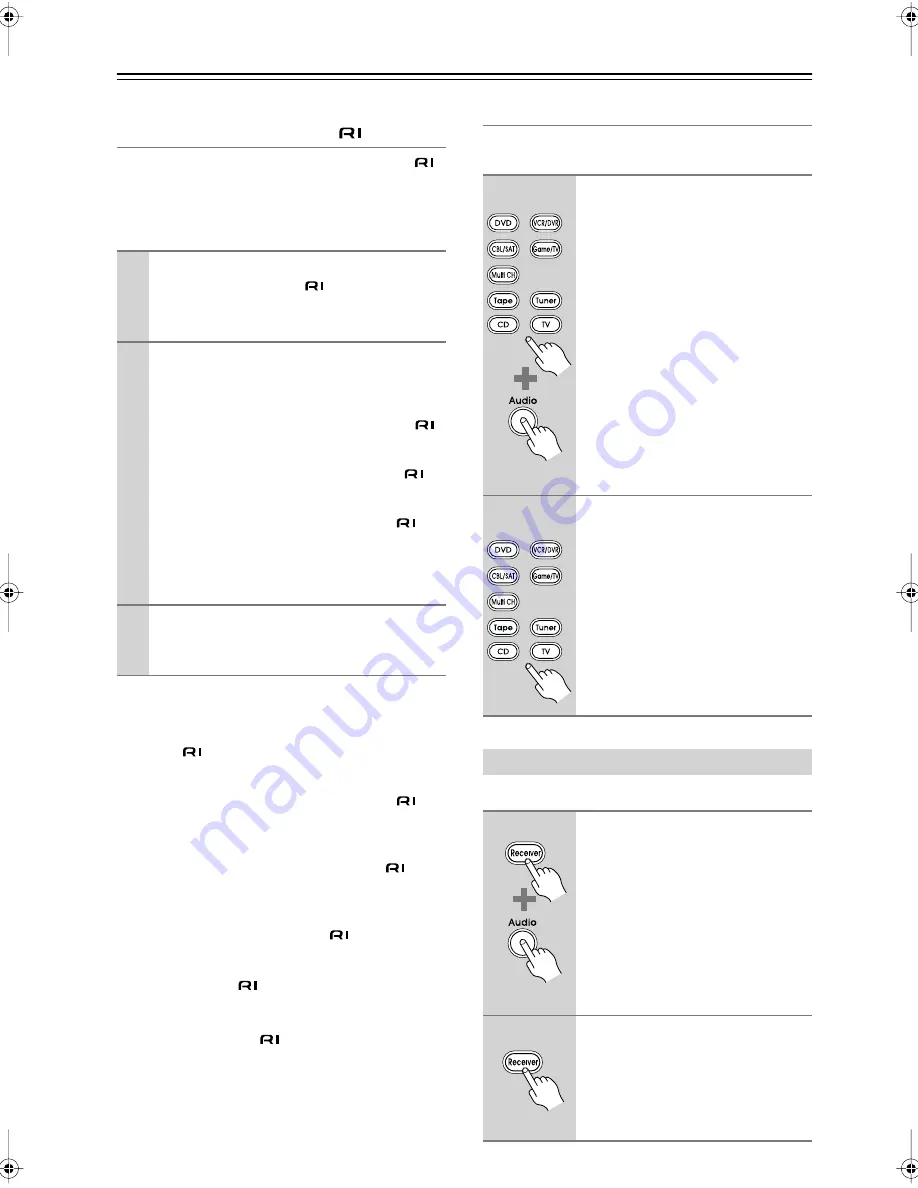
Resetting the Remote Mode Buttons


You can reset a Remote Mode button to its default 
remote control code.

You can reset the remote controller to its default settings.


1


Make sure the Integra/Onkyo component 
is connected with an 

 cable and an 

analog audio cable (RCA).


See page 33 for details.


2


Enter the appropriate remote control code 
to the Remote Mode button.


• [DVD] Remote Mode button


31612:


Integra/Onkyo DVD player with 

• [CD] Remote Mode button


71327:


Integra/Onkyo CD player with 

• [Tape] Remote Mode button


42157:


Onkyo cassette recorder with 


(default)

See the previous page for how to enter remote 
control codes.


3


Press the Remote Mode button, point the 
remote controller at the AV receiver, and 
operate the component.


1


While holding down the Remote 
Mode button that you want to 
reset, press and hold down the 
[Audio] button until the Remote 
indicator lights up (about 3 sec-
onds).


2


Within 30 seconds, press the 
Remote Mode button again.


The Remote indicator flashes twice, 
indicating that the button has been 
reset.
Each of the Remote Mode buttons is 
preprogrammed with a remote control 
code. When a button is reset, its prepro-
grammed code is restored.


Resetting the Remote Controller


1


While holding down the 
[Receiver] Remote Mode button, 
press and hold down the [Audio] 
button until the Remote indicator 
lights up (about 3 seconds).


2


Within 30 seconds, press the 
[Receiver] Remote Mode button 
again.


The Remote indicator flashes twice, 
indicating that the remote controller 
has been reset.

(3 seconds)

(3 seconds)

DTR-4.9̲En.book Page 72 Tuesday, April 15, 2008 5:13 PM

Содержание DTR-4.9

Страница 1: ...DTR 4 9 Instruction Manual AV Receiver ...

Страница 2: ...er adjustment of other controls may result in damage and will often require extensive work by a qualified technician to restore the apparatus to its normal operation E If the apparatus has been dropped or damaged in any way and F When the apparatus exhibits a distinct change in performance this indicates a need for service 16 Object and Liquid Entry Never push objects of any kind into the apparatu...

Страница 3: ...d use This is normal If you do not use this unit for a long time it may not work properly the next time you turn it on so be sure to use it occasionally For U S models FCC Information for User CAUTION The user changes or modifications not expressly approved by the party responsible for compliance could void the user s authority to operate the equipment NOTE This equipment has been tested and found...

Страница 4: ...SP B Zone 2 Left Surround Right Surround Right Surround Back Right Surround Back Right Zone 2 Right Zone 2 Right Front Left Front Left SP B Zone 2 Left SP B Zone 2 Left Front Right Front Right SP B Zone 2 Right SP B Zone 2 Right Front Right Front Right SP B Zone 2 Right SP B Zone 2 Right Surround Right Surround Right Center Center Center Center Surround Left Surround Left Surround Left Surround Le...

Страница 5: ...y 41 Automatic Audio Input Selection Setup 42 Playing Your AV Components 43 Basic AV Receiver Operation 43 Common Functions 44 Setting the Display Brightness 44 Muting the AV Receiver 44 Using the Sleep Timer 44 Using Headphones 45 Displaying Source Information 45 Specifying the Digital Signal Format 46 Listening to the Radio 47 Listening to AM FM Stations 47 Presetting AM FM Stations 49 Using the...

Страница 6: ...ogrammed Compatible Remote 1 Manufactured under license from Dolby Laboratories Dolby Pro Logic and the double D symbol are trademarks of Dolby Laboratories 2 Manufactured under license under U S Patent s 5 451 942 5 956 674 5 974 380 5 978 762 6 226 616 6 487 535 7 003 467 7 212 872 other U S and worldwide patents issued pending DTS DTS Digital Surround ES and Neo 6 are registered trademarks and ...

Страница 7: ...h room Main Room In your main listening room you can enjoy up to 5 1 channel playback see page 14 You can enjoy the various listening modes such as Dolby and DTS pages 50 55 Zone 2 In your Zone 2 room you can enjoy 2 channel stereo playback see page 66 The listening modes cannot be used with Zone 2 External power amplifier required Main Room Front left and right speakers Center speaker Surround le...

Страница 8: ... listening modes intended for use with video games H Display See Display on page 9 I Dimmer button 44 Adjusts the display brightness J Memory button 49 Used when storing or deleting radio presets K Tuning Mode button 47 Selects the Auto or Manual tuning mode for AM and FM radio L Display button 45 Displays various information about the currently selected input source M Setup button Opens and close...

Страница 9: ... the volume and balance of Zone 2 T Return button Selects the previously displayed setup menu For detailed information see the pages in parentheses 1 SLEEP indicator 44 Lights up when the Sleep function has been set 2 MUTING indicator 44 Flashes while the AV receiver is muted 3 Listening mode and format indicators 46 50 Show the selected listening mode and audio input signal format 4 Tuning indica...

Страница 10: ...elector to suit your setup See HDMI Input Setup on page 39 The HDMI outputs are for connecting a TV or pro jector with an HDMI input E ETHERNET This port is for connecting the AV receiver to home automation equipment and external controllers Use only shielded Ethernet cables F MONITOR OUT The S Video or composite video jack should be connected to a video input on your TV or projector G FM ANTENNA ...

Страница 11: ...d composite video input jacks for connecting the video signal R CBL SAT IN A cable or satellite receiver can be connected here There are S Video and composite video input jacks for connecting the video signal and there are analog audio input jacks for connecting the audio signal S VCR DVR IN OUT A video component such as a VCR or DVR can be connected here for recording and playback There are S Vid...

Страница 12: ...ange audio settings When the Audio TV Out setting is set to On page 64 this button is disabled M Sleep button 44 Used with the Sleep function AUX and SP A B are not used in this AV receiver Controlling the tuner To control the AV receiver s tuner press the Tuner or Receiver Remote Mode button You can selectAM or FM by pressing the Tuner button repeatedly 1 Arrow buttons Used to tune into radio sta...

Страница 13: ...of the same type is used in the same room or the AV receiver is installed close to equipment that uses infrared rays the remote control ler may not work reliably Don t put anything on top of the remote controller such as a book or magazine because a button may be pressed continuously thereby draining the batteries The remote controller may not work reliably if the AV receiver is installed in a rac...

Страница 14: ...sition it close to your TV preferably on top facing forward at about ear level or at the same height as the front left and right speakers Subwoofer The subwoofer handles the bass sounds of the LFE Low Frequency Effects channel The vol ume and quality of the bass output from your subwoofer will depend on its position the shape of your listening room and your listening position In general a good bas...

Страница 15: ...e surround left and right dipole speakers should be positioned so that their arrows point toward your TV or screen Connecting a Powered Subwoofer Using a suitable cable connect the AV receiver s PRE OUT SUBWOOFER to the input on your powered sub woofer If your subwoofer is unpowered and you re using an external amplifier connect the PRE OUT SUB WOOFER to the amp s input Attaching the Speaker Label...

Страница 16: ... way around the sound will be out of phase and will sound unnatural Unnecessarily long or very thin speaker cables may affect the sound quality and should be avoided Be careful not to short the positive and negative wires Doing so may damage the AV receiver Don t connect more than one cable to each speaker termi nal Doing so may damage the AV receiver Don t connect a speaker to several terminals C...

Страница 17: ...FM radio station and adjust the position of the FM antenna to achieve the best possible reception 2 Use thumbtacks or something similar to fix the FM antenna into position Caution Be careful that you don t injure yourself when using thumbtacks ANTENNA FM AM 75 AM antenna push terminals FM antenna jack FM 75 Insert the plug fully into the jack Thumbtacks etc Connecting the AM Loop Antenna 1 Assembl...

Страница 18: ... regulations to prevent electrical shock haz ards Using a TV FM Antenna Splitter It s best not to use the same antenna for both FM and TV reception as this can cause interference problems If cir cumstances demand it use a TV FM antenna splitter as shown If good reception cannot be achieved using the supplied AM loop antenna an outdoorAM antenna can be used in addition to the loop antenna as shown ...

Страница 19: ... Jack Description HDMI HDMI connections can carry uncompressed stan dard or high definition digital video and audio and offer the best picture and sound quality Video Component video cable Component video separates the luminance Y and color difference signals PR PB providing the best picture quality Some TV manufacturers label their component video jacks slightly differently S Video cable S Video ...

Страница 20: ...uts of the same format as the input will output the signal Audio Connection Formats Audio equipment can be connected to the AV receiver by using any of the following audio connection formats analog optical coaxial analog multichannel or HDMI When you connect audio equipment to an HDMI OPTICAL or COAXIAL input you must assign that input to an input selector see pages 39 and 40 When choosing a conne...

Страница 21: ...ality COMPONENT VIDEO OUT Component video input Best MONITOR OUT S S Video input Better MONITOR OUT V Composite video input Standard GAME TV IN L R Analog audio L R output DIGITAL IN COAXIAL 2 Digital coaxial output DIGITAL IN OPTICAL 1 Digital optical output Step 1 Video Connection Choose a video connection that matches your TV or and then make the connection A B C Step 2 Audio Connection Choose ...

Страница 22: ...dard DVD IN FRONT L R Analog audio L R output DIGITAL IN COAXIAL 1 Digital coaxial output DIGITAL IN OPTICAL 1 Digital optical output Step 1 Video Connection Choose a video connection that matches your DVD player or and then make the connection You must connect the AV receiver to your TV with the same type of connection A B C Step 2 Audio Connection Choose an audio connection that matches your DVD...

Страница 23: ... normal audio cables to connect the AV receiver s DVD IN FRONT L R CENTER SURR L R and SUBWOOFER jacks to the 5 1 channel analog audio output on your DVD player To select the multichannel input see BasicAV Receiver Operation on page 43 To adjust the subwoofer sensitivity for the multichannel input see Using the Audio Adjust Settings on page 57 or see Hardware Setup on page 63 ANTENNA FM AM 75 PRE ...

Страница 24: ...output Better VCR DVR IN V Composite video output Standard VCR DVR IN L R Analog audio L R output DIGITAL IN COAXIAL 2 Digital coaxial output DIGITAL IN OPTICAL 1 Digital optical output Hint Step 1 Video Connection Choose a video connection that matches your VCR or DVR or and then make the connection You must connect the AV receiver to your TV with the same type of connection A B C Step 2 Audio Co...

Страница 25: ...ignals connected to S Video inputs can only be recorded via theVCR DVR OUT S jack So if your source TV or VCR is connected to an S Video input the recording VCR DVR must be connected to the VCR DVR OUT S jack Connecting a VCR or DVR for Recording Connection AV receiver Signal flow VCR or DVD recorder Picture quality VCR DVR OUT S S Video input Better VCR DVR OUT V Composite video input Standard VC...

Страница 26: ... output Best CBL SAT IN S S Video output Better CBL SAT IN V Composite video output Standard CBL SAT IN L R Analog audio L R output DIGITAL IN COAXIAL 2 Digital coaxial output DIGITAL IN OPTICAL 1 Digital optical output Hint Step 1 Video Connection Choose a video connection that matches the video source or and then make the connection You must connect the AV receiver to your TV with the same type ...

Страница 27: ... Dolby Digital Plus DTS Your DVD player must be able to output these formats from its HDMI OUT About Copyright Protection The AV receiver supports HDCP High bandwidth Digital Content Protection 2 a copy protection system for digital video signals Other devices connected to the AV receiver via HDMI must also support HDCP Use a commercially available HDMI cable supplied with some components to conne...

Страница 28: ...s from a PC are not supported To listen to an HDMI source component through the AV receiver you must configure your system so that video from the HDMI source component can be displayed on your TV i e on your TV select the HDMI input that s connected to the AV receiver s HDMI OUT This is necessary because a component identification check has to be performed on your TV before an HDMI source componen...

Страница 29: ...o L R output ANTENNA FM AM 75 S VIDEO IN VIDEO IN S VIDEO OUT OPTICAL OUT AUDIO OUT L R VIDEO OUT B A b a B C Step 1 Video Connection or Connect your camcorder s video output jack to the AV receiver s GAME TV IN S or V jack Connect the AV receiver s MONITOR OUT to your TV s video input with the same type of connection Step 2 Audio Connection or Connect your camcorder s audio output jack to the AV ...

Страница 30: ...onnection AV receiver Signal flow CD or turntable CD IN L R Analog audio L R output DIGITAL IN COAXIAL 2 Digital coaxial output DIGITAL IN OPTICAL 2 Digital optical output ANTENNA FM AM 75 OPTICAL 2 CD 2 CBL SAT COAXIAL IN L R L R CD AUDIO OUTPUT OPTICAL OUT AUDIO OUT L R COAXIAL OUT L R IN CD b c a a Step 1 Choose a connection that matches your CD player or Use connection for a turntable with a b...

Страница 31: ... TAPE OUT L R Analog audio L R output Analog audio L R input DIGITAL IN COAXIAL 2 Digital coaxial output DIGITAL IN OPTICAL 2 Digital optical output DIGITAL OPTICAL OUT Digital optical input ANTENNA FM AM 75 PRE OUT SUB WOOFER COAXIAL 2 CBL SAT COAXIAL OUT AUDIO IN L R OPTICAL OUT OPTICAL 2 CD L R IN TAPE AUDIO OUT L R L R TAPE DIGITAL OUT b c a a OPTICAL IN d Step 1 Choose a connection that match...

Страница 32: ...jacks to the AV receiver s TAPE IN L R jacks Connecting an RI Dock Not all iPod models output video For information about which iPod models are supported by the RI Dock see the RI Dock s instruction manual L R IN GAME TV V GAME TV L R IN TAPE Notes Enter the appropriate remote control code before using the AV receiver s remote controller for the first time see page 72 Connect the RI Dock to the AV...

Страница 33: ...e remote control code first see page 72 And remember to point the remote controller at the AV receiver and not the other component Notes Use only cables for connections cables are supplied with Integra Onkyo players DVD CD etc Some components have two jacks You can con nect either one to the AV receiver The other jack is for connecting additional capable components Connect only Integra Onkyo compo...

Страница 34: ...ess the remote con troller s On Standby button The AV receiver will enter Standby mode To prevent any loud surprises the next time you turn on the AV receiver turn down the volume before you turn it off Remote controller AV receiver or Up and Running in a Few Easy Steps To get your system up and running with the minimum of fuss here s a few pointers to help you configure the AV receiver before you...

Страница 35: ...efer to your speakers manuals to deter mine the optimum crossover frequencies Speaker Settings 1 Press the Receiver button fol lowed by the Setup button 2 Use the Up and Down buttons to select 2 Speaker Setup and then press the Enter button Setup Receiver Enter 3 Use the Up and Down buttons to select Sp Config and then press the Enter but ton 4 While the Subwoofer setting is selected use the Left ...

Страница 36: ... or the multichannel DVD input is being used This procedure can also be performed on the AV receiver by using its Setup Enter and arrow but tons Speaker Distance With these settings you can specify the distance from each speaker to the listening position 7 Use the Down button to select Surr and then use the Left and Right buttons to select a crossover frequency If no surround left and right speake...

Страница 37: ...9 meters in 0 15 meter steps 6 Use the Down button to select Left and use the Left and Right buttons to specify the distance for the front speak ers then press the Down button to select the next speaker 7 Repeat step 6 for all speakers Note Speakers that you set to No or None in the Speaker Configuration page 35 cannot be selected 8 Press the Setup button Setup closes 1 Press the Receiver Remote M...

Страница 38: ...tton followed by the Setup button 2 Use the Up and Down buttons to select 2 Speaker Setup and then press the Enter button 3 Use the Up and Down buttons to select Eq Settings and then press Enter 4 Use the Left and Right buttons to select Off Tone off response flat Manual You can adjust the equal izer for each speaker manually If you selected Manual continue with this procedure If you selected Off ...

Страница 39: ...to the same HDMI IN See Digital Input Setup on page 40 This procedure can also be performed on the AV receiver by using its Setup Enter and arrow but tons HDMI Input Setup 1 Press the Receiver button fol lowed by the Setup button 2 Use the Up and Down buttons to select 1 Input Assign and then press Enter 3 Use the Up and Down buttons to select 1 1 HDMI and then press Enter Setup Receiver Enter 4 U...

Страница 40: ...player to OPTICAL IN 1 you must assign OPTICAL IN 1 to the CD input selector These are the default assignments Component Video Input Setup 1 Press the Receiver button fol lowed by the Setup button 2 Use the Up and Down buttons to select 1 Input Assign and then press Enter 3 Use the Up and Down buttons to select 1 2 Compo nent and then press Enter Setup Receiver Enter 4 Use the Up and Down buttons ...

Страница 41: ...ss Enter 3 Use the Up and Down buttons to select 1 3 Digital and then press Enter 4 Use the Up and Down buttons to select an input selec tor and then use the Left and Right buttons to select COAX1 Select if the component is connected to DIGITAL IN COAXIAL 1 COAX2 Select if the component is connected to DIGITAL IN COAXIAL 2 OPT1 Select if the component is connected to DIGITAL IN OPTICAL 1 OPT2 Sele...

Страница 42: ... selected when an HDMI input is assigned to an input selector page 39 When this option is selected the relevant HDMI digital and analog inputs will be checked for the presence of an audio signal If sig nals are present at more than one input the inputs will be selected in the follow ing order of priority HDMI digital analog COAXx Auto OPTx Auto This option can be selected when a dig ital input is ...

Страница 43: ...s they are 2 Start playback on the source component To watch a DVD or other video source on your TV select the video input that s con nected to the AV receiver s COMPONENT VIDEO OUT HDMI OUT or MONITOR OUT On some DVD players you may need to change the digital or HDMI audio output settings 3 To adjust the volume use the Master Volume control or the remote con troller s VOL button Since the AV rece...

Страница 44: ...sleep time by 10 minutes Setting the Display Brightness Press the Receiver Remote Mode button and then press the remote controller s Dimmer but ton repeatedly to select dim dimmer or normal brightness You can also use the AV receiver s Dimmer button Muting Display Sleep Dimmer Phones Dimmer Display Press Receiver first AV receiver Remote controller Muting the AV Receiver Press the Receiver Remote ...

Страница 45: ...rrent input source as follows Note This procedure can also be performed on the AV receiver by using its Display button The following information can typically be displayed 1 WhenAM or FM radio is used the band preset num ber and frequency are displayed 2 If the input signal is analog or AM or FM radio is selected no format information is displayed If the input signal is PCM the sampling frequency ...

Страница 46: ...Specifying the Digital Signal Format Format Display Dolby Digital DTS PCM 1 Press and hold the AV receiver s Enter button for about 3 sec onds 2 While Auto is displayed about 3 seconds use the Left and Right buttons to select PCM DTS or Auto PCM Only 2 channel PCM format input signals will be heard If the input signal is not PCM the PCM indicator will flash and there will be no sound DTS Only DTS ...

Страница 47: ...s case switch to Manual Tuning mode and listen to the station in mono Note You can also use the remote controller s Up and Down buttons to tune the radio Listening to AM FM Stations Use the Tuner input selector button to select AM or FM In this example FM has been selected Actual display depends on country 1 Press the Tuning Mode button so that the AUTO indicator appears on the display 2 Press the...

Страница 48: ...ion 1 Press the Tuner button repeat edly to select AM or FM followed by the D TUN button Actual display depends on country 2 Within 8 seconds use the num ber buttons to enter the fre quency of the radio station For example to tune to 87 5 FM press 8 7 5 Tuner D TUN Number buttons Press the Display button to dis play the available information Display Band Listening mode Frequency Preset ...

Страница 49: ...tton again to store the station The station is stored and the preset number stops flashing Repeat this procedure for all of your favorite stations 1 Select the preset that you want to delete See the next section 2 While holding down the Mem ory button press the Tuning Mode button The preset is deleted and its number disappears from the display 2 4 3 2 To select a preset use the Preset buttons or t...

Страница 50: ...ton selects the listening modes intended for use with music Game button This button selects the listening modes intended for use with video games Stereo button This button selects the Stereo listening mode It also selects the All Channel Stereo listening mode Selecting the Listening Modes The Dolby Digital and DTS listening modes can only be selected if your DVD player is connected to the AV recei...

Страница 51: ... channel 2ch Mono Multiplex Media Listening Mode CD TV radio DVD DVD Blu ray disc DVD Blu ray disc Movie TV Mono Multichannel Dolby PLII Movie Neo 6 Cinema MonoMovie 3 4 3 Available only when using surround speakers 4 PCM of 88 2kHz and 96kHz are processed at 44 1kHz and 48kHz respectively TV Logic 3 4 AllChStereo FullMono T D 4 Music Direct Stereo Multichannel Dolby PLII Music Neo 6 Music Orchest...

Страница 52: ...ichannel 2ch Mono Multiplex Media Listening Mode DVD DTV etc Blu ray HD DVD Movie TV Mono DolbyDigital DolbyDigital Plus 1 1 Cannot be selected with some source formats Dolby PLII Movie Neo 6 Cinema MonoMovie 2 2 Available only when using surround speakers TV Logic 2 AllChStereo FullMono T D Music Direct Stereo DolbyDigital DolbyDigital Plus 1 Dolby PLII Music Neo 6 Music Orchestra 2 Unplugged 2 S...

Страница 53: ...S DTS 96 24 Dolby PLII Movie Neo 6 Cinema MonoMovie 1 2 1 Available only when using surround speakers 2 DTS 96 24 is processed as DTS TV Logic 1 2 AllChStereo FullMono T D 2 Music Direct Stereo DTS DTS 96 24 Dolby PLII Music Neo 6 Music Orchestra 1 2 Unplugged 1 2 Studio Mix 1 2 AllChStereo FullMono Game DTS DTS 96 24 Dolby PLII Game AllChStereo FullMono T D 2 Stereo AllChStereo Stereo ...

Страница 54: ... bear the Dolby Pro Logic II logo Dolby Digital Use this mode with DVDs that bear the Dolby Digital logo and Dolby Digital TV broadcasts This is the most common digital surround sound format and it ll put you right in the middle of the action just like being in a movie theater or concert hall Dolby Digital Plus Developed for use with HDTV including the new video disc formats Blu ray and HD DVD thi...

Страница 55: ... in this mode creates a lively sound field with a powerful acous tic image like being at a club or rock concert TV Logic This mode adds realistic acoustics to TV shows pro duced in a TV studio surround effects to the entire sound and clarity to voices All Ch Stereo Ideal for background music this mode fills the entire lis tening area with stereo sound from the front and sur round speakers Full Mon...

Страница 56: ... audio only input source such as TAPE TUNER or CD is selected the video source remains the same In the following example audio from the CD player con nected to the CD IN and video from the camcorder con nected to the GAME TVV jack are recorded by theVCR connected to the VCR DVR OUT jacks Recording the Input Source 1 Use the input selector buttons to select the source that you want to record See Wh...

Страница 57: ...hese settings apply to Dolby Pro Logic II Panorama With this setting you can broaden the width of the front stereo image when using the Dolby Pro Logic II Music listening mode On Panorama function on Off Panorama function off default Dimension With this setting you can move the sound field forward or backward when using the Dolby Pro Logic II Music listening mode It can be adjusted from 3 to 3 The...

Страница 58: ...nal Setting LstnAngl Listening Angle With this setting you can optimize the Theater Dimen sional listening mode by specifying the angle of the front left and right speakers relative to the listening position Ideally the front left and right speakers should be equi distant from the listening position and at an angle close to one of the two available settings Narrow Select if the listening angle is ...

Страница 59: ... 96 24 and Neo 6 Off CinemaFILTER off On CinemaFILTER on Note The CinemaFILTER may not work when used with certain input sources Music Optimizer M Optimizer The Music Optimizer function enhances the sound qual ity of compressed music files Use it with music files that use lossy compression such as MP3 Off Music Optimizer off default On Music Optimizer on Note The Music Optimizer function only work...

Страница 60: ...y that input selector appear For the TUNER input selector Anlg Analog is the only format available 4 Use the Up and Down buttons to select an audio for mat and use the Left and Right buttons to select a lis tening mode Only listening modes compatible with the audio format can be selected see pages 51 53 A PCM Specifies the default listening mode for analog and PCM sources Dolby Specifies the defau...

Страница 61: ...the A V Sync setting you can correct this by applying a delay to the audio signal The delay can be set from 0 to 100 milliseconds msec in 5 millisecond steps Use the Up and Down buttons to select an input selector and use the Left and Right but tons to set the delay To view the TV picture while setting the delay press Enter If HDMI Lip Sync is enabled see page 64 and your TV or display supports HD...

Страница 62: ...one 2 Power On Volume This setting determines what the volume will be for Zone 2 each time the AV receiver is turned on The range is Last Min 1 to 79 Max To use the same volume level as when the AV receiver was last turned off select Last HP Level With this setting you can offset the headphone volume relative to the main volume This is useful if your head phones are too loud or too quiet at the vo...

Страница 63: ...anging the Remote Controller s ID Zone 2 See Zone 2 on page 66 Hardware Setup 1 Press the Receiver Remote Mode button followed by the Setup button 2 Use the Up and Down buttons to select 7 Hardware Setup and then press Enter 3 Use the Up and Down buttons to select an item and then press Enter The screen for that item appears Setup Receiver Eenter Number buttons Remote indicator 4 Use the Up and Do...

Страница 64: ...hange your TV s settings or turn down the AV receiver s volume LipSync The Lip Sync function can automatically synchronize HDMI audio and video that s gotten out of sync due to the complex digital video processing being performed by your HDMI compatible TV With HDMI Lip Sync the audio delay required to synchronize the audio and video is calculated and applied automatically by the AV receiver Disab...

Страница 65: ...TV Control setting can be set only when the above Control and Power Control settings are both set to Enable When the AudioTVOut setting is set to On or TV Control is set to Enable and you re listening through your TV s speakers see page 28 if you turn up the AV receiver s volume control the sound will be output by the AV receiver s speakers To stop the AV receiver s speakers producing sound change...

Страница 66: ...l in Zone 2 you must set the Zone 2 Out setting toVariable see right column If you ve connected your Zone 2 speakers to an amp with no volume control set the Zone 2 Out setting respec tively to Variable so that you can set the zone s volume balance and tone on the AV receiver Connecting Zone 2 R L IN R L ZONE 2 PRE OUT Main room Zone 2 TV Receiver integrated amp AV receiver Zone 2 Out Settings 1 P...

Страница 67: ...n input selector button within 8 seconds Zone 2 turns on and ZONE 2 indicator lights up To select the same source as that of the main room press the Zone 2 button repeatedly until Z2 Sel Source appears To select AM or FM press the Tuner Input Selector button repeatedly Note You cannot select different AM or FM radio stations for your main room Zone 2 The same AM FM radio station will be heard in e...

Страница 68: ...one2 Muting VOL AV receiver Remote controller AV receiver 2 Press the AV receiver s Tone button repeatedly to select Bal ance 3 Use the Tone Plus and Minus buttons to adjust the balance You can adjust the balance from 0 in the center to 10 to the right or 10 to the left in 2 steps On the remote controller press the Zone 2 Remote Mode but ton and then press the Muting button To unmute a zone on the...

Страница 69: ...imes heard when a source component is turned on Delaying the trigger signal for your power amplifier so that it s the last component to be turned on will accom plish this Using the 12V Triggers 1 Press the Receiver Remote Mode button followed by the Setup button 2 Use the Up and Down buttons to select 6 Miscellaneous and then press Enter ANTENNA FM AM 75 PRE OUT SUB WOOFER C B 12V TRIGGER OUT A 3 ...

Страница 70: ...roller and feeds them to the AV receiver located in the cabinet via the connecting block Using a Multiroom Kit with Other Components In this setup an IR emitter is connected to the AV receiver s IR OUT jack and placed in front of the other component s remote control sensor Infrared signals received at the AV receiver s IR IN A or B jack are fed through to the other component via the IR emitter Sig...

Страница 71: ...isplay Number buttons Remote indicator 1 Look up the component s remote control code in the separate Remote Control Codes list The codes are organized by category 2 While holding down the Remote Mode button to which you want to enter a code press and hold down the Display button until the Remote indicator lights up about 3 seconds Note Remote control codes cannot be entered for the Receiver and Zo...

Страница 72: ...tings 1 Make sure the Integra Onkyo component is connected with an cable and an analog audio cable RCA See page 33 for details 2 Enter the appropriate remote control code to the Remote Mode button DVD Remote Mode button 31612 Integra Onkyo DVD player with CD Remote Mode button 71327 Integra Onkyo CD player with Tape Remote Mode button 42157 Onkyo cassette recorder with default See the previous pag...

Страница 73: ... playback function J Search button Used to search title chapter and track numbers and to search times for locating specific points K Number buttons Used to enter title chapter and track numbers and to enter times for locating specific points The 10 button works as a 10 button or button L Display button Displays information about the current disc title chapter or track including elapsed time remain...

Страница 74: ...e TV s external inputs D TV VOL button Adjust the TV s volume E Guide button Displays the program guide or navigation list F Arrow and Enter buttons Used to navigate menus and select items G Setup button Displays the video recorders setup menu H Previous button Previous or instant replay function I Number buttons Enter numbers The 0 button enters 11 on some components The 10 button works as a 10 b...

Страница 75: ...lored buttons or A B C D buttons F Number buttons Enter numbers The 10 button works as a 10 button or button G Display button Displays information H Muting button 44 Mutes or unmutes the AV receiver I CH button Selects satellite cable channels J VOL button 43 Adjusts the volume of the AV receiver K PREV CH button Selects the previous channel L Return button Exits the menu M Audio button Selects fo...

Страница 76: ...epeat button Used with the repeat playback function G Search button Used to locate specific points H Number buttons Used to enter track numbers and times for locating specific points The 10 button works as a 10 button or button I Display button Displays information about the current disc or track including elapsed time remaining time total time and so on J Muting button 44 Mutes or unmutes the AV ...

Страница 77: ... will remain off when the remote controller trans mits an Off command B Top Menu button Works as a Mode button when used with a DS A2 RI Dock C Arrow and Enter buttons Used to navigate menus and select items D Previous button Restarts the current song Press it twice to select the previous song E Rewind button Press and hold to rewind F Pause button Pauses playback With 3rd generation iPod models i...

Страница 78: ... page 71 On twin cassette decks only Deck B can be controlled A On Standby button Turns the cassette recorder on or off B Previous and Next buttons The Previous button selects the previous track During playback it selects the beginning of the current track The Next button selects the next track Depending on how they were recorded the Previous and Next buttons may not work prop erly with some casse...

Страница 79: ...program guide E Arrow and Enter buttons Used to navigate menus and select items F Setup button Displays a menu G Playback buttons From left to right Previous Rewind Pause Play Stop Fast Forward and Next These buttons works for combination devices H SEARCH REPEAT RANDOM and PLAY MODE buttons Function as colored buttons or A B C D buttons I Number buttons Enter numbers 0 button enters 11 on some com...

Страница 80: ...an audio format from a menu or with theAudio button on your DVD player s remote controller If your turntable doesn t have a phono preamp built in you must connect one between it and the AV receiver If your turntable uses an MC cartridge you must con nect an MC head amp or an MC transformer and a phono preamp Check the speaker settings pages 35 38 If the digital signal format is set to PCM or DTS s...

Страница 81: ...pling rate or frequency response changed and the AV receiver doesn t recog nize it as a genuine DTS signal In such cases you may hear noise The beginning of audio received by an HDMI IN can t be heard Since it takes longer to identify the format of an HDMI signal than it does for other digital audio sig nals sound may not be output immediately There s no picture Make sure that all video connecting...

Страница 82: ...a multiplex source On the Audio Adjust menu change the Input Mux setting to Main or Sub page 57 The functions don t work To use you must make an connection and an analog audio connection RCA between the compo nent and AV receiver even if they are connected digi tally page 33 While Zone 2 is selected the functions don t work The following settings can be made for the S Video and composite video inp...

Страница 83: ...z 1 dB 3 dB Tone Control 10 dB 50Hz BASS 10 dB 20kHz TREBLE Signal to Noise Ratio 106 dB LINE IHF A Speaker Impedance North American 6Ω 16Ω Input Sensitivity Output Level and Impedance 1 Vp p 75Ω Component and S VideoY 0 7 Vp p 75Ω Component Pb Cb Pr Cr 0 28 Vp p 75Ω S Video C 1 Vp p 75Ω Composite Component Video Frequency Response 5Hz 50MHz 3 dB Tuning Frequency Range 87 50MHz 107 90MHz Tuning Fr...

Страница 84: ... ONKYO U S A CORPORATION 18 park Way Upper Saddle River N J 07458 U S A Tel 201 785 2600 Fax 201 785 2650 http www integrahometheater com Integra Division of ONKYO CORPORATION Sales Product Planning Div 2 1 Nisshin cho Neyagawa shi OSAKA 572 8540 JAPAN Tel 072 831 8023 Fax 072 831 8163 En 2 9 3 4 4 6 8 5 ...

Отзывы: