Intech Instruments Ezeio Скачать руководство пользователя страница 3

3 | 

P a g e    

Ezeio v9 - 120317


Getting started with configuration:  
 

Go to 

www.ezecontrol.com


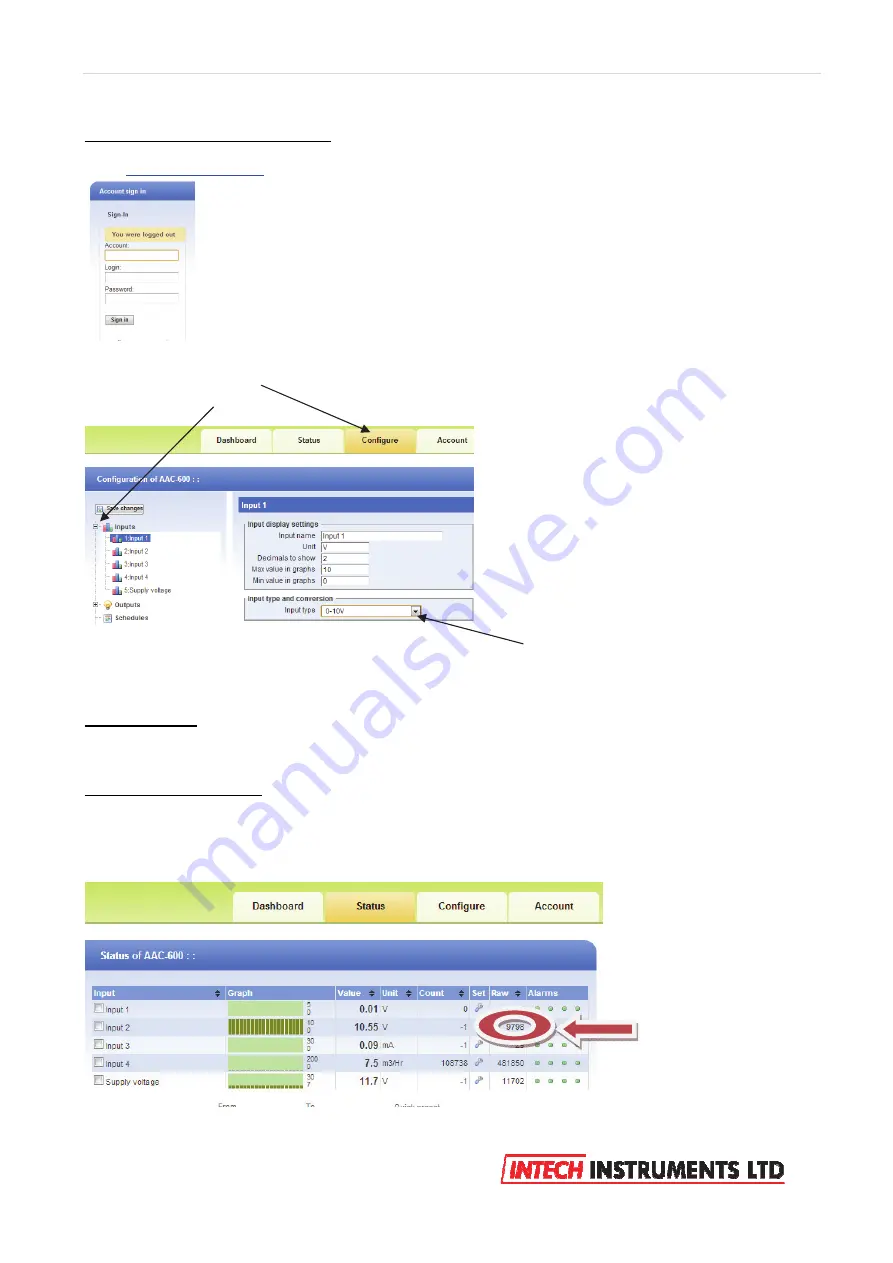
Click on the ‘Configure’ tag 
And then the + by the inputs: 


Now select which input you wish to configure. Select the ‘Input Type’ to match the configuration of the 
‘Jumper’ setting in the table above. Always remember to select ‘Save Changes’ after making a change. 


Important Note:

 The analogue inputs have a nominal calibration only (ex factory), and where accuracy is 

required, individual calibration of each channel is required. This is done with the use of an accurate signal 
calibrator. 
 

Follow these easy steps: 

 
1. As an example, on the Ezeio Controller Input 2, the analogue input is set to 0~10v dc. Apply an accurate 
10v signal to this input and on the Ezeio ‘Status Page’, note the ‘Raw’ reading on channel 2.  
In this example below the Raw reading = 9798. 


Enter your Account number, Login and Password. 


Содержание Ezeio

Страница 1: ...Ezeio Controller 7 Setting the 2400 A16 Station number Polling Address 8 Configuring the Ezeio with the 2400 A16 10 2400 A16 input examples on the Ezeio 11 Section 2b Introducing the 2300 input and o...

Страница 2: ...y removing the four black screws Read the Ezeio manual pages 12 through to and including 15 covering input connections Jumper setting Description 0 5Vdc Input impedance is 70kOhm Raw reading is about...

Страница 3: ...change Important Note The analogue inputs have a nominal calibration only ex factory and where accuracy is required individual calibration of each channel is required This is done with the use of an a...

Страница 4: ...anges and go back to the Ezeio Status Point 1 and Point 2 are what we want this input to read which in this example is 0 10v Point 1 is the zero point which is 0 for the Raw Value and 0 for the Value...

Страница 5: ...for a wide variety of applications and is easily implemented with the Ezeio Up to 16 Isolated Universal Analogue Inputs with Plug In Terminals Each Input is fully Isolated and Individually Selected S...

Страница 6: ...us 485 port is by using a standard Ethernet cable plugged into the Ezeio Controller and broken out to twisted pairs Getting started with configeration The first task is to configure the A16 Connect th...

Страница 7: ...ferred to on the Ezeio Controller as the Polling Address Note that on the A16 the Address number can be set differently for each comms port so make sure the A16 port used for the Ezeio Controller is t...

Страница 8: ...which must be set the same in the A16 as well In this example 1 has been entered and the A16 has been configured as address 1 Enter your Account number Login and Password Scroll down to Intech Next s...

Страница 9: ...Next click on System Next task is to add the A16 inputs onto the Ezeio Controller Click on Inputs and then click on Add Input Set the Modbus Baud to the same as that of the A16 as shown above Note Not...

Страница 10: ...ations Type in these 2 calibration details for all listed temperature probes both RTD and Thermocouple The A16 sends the exact temperature to the Eze Controller Chose a Logging time Note Failure to se...

Страница 11: ...rt and broken out to twisted pairs The 2300 series field stations are a family of modular I O Remote Stations that add an even lower cost option to Intech s already extensive intelligent I O Remote St...

Страница 12: ...th the Eze Controller and 2300 Two of these pairs are used to connect to one of the A16 RS485 ports to the ModBus 485 ports of the Ezek Controller as follows Blue pair Blue 70 on A16 comms Blue White...

Страница 13: ...on Add Device Next enter the Serial ModBus Polling Address which must be set the same in the 2300 as well In this example 1 has been entered and the 2300 has been configured as address 1 Note The Pol...

Страница 14: ...120317 Next click on System Next task is to add the 2300 inputs onto the Ezeio Controller Click on Inputs and then click on Add Input Set the Modbus Baud to the same as that of the 2300 Note Not all t...

Страница 15: ...Type in these 2 calibration details for all temperature inputs The 2300 sends the exact temperature of the RTD s and thermocouple s to the Eze Controller Chose a Logging time for this input to be log...

Страница 16: ...go to each input change of the inputs to another input under Input Location on the Ezeio Click on Save Changes change back and save again This will refresh the setting and it will poll the correct A1...

Страница 17: ...any reading eg flow meter pH pressure etc Note be careful not to overwrite or alter the existing calibration values A copy of the existing calibration values should be made before proceeding to prote...

Страница 18: ...0 mins Setup both these areas Add Alarm Action relates to the Alarm Settings Hi Temp Alarm setpoint above that activates the alarm relay or message Add Restore Action relates to the Restore Settings s...

Страница 19: ...age select Send Message Refer B above on page 15 Important note The monthly Service plan fee you chose from Eze has a monthly limit on text messages Be careful when configuring and saving configuratio...

Страница 20: ...must be typed in as explained below Note to get the Ezeio communicating on the simms after setting up with TCP connected requires the power to be turned off on for a connection to be re established v...

Страница 21: ...mms Typical data usage for a full month is about 5 10 MB million bytes but may vary depending on how frequently logging data is captured and other configuration parameters Important LED indication of...

Отзывы: