INSTEON LampLinc 2456D2 Скачать руководство пользователя страница 12

INSTEON LampLinc Dimmer User’s Guide 


Page 12 of 21 


Enabling X10 Resume Dim 

If X10 Resume Dim is enabled, LampLinc Dimmer will remember the last brightness level to which it was 
set.  Then, when an X10 ON command is received from an X10 Controller, the lamp will go to the 
remembered brightness, rather than to the X10 On-Level. 

To enable X10 Resume Dim, set up an X10 Primary Address On-Level of OFF (or zero).  To disable X10 
Resume Dim, set up an X10 Primary Address On-Level of anything but OFF. 

See the section 

Setting the X10 On-Level for the X10 Primary Address

, above, for instructions (briefly, set 

the brightness, then tap the SET Button). 

Setting the X10 Ramp Rate for the X10 Primary Address 

The X10 Ramp Rate sets the time it will take for the lamp you are controlling to go from OFF to the X10 
On-Level brightness, or from the X10 On-Level brightness to OFF, when LampLinc Dimmer receives an 
X10 ON or X10 OFF command.  This time is adjustable from 0.1 to 9 seconds to ramp between full-ON 
and full-OFF.  The default is 0.1 second. 

3.  Use the BRIGHT or DIM Buttons on any Controller to 

adjust the X10 Ramp Rate

 of the lamp you are 

controlling.  Adjust the X10 Ramp Rate to be faster by pressing the BRIGHT Button, or adjust it to be 
slower by pressing the DIM Button.  The table below gives the approximate relationship between 
brightness and Ramp Rate. 


4. Tap 

the 

SET Button

 on LampLinc Dimmer 

TWICE

.  The lamp you are controlling will blink to confirm 

the X10 Ramp Rate setting. 


NOTE 

 
If the lamp is ramping to 
less than full brightness, 
then the time it will take 
will be proportionately 
less.  For instance, if the 
lamp is going to half 
brightness, the time it will 
take for a given Ramp 
Rate will be halved. 
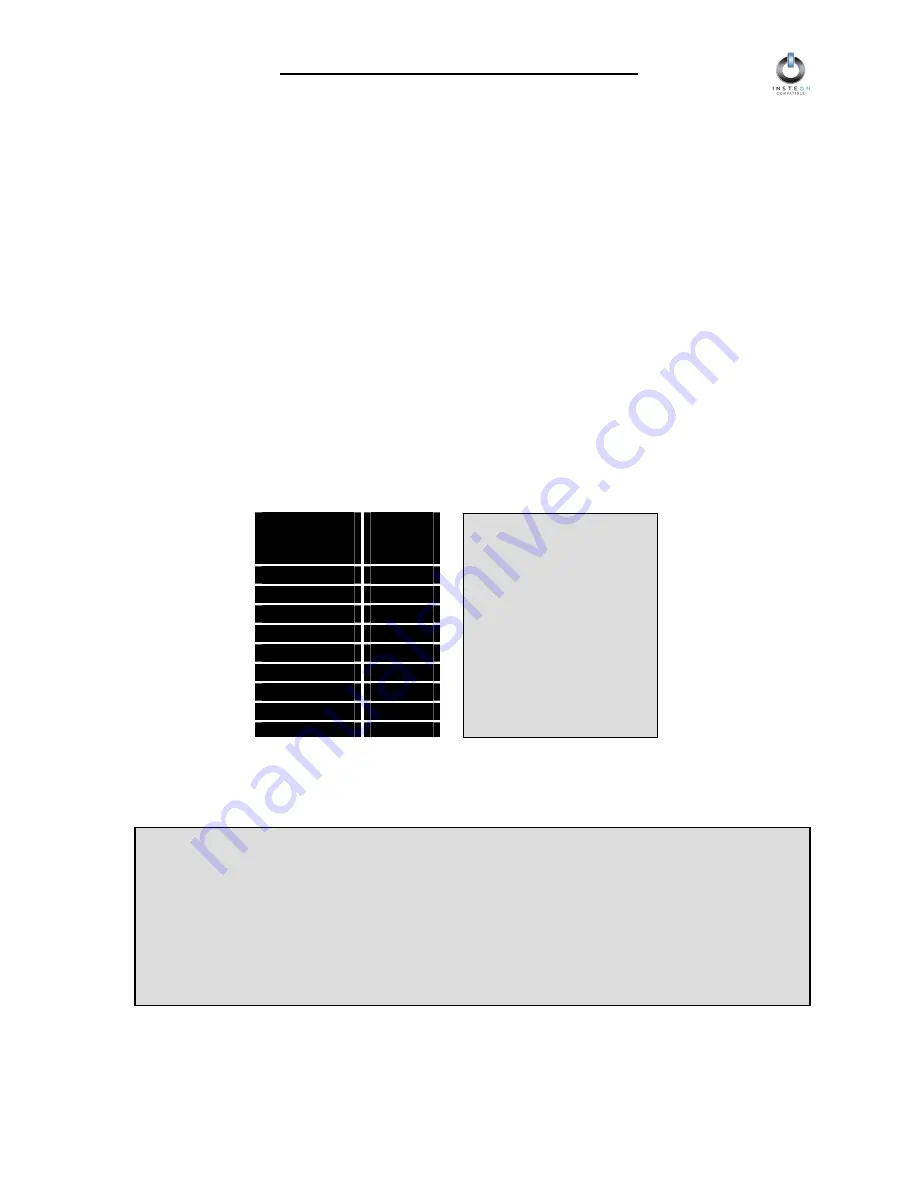
Approximate 

Brightness 

Level 

Ramp 

Rate in 

Seconds

90-100% 

0.1 

77-87% 

0.2 

65-74% 

0.3 

52-61% 

0.5 

39-48% 

2.0 

26-35% 

4.5 

13-23% 

6.5 

1-10% 

8.5 

0% 

9.0

NOTE 

 
When adjusting LampLinc Dimmer’s Ramp Rate using an INSTEON Controller, the INSTEON 
setting will override any previous X10 Ramp Rate set up for the X10 Primary Address.  If you need 
separate Ramp Rates for INSTEON and X10, simply set up an additional X10 address, known as 
an X10 Scene Address, then set the desired X10 Ramp Rate for that X10 Scene Address.  Each 
X10 Address can have its own X10 On-Level and X10 Ramp Rate.  For detailed instructions on 
programming these additional X10 Scene Addresses, please refer to the next section, 

ADVANCED X10 PROGRAMMING OPTIONS

Содержание LampLinc 2456D2

Страница 1: ...INSTEON LampLinc INSTEON Lamp Dimmer For models 2456D2 LampLinc Dimmer two prong 2456D3 LampLinc Dimmer with ground pin...

Страница 2: ...the X10 Primary Address 11 Removing the X10 Primary Address 11 Enabling or Disabling Local Control 11 Setting the X10 On Level for the X10 Primary Address 11 Enabling X10 Resume Dim 12 Setting the X1...

Страница 3: ...evice is a two way repeater And affordable not just because of low cost but because INSTEON also works with legacy X10 devices An INSTEON home grows in value with every INSTEON device you add making l...

Страница 4: ...les together by plugging them into each other Stacked modules may overheat and stop functioning Caution Read and understand these instructions before installing and retain them for future reference La...

Страница 5: ...hed wall receptacle The white Status LED on the side will illuminate steadily 3 Plug the lamp you want to control into the controlled outlet on the bottom of LampLinc Dimmer 4 The lamp you plugged in...

Страница 6: ...nc Dimmer Press and hold the ON Button of the pair for 10 seconds To confirm that it is in Linking Mode ControLinc s Status LED will begin blinking C KeypadLinc Choose the ON Button you want to use fo...

Страница 7: ...top LED in its LED Bar B ControLinc Tabletop Controller Press and hold the OFF Button of the ON OFF Button Pair you used for controlling LampLinc Dimmer for 10 seconds To confirm that it is in Unlinki...

Страница 8: ...he default is 0 5 second 1 Using the ON OFF Button Pair that you already linked LampLinc Dimmer to set the INSTEON Controller to Linking Mode by pressing and holding the ON Button of the pair for 10 s...

Страница 9: ...setup step by placing the Controller in Scene Setup Mode also called Multilink Mode Refer to your INSTEON Controller s User s Guide for detailed instructions on how to set it to Scene Setup Mode The f...

Страница 10: ...nd restore its factory default settings This procedure will clear the unit of all INSTEON Links and any programmed On Levels Ramp Rates X10 Primary Address or X10 Scene Addresses 1 Before resetting a...

Страница 11: ...1 Press and hold the black SET Button on LampLinc Dimmer for 3 seconds The white Status LED will begin flashing and the lamp you are controlling will blink to confirm that you are setting up an X10 Pr...

Страница 12: ...Rate of the lamp you are controlling Adjust the X10 Ramp Rate to be faster by pressing the BRIGHT Button or adjust it to be slower by pressing the DIM Button The table below gives the approximate rela...

Страница 13: ...nit code 3 Set the On Level for the X10 Primary Address by adjusting LampLinc Dimmer s brightness using any Controller If you skip this step the current On Level will be used 4 Send the following X10...

Страница 14: ...Scene Address and On Level 1 Using an X10 Controller send the CLEAR Sequence 2 Set the On Level for the X10 Scene Address by adjusting LampLinc Dimmer s brightness using any controller If you skip th...

Страница 15: ...Dimmer s X10 Primary Address house code and unit code 3 Use any controller to adjust LampLinc Dimmer s brightness so it corresponds to the Ramp Rate you want in the table below Brighter is faster 4 Se...

Страница 16: ...to overcome signals getting weaker is to increase the coverage of the mesh network by introducing more INSTEON devices It is possible that some audio video products computers power strips or other el...

Страница 17: ...turn on or turn off when you set the X10 Address for the product If turned on the BoosterLinc technology may interfere with INSTEON KeypadLinc 6 with Integrated Dimmer 12073W 12073WB and 12073WW Swit...

Страница 18: ...r INSTEON Controller with both of them plugged into the same outlet Once linked move them to the desired locations The lamp does not appear to turn on or off when a signal is sent The Ramp Rate may be...

Страница 19: ...e lamp flashes to acknowledge the X10 On Level setting If you are not using LampLinc Dimmer in X10 mode this setting will be ignored My LampLinc Dimmer doesn t respond to X10 address A1 when I first s...

Страница 20: ...Yes X10 Features X10 Primary Address 1 optional comes unassigned X10 Scene Addresses 255 possible X10 Status Response Supported X10 Resume Dim Supported by setting X10 Primary Address On Level to zer...

Страница 21: ...ackage the product with the RA clearly printed on the outside of the package and send the product along with all other required materials to Smarthome Inc ATTN Receiving Dept 16542 Millikan Ave Irvine...

Отзывы: