background image

6

January 2017

OPERATING THE TRANSFER SYSTEM

1.  Set the desired height on both tub base and rolling base by 

depressing the locking button on leg tubes and slide them up or 
down. 

2.  Place the tub base inside the tub or 

shower (Fig. 11). Level the frame by 
adjusting the leveling feet making sure that 
the height of the rolling base is the same 
as the tub base (Fig. 12). Lock the leveling 
feet in place with the jam nuts. 

3.  Place the bridge in position to connect 

the tub base to the rolling base (Fig. 13). 
Be sure that the bridge sits in the indent 

slots so that it is fl at with the top of the 
rails. If the bridge does not sit fl at, check 

the height adjustment on both bases. The 
height must be the same on both bases for 

proper bridge fi t and smooth transfers. 

WARNING: Never operate the transfer 
system if the bridge is not seated 

securely in place and fl at with the 

rolling and transfer base rails.

4.  To transfer the seating frame, lift up on the 

safety latch located behind the seat, slide 
the seat to the desired position (Fig. 14). 
The seat is in position when the safety 
latch locks on the other side of the transfer 
base.

5.  The bridge can be removed during use so 

the shower door or curtain can be closed 
(Fig. 15). 

WARNING: Do not remove the bridge 
unless the safety lock is latched.

Figure 11

Figure 12

Figure 13

Figure 14

Figure 15

Содержание Versa BTV-5100

Страница 1: ...Versa Bath Transfer Versa Transfer System BTV 5100...

Страница 2: ...tand ALL instructions 2 To reduce the risk of injury or drowning NEVER leave the user unsupervised or unattended while using this product 3 Determine with a physician or therapist the suitability of t...

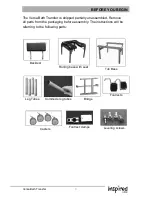
Страница 3: ...shipped partially unassembled Remove all parts from the packaging before assembly The instructions will be referring to the following parts Backrest Rolling base with seat Footrests Casters Footrest c...

Страница 4: ...p with bolts The height is adjustable and can be re positioned when the seating is fully assembled for correct t 2 Insert the casters into the socket on the bottom of the individual leg tubes Fig 3 3...

Страница 5: ...the seating frame assembly onto the rolling base Fig 8 Be sure to slide the seating all the way until the safety locking latch clicks into position on the base Fig 9 2 Slide the footrests onto the foo...

Страница 6: ...is at with the top of the rails If the bridge does not sit at check the height adjustment on both bases The height must be the same on both bases for proper bridge t and smooth transfers WARNING Never...

Страница 7: ...7 Versa Bath Transfer Soapy water or mild cleansers may be used on all parts of your Versa Transfer System Harsh abrasive cleaners Ajax Comet etc may dull the nish CLEANING YOUR VERSA...

Страница 8: ...roduct at our discretion for a period of up to one year from the date of delivery to the original purchaser This warranty does not include cost of inconvenience shipping property damage misuse abuse a...

Отзывы: