background image


6

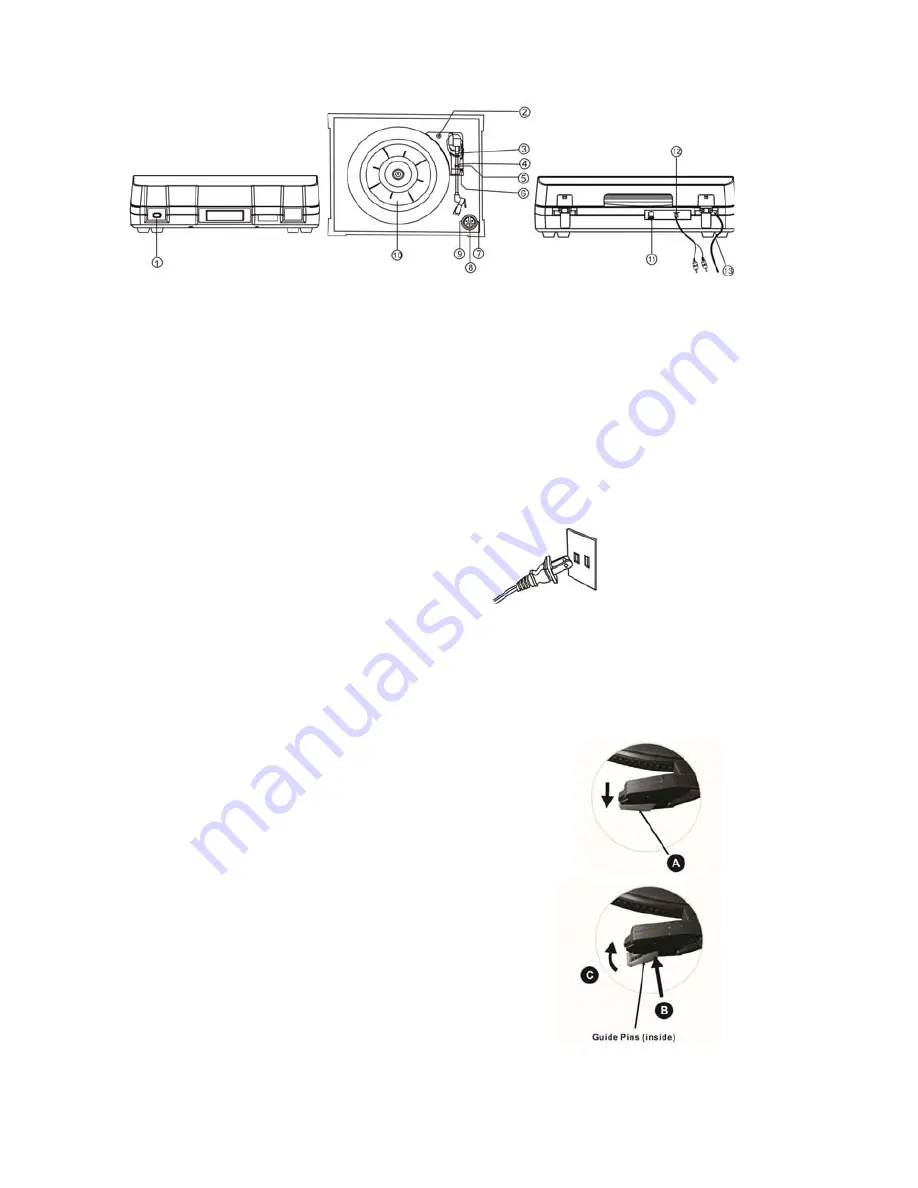
Location of parts   


1. POWER SWITCH 

2. TRANSIT SCREW 

3. TONE ARM   

4. SECURITY HOOK 

5. TONE ARM REST 

6. SPEED CONTROL SWITCH 

7. STOP BUTTON 

8. EJECT BUTTON 

9. PLAY BUTTON 

10. TURNTABLE 

11. USB SLOT   

12. LINE OUT CABLE 

13. AC POWER CORD


Preparation for Use   


1. Connect the AC power cord to household outlet.   


2. Before your playback, repeatedly move the tone arm slowly and gently from the silver spindle to 

tone arm rest for several times. 


How to Replace the Turntable Stylus (Needle) 


Removing old stylus   


1. Set a screwdriver at the tip of the stylus and push 

down in the direction “A”. 

2. Remove the stylus by pulling it forward and down. 


Installing a new stylus 


1. Hold the tip of the stylus and insert the other edge 

by pressing in the direction “B”. 

2. Push up in the direction “C” until it locks at the tip. 


Содержание ITUT-201SVR

Страница 1: ...MODEL ITUT 201SVR ITUT 201 USB Turntable PLEASE NOTE OUR NEW CUSTOMER SUPPORT TOLL FREE PHONE NUMBER ONLY FROM USA 1 877 ITECH 97 1 877 483 2497...

Страница 2: ...l Buttons Page 14 Audacity Preferences Page 15 Preparing to Export and Save Files Page 17 Recording Operation Steps Page 20 General Problems for All Windows Versions Page 21 Adjustment for Win7 and So...

Страница 3: ...child or adult and serious damage to the product Use only with a stand bracket or table recommended by the manufacturer or sold with the product Any mounting of the product should follow the manufactu...

Страница 4: ...r hazards Refer all servicing to qualified service personnel 19 Damage Requiring Service Unplug this product from the wall outlet and refer servicing to qualified service personnel under the following...

Страница 5: ...nce to rain or moisture CAUTION RISKS OF ELECTRIC SHOCK DO NOT OPEN To reduce the risk of electric shock do not remove cover or back No user serviceable parts inside Refer servicing to qualified servi...

Страница 6: ...ould get into the set contact your dealer 3 Be sure not to handle stylus needle with dirty fingers 4 When removing the power plug from the wall outlet always pull directly on the plug never pull the c...

Страница 7: ...2 Before your playback repeatedly move the tone arm slowly and gently from the silver spindle to tone arm rest for several times How to Replace the Turntable Stylus Needle Removing old stylus 1 Set a...

Страница 8: ...ith the manual 5 Select player speed 33 1 3 45 OR 78 rpm according to your playing record 6 Remove the tone arm rest holder lift the cue lever and move the tone arm gently to the desired position over...

Страница 9: ...98 2000 ME XP VISTA 7 and Macintosh Audacity Installation and USB Connection Connect the USB cable to the turntable and into your computer Connect the turntable s power cord Then press Power button to...

Страница 10: ...9 Installing the Audacity Software 1 The Audacity Setup Wizard will appear Click on Next to install the software 2 Click on I accept the agreement and click on Next...

Страница 11: ...10 3 Continue to click on the Next buttons...

Страница 12: ...11 4 Click on the Install button to start installation...

Страница 13: ...lation 6 You can now open the Audacity software and start recording your files NOTE Once you set up Audacity you do not need to re set it with each use For additional information visit the Audacity we...

Страница 14: ...13 Configuring Audacity for Microsoft Windows Audacity Interface Audacity Interface Settings and controls...

Страница 15: ...e Edit View Project Generate Effect and Analyze menus to Save Export and edit the music 1 Click the button to skip to start 2 Adjust the output volume 3 Click the button to play 4 Click the button to...

Страница 16: ...Edit on the Audacity interface select Preferences z The screen will open up Audacity Preferences You can see the Audio I O Quality File Formats Spectrograms Directories Interface Keyboard and Mouse i...

Страница 17: ...select 2 stereo z Click the OK z Note If you couldn t find the microphone USB Audio CODEC from the Device list close the Audacity Software and re open then try again 3 Adjust the output and input vol...

Страница 18: ...rt Additional software lame_enc dll needs to be installed 1 Please make sure that the Audacity disc is still inserted in your computer 2 Click the Edit Tab on the Audacity interface select Preferences...

Страница 19: ...18 4 A dialog box will appear Click Yes 5 Another box appears to locate the CD ROM You will find the lame_enc dll software Click the software then click Open...

Страница 20: ...19 6 Click on the OK Button Now the MP3 software set up is complete and you may proceed with the recording and exporting to MP3 format...

Страница 21: ...her desired song Press Play button on turntable to start playing Immediately press Pause button on software and downloading will continue 5 Repeat steps 3 and 4 until you have finished downloading NOT...

Страница 22: ...he turntable connects to the PC Preferred Solution Remove the USB cable from the PC Alternative Solution If you select this solution you need to change the setting manually every time you connect the...

Страница 23: ...Then in the Sound Recorder click Edit tab and select Audio Properties Or find and click into Control Panel Find and select Sound and audio device and choose Audio tab z In Sound playback change the de...

Страница 24: ...music while downloading to the computer go to the Audacity interface Click Edit and select Preference Then click Audio I O tab And follow the following setting Click OK to confirm Deselect the check...

Страница 25: ...nly If do not have the fluctuant wave on the Audacity interface or the sound is distorted when recording adjust the recording level as follows z Click Start at the lower left corner go to the Control...

Страница 26: ...25 z Or in Control Panel Home view click Hardware and Sound Then click sound...

Страница 27: ...6 z In the Sound interface select Recording tab z Then choose a recording device Herein we recommend you to select Microphone of USB Audio CODEC which is highlighted in the picture and click Propertie...

Страница 28: ...from the Audacity panel that doesn t excess 0 Then click OK on the Microphone properties interface and sound interface Close the Control Panel Please note that there is no Levels tab in Sound panel in...

Страница 29: ...to the waveform and then left click the mouse hold and drag to highlight your desired area And then release the mouse 3 Click file tab then select an export form EXPORT SELECTION AS WAV EXPORT SELECTI...

Страница 30: ...29 Take Export as WAV format for example Divide and export 2 nd song 1 Move cursor to your highlight your 2 nd song 2 Follow Steps 3 4 and 5 above to divide songs one by one...

Страница 31: ...P3 formats before exporting z You may play back the song through your computer Simply click the to play z For more detailed information and operation you may visit the Audacity website at http audacit...

Страница 32: ...31 name and select an export location normally most users prefer to select desktop Then click Save Save as WAV Save as Ogg Follow the same steps as above for Save as MP3...

Страница 33: ...to title the song being saved All subsequent songs being divided from the same track are with the same title To change the titles follow steps below 1 Right click on the Music file which will show al...

Страница 34: ...Interface Settings and controls At the top of the main Audacity window to the right of the play control buttons you will see the input and output level meters labeled L and R Under the output level me...

Страница 35: ...e Edit View Project Generate Effect and Analyze menus to Save Export and edit the music 1 Click the button to skip to start 2 Click the button to play 3 Click the button to record 4 Click the button t...

Страница 36: ...the Audacity on the Audacity interface select Preferences z The screen will open up Audacity Preferences You can see the Audio I O Quality Import Export Interface Spectrograms Directories Smart Recor...

Страница 37: ...DEC z Click the Channels and select 2 stereo z Click the OK z Note If you couldn t find the Core Audio USB Audio CODEC from the Device list close the Audacity Software and re open then try again or in...

Страница 38: ...right of the input and output level meters labeled L and R you will see the input and output volume The left of the input and output volume there is a volume icon Adjust the output and input volume to...

Страница 39: ...our computer Simply click the to play z For more detailed information and operation you may visit the Audacity website at http audacity source forge net and find and click help contact us 1 Click the...

Страница 40: ...down arrow and select Monitor Input This will enable you to hear the audio from the turntable even if you have not record enabled the Audacity application If you are not seeing the microphone slider...

Страница 41: ...losing all applications restarting the computer and only run Audacity while recording Make sure that you have properly installed and calibrated the tone arm of the turntable Specifications RECORD PLAY...

Страница 42: ...duct contains a chemicals known to the State of California to cause birth defects or other reproductive harm For more information on these regulations and a list of chemicals log on the following webs...

Страница 43: ...ll be shipped back to a PO Box Please include your check or money order in the amount of 12 00 payable to Innovative Technology Electronics Corp to cover handling and return shipping charges IT will n...

Страница 44: ...201100802EO...

Отзывы: