background image


73 

December 2008 - InnoMedia


© 2001 InnoMedia. All rights reserved. 


InnoMedia iPBX Administrative Guide


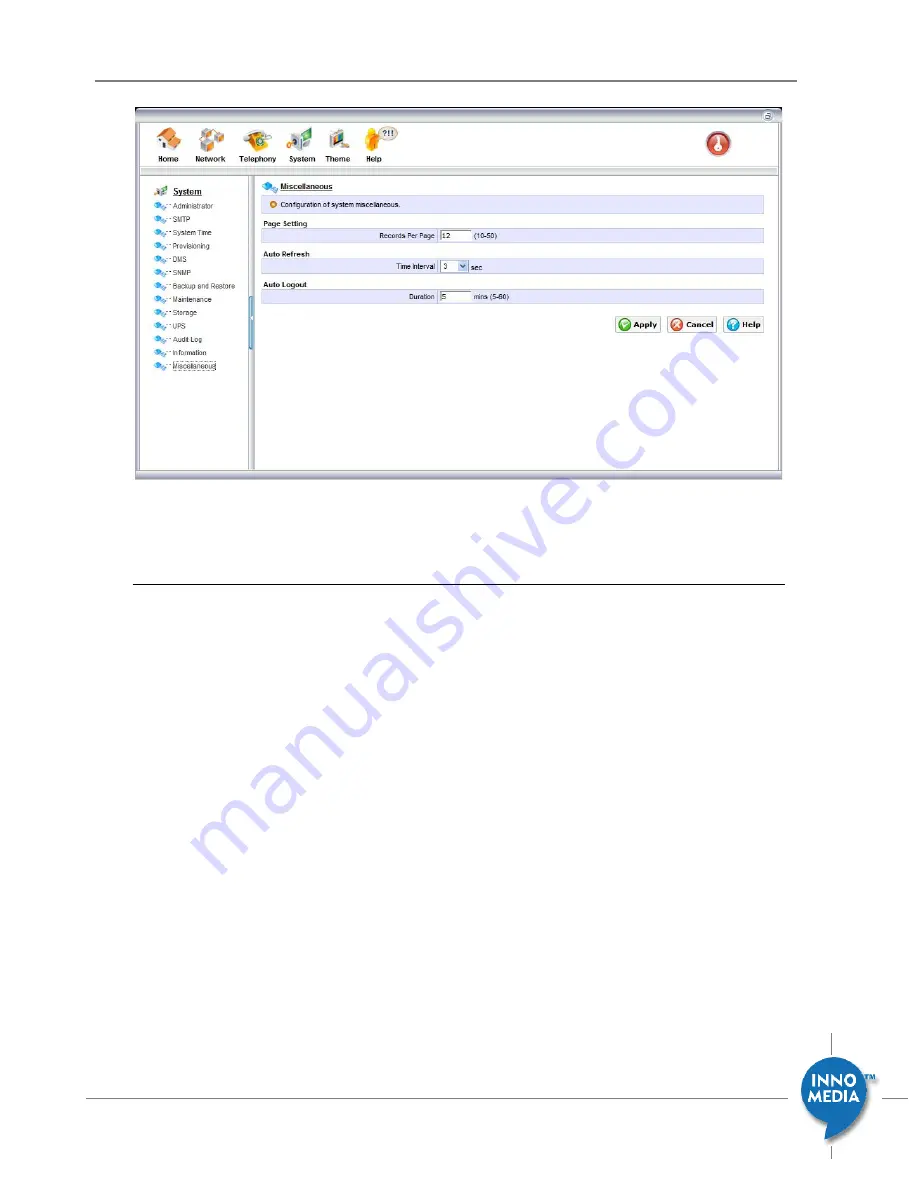
Figure 7.13 iPBX Web Representation Configuration 

6.12.2


Configuring Miscellaneous Settings 

To configure the miscellaneous setting, follow these steps: 

1.


In the Page Setting field, enter the number of records you would like to see per page. The 

minimum number can be displayed per page is 10 and the maximum is 50. 

2.


In the Auto Refresh field, the time interval in seconds from the drop-down menu that the system 

will automatically refresh the information on the screen. 

3.


In the Auto Logout field, enter the duration in minutes that the system will automatically logout 

the user when there is no activity presents. 

Содержание iPBX-400

Страница 1: ...InnoMedia iPBX Administrative Guide 1 Feb 2009 InnoMedia 2001 InnoMedia All rights reserved InnoMedia iPBX Administrative Guide Version 1 2 February 2009...

Страница 2: ...1 Running Parallel with Existing Corporate Firewall 14 2 1 2 iPBX at corporate firewall DMZ 15 2 1 3 iPBX behind Corporate Firewall with Port Mapping 15 2 1 4 For new network setup also as SMB Firewa...

Страница 3: ...DID DOD to Individual Users 33 4 7 4 Configuring VoIP Trunk Profiles 33 4 8 ASSIGNING EXTENSION NUMBERS TO ANALOG DEVICES 34 4 9 CONFIGURING PSTN TRUNKS ONLY AT MODELS IPBX 412 AND IPBX 404F 35 4 10...

Страница 4: ...X EVENT LOGS 54 5 10 ACCESS IPBX COMMUNICATION RECORDS 54 5 11 IPBX FEATURE CODE LOOK UP MAP 55 6 SYSTEM CONFIGURATION 57 6 1 ADMINISTRATOR CONFIGURATION 57 6 1 1 Accessing the Administrator Page 57 6...

Страница 5: ...age Configuration Screen 68 6 8 2 Viewing the Storage Information 68 6 9 UPS 69 6 9 1 Accessing the UPS Status Information Screen 69 6 9 2 Viewing UPS Status Information 69 6 10 AUDIT LOG 70 6 10 1 Ac...

Страница 6: ...nfiguration Screen 85 7 3 2 Configuring LAN 85 7 4 DHCP 86 7 4 1 Accessing DHCP Configuration Screen 86 7 4 2 Configuring DHCP 87 7 5 ADVANCED 89 7 5 1 DNS Proxy 90 7 5 2 Access Control 91 7 5 3 Port...

Страница 7: ...reate extension numbers assign devices to users 1 1 iPBX Network Placement Figure 1 1 iPBX Network Placement the picture is of model iPBX 400 Note The default LAN IP of iPBX is 172 16 1 1 with the Sub...

Страница 8: ...Powering up the iPBX Connect the power cord to the iPBX and power on iPBX The Power Led will then turn ON Step 2 Connecting Panel Ports 2 1 Connecting the LAN Port Connect iPBX LAN interface to the h...

Страница 9: ...ted IP ad dress changes which may result in a loss of connectivity You should avoid DHCP for LAN IP obtaining if possible 1 To change the LAN settings go to the page at Network Settings LAN 2 Give an...

Страница 10: ...k the button Apply then finish 2 To configure SIP account back to the page of Telephony Settings VoIP Trunks a Click one VoIP trunk line from the list The settings are displayed in the edit section at...

Страница 11: ...page System Provisioning Device Provisioning MAC Address The MAC address of IP Phone Line ID Start from 1 identifying a line of this Device Extension Number 2 4 digitals the extension number assigned...

Страница 12: ...ephony Settings Ext IP Phones 3 5 Configuring Analog Phone Extensions The Analog Phone extension numbers are preconfigured at iPBX 10 to 13 are mapped to FXS port 1 to 3 You may change the extension n...

Страница 13: ...curity reasons if you would like to have iPBX to serve remote tele commuters or users working at home they need to have VPN or other method access to your corporate network and register their IP Phone...

Страница 14: ...network the investment for wiring of IP telephony can be saved 2 1 1 Running Parallel with Existing Corporate Firewall iPBX connects to both the LAN and the Internet operating entirely in parallel wi...

Страница 15: ...3 iPBX behind Corporate Firewall with Port Mapping The iPBX connects behind the corporate firewall with a range of TCP UDP ports mapped to iPBX for voice services all data and voice traffic still pass...

Страница 16: ...its at the edge of the corporate network and acts as the SMB firewall controlling both the voice and data traffic Connecting one of the WAN ports of iPBX to the corporate router and the LAN port to co...

Страница 17: ...CP server to assign IP addresses to IP Phones Power on iPBX and connect iPBX LAN interface to the corporate LAN and configure LAN interface IP address As the example stated in section 1 2 1 IT manager...

Страница 18: ...ipment and the reserved IP address for it Figure 2 9 Configuring IP addresses for devices which require permanent leasing of IP addresses Note 2 If you uncheck the box Only for managed devices iPBX as...

Страница 19: ..._Device Arrangement in a batch mode by importing CSV File Input Before iPBX can start to serve the IP telephony devices for your corporate you need to determine the best course of action for deploying...

Страница 20: ...Model is listed at the page of System Provisioning Device Provisioning 2 Line ID the nth voice line of the particular device 3 Extension group company s organizational group 4 Ext No user extension n...

Страница 21: ...Provider will only supply your DID Numbers and Account information for the iPBX VoIP Trunks and you may have control over the configurations the iPBX and devices connected to the iPBX Note Devices th...

Страница 22: ...rovider supplied the IP phones they should have a list of the MAC address and models for each device otherwise you will need to supply a list of MAC addresses and models for the devices to be connecte...

Страница 23: ...ribing each field Example of the device list in csv format Model ID MAC Address line ID Extension Number PIN User ID Full Name Password 1 11 22 33 D4 E5 F6 2 5405 5405 Alex Alex Plato Alex Attributes...

Страница 24: ...heck the settings and do necessary modifications 6 After having completed the verifications go to page Telephony Settings Devices click the Export button and save the device user list for future maint...

Страница 25: ...C and model name of devices Procedure 1 Connect new IP Phone devices to the network nodes switch hub which are within the same subnet as iPBX LAN interface Then power on these devices 2 New IP Phone u...

Страница 26: ...to manually add one device at a time By entering the admin web page at Telephony Settings Devices clicking Add button a dialog box displays IT manager can type the MAC address of the new device choos...

Страница 27: ...anagement features will not be available to those IP Phones which do not exist in the table at device provisioning page System Provisioning Device Provisioning To assign these unmanaged SIP Phones to...

Страница 28: ...ecember 2008 InnoMedia 2001 InnoMedia All rights reserved InnoMedia iPBX Administrative Guide Note that iPBX cannot guarantee the interconnection and voice quality of those uncertified 3rd party IP Ph...

Страница 29: ...to create extension numbers for iPBX users and devices 4 Configure appropriate call privileges and attributes to this batch of extensions Figure 5 1 Creating Extensions in a batch mode 4 5 Adding User...

Страница 30: ...re 5 2 Adding users one at a time 4 6 Assigning an Extension Number to a New User Once you add users to iPBX database you may start to assign them extension numbers One user may have one or more exten...

Страница 31: ...es SIP trunk lines before iPBX can route outbound calls to the external or can receive inbound calls A Service Provider assigns trunk line numbers phone numbers to a company and the company IT manager...

Страница 32: ...r VoIP trunk line values is displayed at the bottom of the page Field Name Description User ID The SIP User ID The E 164 phone number DID incoming DOD outgoing assigned by Service provider Display Nam...

Страница 33: ...The edit box displays at the bottom You may assign a public DID DOD line displayed as User ID to a user with a private extension displayed as Private Line 5 Click to activate this configuration If th...

Страница 34: ...gure 5 6 SIP registration profile to the service provider 4 8 Assigning Extension Numbers to Analog Devices The iPBX is equipped with 4 analog interfaces FXS ports to which analog devices such as POT...

Страница 35: ...rd Dialing numbers DID DOD to Users for analog devices Figure 5 7 Assigning extension numbers to iPBX analog devices 4 9 Configuring PSTN Trunks only at models iPBX 412 and iPBX 404F In addition to SI...

Страница 36: ...ppens this analog phone is still able to make or receive calls e Click Action to confirm the settings Figure 5 8 PSTN Trunk Line Settings 4 10 Configuring Extension Groups 4 10 1 Hunting Groups Extens...

Страница 37: ...extension groupnumber Number 200 for Customer service for this selected group 3 Click the Action button to add this configuration to iPBX database 4 Click the Group Setting button to configure all th...

Страница 38: ...page of Telephony Settings Ext IP Phones Click on a user s Setting button and get the following user configuration page 1 For managed devices iPBX automatically generates SIP Authentication Password...

Страница 39: ...Phone Feature Settings Call Level IDD International Direct Dialing including Domestic Direct Dialing Local Direct Dialing VoIP and extension numbers DDD Domestic Direct Dialing including Local Direct...

Страница 40: ...e Follow Me The service allows users to configure several numbers to answer any incoming calls Forward to My Voice Mail If the incoming is not answered call will be forwarded to the Voice Mail Callers...

Страница 41: ...rations for incoming calls outgoing calls and private trunk lines VoIP and PSTN trunk lines can be configured separately 4 12 1 Setup Incoming Call Routing Rules A company may assign some phone number...

Страница 42: ...ettings VoIP trunks 2 Configure phone numbers 4083786666 and 4083786667 as the company representative numbers named one as HQ and the other CS as the image shown below Note that the Private line field...

Страница 43: ...ant profile b voice mail system c extension group or d a particular personnel extension number Routing incoming calls by schedule Pick a color block that is defined with the destination and fill the s...

Страница 44: ...calls routing rules for the trunk lines that are not assigned to individual DIDs If there is no special consideration iPBX choose circular hunt scheme to select an available trunk line for an outgoin...

Страница 45: ...urs iPBX allows multiple Auto Attendant configurations Different incoming call numbers can be routed to different Auto Attendant paths Please see Incoming call routing rules By default a company may c...

Страница 46: ...external phone number This requires input a password in order to get further service or avoid fraud Click Change Gateway Password button to secure the access of outbound calls 5 Click the button to u...

Страница 47: ...er entering iPBX auto attendant system and then dials the destination number 4 iPBX will prompt a message to ask for correct gateway password Once being authorized the call will be connected 5 2 Confi...

Страница 48: ...mail be sent to the designated email Please refer to the email client configuration guide of your email system either hosted or premises based Figure 6 3 Configuring the Corporate E Mail Server Inform...

Страница 49: ...onfiguring Music on hold iPBX provides the flexibility and convenience for IT manager to configure the music or any audio message to play for people waiting during call on hold The music or audio mess...

Страница 50: ...st function only works when the CND caller number display function available from service provider The black list entries can be phone numbers or represented as wild card Such as 3335555 333xxxx means...

Страница 51: ...ix number required for calls directing VoIP route That is calls are routed to SIP Trunk lines by default Outbound code When a caller from any extension dials a number that matches the dial pattern the...

Страница 52: ...age Telephony Advanced Dial Plan the Feature Access Code Figure 6 8 Configuring iPBX Feature Access Code 5 8 Miscellaneous Settings Go to the page Telephony Advanced Miscellaneous This page consists o...

Страница 53: ...Ring With Distinctive Ring you can recognize the incoming call s type before answering the call You can distinguish between inbound calls group calls and those on each analog phone Group Call Ring One...

Страница 54: ...file Clear empties the iPBX event database Diagnose selects any specific IP phone clients or SIP trunk lines to be tracked with the SIP communication messages Figure 6 9 iPBX event log 5 10 Access iPB...

Страница 55: ...speed dial and outbound prefix code can be retrieved at the iPBX phone book pages 5 11 iPBX Feature Code Look Up Map All the access codes of iPBX operating features and call features are listed in thi...

Страница 56: ...56 December 2008 InnoMedia 2001 InnoMedia All rights reserved InnoMedia iPBX Administrative Guide Figure 6 11 iPBX Feature Codes for Set Based Features...

Страница 57: ...allows you to modify the password for the system administrator account 6 1 1 Accessing the Administrator Page Procedure 1 Click the icon on the navigation bar The System Configuration Page appears Fig...

Страница 58: ...Confirm New Password field 4 Click Apply to submit your changes To change your PIN 1 Enter the old PIN in the Old PIN field 2 Enter a new PIN in the New PIN field 3 Re enter your new PIN in the Confi...

Страница 59: ...the screen in the Your Name field 2 Enter your email address in the E mail Address field An email alert will send to this email account when you have received new voice mails or there is new firmware...

Страница 60: ...message will be sending to the email address you have entered in the E mail field 9 Click to submit your changes 6 3 System Time Configuration The System Time Configuration screen allows the system a...

Страница 61: ...ets the system administrator to configure iPBX server as well as the devices connected to it 6 4 1 Accessing Provisioning Page Procedure 1 Click the icon on the navigation bar 2 Click System Time link...

Страница 62: ...in the Port field 4 Enter the user name in the User Name field 5 Enter the password in the Password field 6 Click the Apply button to submit your changes A list of devices connected to the iPBX is dis...

Страница 63: ...All rights reserved InnoMedia iPBX Administrative Guide Figure 7 4 iPBX managed device configuration 4 Click the Action button 5 The Device Codec Setting page appears see Figure 7 5 Figure 7 5 The cod...

Страница 64: ...click the delete button 8 To restore the factory default click the Restore Default button 9 Click Apply 6 5 DMS Configuration This page allows the system administrator to define the DMS settings DMS...

Страница 65: ...our Region ID in the Region ID field 7 Select the Heartbeat Type from the drop down menu 8 Click Apply 6 6 Backup and Restore Configuration To prevent the database from any accidental damage system pe...

Страница 66: ...Storage Area from the pull down menu Make sure the Status field shows Connected which means there is an external storage device connected to the iPBX via the USB port 2 Enter the configuration file na...

Страница 67: ...Click System Time link under the System menu in the left panel The Maintenance screen appears Figure 7 8 Figure 7 8 iPBX system maintenance Rebooting To reboot the system click the button Restore Fact...

Страница 68: ...ick Storage link under the System menu in the left panel The Storage screen appears Figure 7 9 Figure 7 9 iPBX External Storage Device Management 6 8 2 Viewing the Storage Information Viewing the Inte...

Страница 69: ...Screen 1 Click the icon on the navigation bar 2 Click UPS link under the System menu in the left panel The UPS screen appears Figure 7 10 Figure 7 10 UPS Power Status Monitor 6 9 2 Viewing UPS Status...

Страница 70: ...000 records If the record exceeds 1000 the new record will overwrite the earliest record 6 10 1 Accessing Audit Log Screen 1 Click the icon on the navigation bar 2 Click Audit Log link under the Syste...

Страница 71: ...d drive follow these steps 1 Click the button the File Download pop up screen appears 2 Click to view the file or click to save the file in your local hard drive 6 11 Information The Information scree...

Страница 72: ...uration The Miscellaneous Configuration screen allows the system administrator to configure Records per page System auto refresh time System auto logo out time 6 12 1 Accessing the Miscellaneous Confi...

Страница 73: ...the Page Setting field enter the number of records you would like to see per page The minimum number can be displayed per page is 10 and the maximum is 50 2 In the Auto Refresh field the time interva...

Страница 74: ...the configuration information provided by your ISP LAN lets the system administrator configure the LAN setting of iPBX DHCP lets the system administrator configure the DHCP server function to allow yo...

Страница 75: ...Monitor Screen Internet Table 1describes the information displayed on the Internet fields Table 1 Field Description Current Connection Internet connection type being used Click the Log button to view...

Страница 76: ...Internet interface s IP address Netmask IPBX system Internet interface s netmask Default Gateway Internet interface default gateway s IP address NS1 Internet interface s primary DNS server s IP addres...

Страница 77: ...l port protocol expiration time and description To see the port mapping information click the button The Port Mapping Table appears Figure 8 2 iPBX VoIP Firewall Port Forwarding Mapping Table Field De...

Страница 78: ...le click the button The Routing Table appears Figure 8 3 iPBX VoIP Router Static Routing Table Field Description No Record Number Interface Static routing s interface name Destination IP The destinati...

Страница 79: ...are four connection types available for selection under the Internet Connection Type drop down menu None Do not use Internet connection PPPOE Use Ethernet PPP to set up Internet connection e g ADSL DH...

Страница 80: ...ed by your ISP for Internet connection Password The security password provided by your ISP for Internet connection On Demand Connection Auto set up connection while accessing the Internet and after it...

Страница 81: ...cess mainly including time event description and can export and clear record Click the button to see the PPPoE connection events history record and export the data to your local drive Refresh Pages re...

Страница 82: ...erface s MAC address Some ISPs may ask user to use the appointed MAC address to lock the user s identity Restore Default Restores the MAC address to the factory default Connection State Whether it has...

Страница 83: ...rd and export the data to your local drive Refresh Pages refresh automatically based on the time interval This time interval can be set on the Auto Refresh page under the System Click and page will be...

Страница 84: ...Internet Connection Record Click the button to see the history of Internet connection and export the data to your local drive Log Record the event information of each connecting Internet process main...

Страница 85: ...ll be restored to the factory default Note that features as Access Control Port Forwarding DMZ Static Routing are only available at models iPBX 400F and iPBX 404F 7 3 1 Accessing the LAN Configuration...

Страница 86: ...idual computer s TCP IP stack software DHCP assigns a number dynamically from a defined range of numbers i e a scope configured for a given network The DHCP allows the system administrator to configur...

Страница 87: ...Time from the drop down menu The Lease Time is the valid time of the DHCP client using the IP address The system will automatically reassign the IP addresses to the clients when they expire 4 Enter th...

Страница 88: ...ghts reserved InnoMedia iPBX Administrative Guide Figure 8 9 iPBX DHCP Client List Managed Devices DHCP Client List This screen displays the client information which uses DHCP service including IP add...

Страница 89: ...Description No Record Number Host Name Client s host name IP Address The IP address that the client gets via DHCP MAC Address Client s MAC address Obtained Time The time that the client gets the IP a...

Страница 90: ...rwards them to an Internet DNS server Figure 8 10 iPBX DNS Proxy Server Settings Adding a DNS Proxy To add a DNS proxy follow these steps 1 Enter the DNS domain name or domain name s suffixes in the D...

Страница 91: ...he Internet IT managers may specify those LAN nodes by IP address subnet TCP UDP application ports or by the device MAC address It is also possible to set schedule to specify when hourly and daily to...

Страница 92: ...s IP address range The IP address must in the range of the LAN and can t be LAN broadcast address Schedule Field Description No Record Number Schedule The time frames of the access control policy take...

Страница 93: ...use a special purpose service such as Internet gaming or Video conferencing Please note that the DMZ host is not protected by the firewall and may be vulnerable to attack Field Description No Rule Nu...

Страница 94: ...you know the port number related setting should be configured in the Port Forwarding 3 Click Apply 7 5 5 UPnP This feature is only available at models iPBX 400F and iPBX 404F The UPnP framework can au...

Страница 95: ...rk 2 Forwarding packets based upon the defined paths Routing can be accomplished by manually entering the information necessary for packets to reach any part of the internetwork into each router This...

Страница 96: ...Or just click the Cancel button of routing table page to go back to the parent screen Field Description No Record Number Interface The iPBX network interface through which traffic moves on this route...

Страница 97: ...AN including data and voice traffic Hence only LAN is available at the interface field through which traffic moves on this route The definition of each field is the same as the descriptions of the tab...

Страница 98: ...Description Enable Ping to WAN Interface Enable or disable Internet remote user to Ping this host s WAN interface Enable access to Web Admin via WAN interface Allow remote users to use browser to acc...

Страница 99: ...Priority value in the field 4 Enter the VLAN ID and priority value for Voice Data in the fields 5 Enter the VLAN ID and priority value for Voice Signal in the fields 6 Enter the VLAN ID and priority v...

Страница 100: ...icon on the navigation bar 2 Click QoS under the Settings menu in the left panel The QoS screen appears see Figure Figure 8 19 iPBX Voice QoS Configuration 7 7 2 Configuring QoS Settings To configure...

Страница 101: ...d will first be green then red then off then steady green System Booting Steady green Running normally Orange blinking On provisioning Red blinking Provisioning failed Red Orange blinking Sip trunk re...

Страница 102: ...The FXS module is internally initialized and the unit is ready to make calls after booting Steady Green The connected telephone handset is off the hook Blinking Green once The connected telephone sta...

Страница 103: ...n battery power Pin 3 Open Blinking Yellow The battery is at a low state Pin 6 Open Steady Red The battery is missing Pin 5 Open Blinking Red The battery fails the Self Test Battery replace Pin 4 Open...

Страница 104: ...104 December 2008 InnoMedia 2001 InnoMedia All rights reserved InnoMedia iPBX Administrative Guide...

Отзывы: