background image

Setting the weekly program

The program can be set for each day in a week separately 
or for the whole week at once. During one day for every 
half an hour comfort temperature is being set. Economic 
temperature is set by default in other half-hour intervals.

 1. 

Open the mobile app.


2. Log in to the account you previously created.


3. Select the device.


4. Click the symbol       in the upper right  


corner and then click SETTINGS.


5. Choose SEVEN DAYS PROGRAM.


6. Choose half-hour intervals in which you want  


to have COMFORT temperature activated, for  


each day separately or the whole week at once.

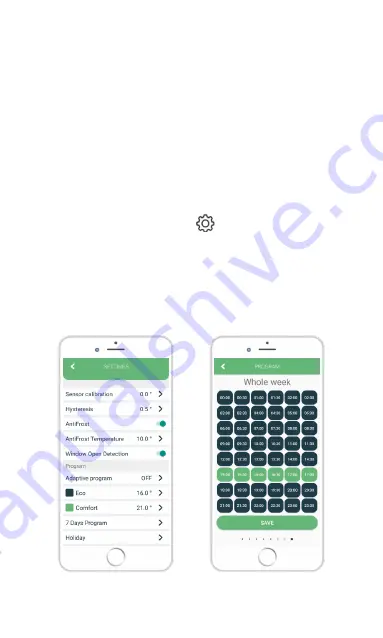
Overview of the screen for 

setting the program

Содержание IT WiFi

Страница 1: ...Thermostat Manual step by step IT WiFi v3 0 EN ...

Страница 2: ......

Страница 3: ...he temperature The units communicate with each other using a radio signal The receiver also communicates with the mobile app using WiFi The advantage of the system is the variability and easier availability of temperature control Important notes Read the user manual not only for the thermostat but also the boiler Turn off the power supply before installing the thermostat We recommend installation ...

Страница 4: ...ture Yes Yes Yes 0 2 C 5 C 5 C 5 C Android 5 0 iOS 5 or higher Free Holiday mode Weekly program Multiple thermostat control Hysteresis setting Temperature sensor calibration Platform Download and update 22 5 Power supply Mounting RF Communication Manual control Frost protection Window open detection Sensitivity Temperature setting Temperature measurement Dimensions 3 V DC 2 AA batteries Wall or po...

Страница 5: ...ll heater valves in the room where the thermostat is installed are fully open Only operate the heating system if it is in technically perfect condition Behaviour in case of loss of wireless communication Low voltage in the batteries that power the thermostat may result in interruption of wireless communication In the event of a loss of wireless communication between the receiver heating system swi...

Страница 6: ...ge the receiver remains in its last state If after 10 minutes the communication with the thermostat is not established it will turn off the the heating In this case the heating can be turned on and controlled only via mobile app by setting the set temperature higher than 7 0 C Freezing damage due to too low room temperature If the room temperature is set too low in some rooms the heating system ca...

Страница 7: ...he product Children must be supervised to ensure that they do not play with the product This thermostat can be used to control a heating system with a boiler Intended use includes Following the enclosed instructions for use installation and maintenance of the device as well as all other system components Compliance with all inspection and maintenance requirements stated in the instructions Use tha...

Страница 8: ...light signal 4 Orange light signal Off in case there is no communication between the thermostat and the receiver On in case communication is established between the thermostat and the receiver Blinks quickly if the device is in SmartConfig mode Blinks two times in case the receiver receives a message from the thermostat On when the receiver is turned on On when heating request is active Blinks qui...

Страница 9: ...isplay Working mode Heating state Time Program Current temperature Set temperature Eco Comfort temperature Time settings Overview of the basic functions Overview of the functions on the settings display Internet connection SmartPairing mode SP SmartConfig mode Holiday mode Child lock ...

Страница 10: ...d off unless anti frost protection turns it on Setting the working mode Program mode Program mode can only be entered if an internet connection is established 1 Press and hold the rotary push button for one second 2 The upper left end of the screen shows the symbol 3 PROGRAM MODE successfully activated Manual mode 1 Press and hold the rotary push button for one second 2 The upper left end of the s...

Страница 11: ...e 1 The upper end of the screen shows the symbol 2 Holding the rotary push button for three seconds exits the holiday mode and enters manual mode Program mode is active Manual mode is active Holiday mode is active ...

Страница 12: ...sh button to set the desired temperature 2 Rotating clockwise increases the set temperature 3 Rotating counterclockwise decreases the set temperature Opening the settings display 1 Hold down the rotary push button for 3 5 seconds until the settings display opens 2 Release the rotary push button ...

Страница 13: ... press the rotary push button to enter the clock setting 3 Rotate the rotary push button set the current MINUTE and briefly press the rotary push button 4 Rotate the rotary push button set the current HOUR and briefly press the rotary push button 5 Rotate the rotary push button set the current DAY and briefly press the rotary push button 6 Briefly press the side button to go a step back to exit th...

Страница 14: ... 2 Rotate the rotary push button select the SP and hold the rotary push button 3 When symbol SP starts to blink release the rotary push button To enter SmartPairing via receiver 1 Push down ON OFF button 2 While green light signal is blinking pull the ON OFF button up 3 Do step 1 and 2 two times 4 Red light signal blinking will indicate that the receivar has entered SmartPairing mode When the Smar...

Страница 15: ...Symbol SP starts to blink when entering the SmartPairing mode ...

Страница 16: ...e rotary push button 3 When symbol SC starts to blink again and there is no time option release the rotary push button 4 Open the mobile app and click the symbol in the upper right corner 5 Click SMART CONFIG and then START SMART CONFIG 6 Enter the WiFi password of the network your mobile device is connected to 7 Click CONNECT and wait 8 A message on the device s connection status will be displaye...

Страница 17: ...Symbol SC starts to blink when entering the SmartConfig mode ...

Страница 18: ...e CREATE ACCOUNT 6 Enter data in corresponding fields 7 Click REGISTER 8 Check the email used to create a new account and confirm registration via the confirmation link 9 Go back to the main screen in the mobile app 10 Enter your username and password in corresponding fields 11 Click LOG IN 12 The application is ready to use Scan QR to download the app from Google Play Scan QR to download the app ...

Страница 19: ...Overview of the register screen Overview of the log in screen ...

Страница 20: ...en the mobile app 4 Log in to the account you previously created 5 Click on ADD NEW DEVICE 6 You can also add a new device by clicking the symbol in upper right corner 7 Select SMART CONFIG 8 Select START SMART CONFIG 9 Enter the password of the WiFi network you are currently connected to and then click CONNECT 10 Wait for the mobile app to recognize your device 11 A message on the device s connec...

Страница 21: ...Overview of the screen without connected devices Overview of the screen with connected device ...

Страница 22: ... by using the mobile app 1 Open the mobile app 2 Log in to the account you previously created 3 Select the device you want to share 4 Click the symbol in the upper right corner 5 Select SHARE DEVICE 6 Use the other mobile phone to scan QR code from the screen of your device Share device option in the menu ...

Страница 23: ...previously explained sharing of the device 1 Open the mobile app 2 Log in to the account you previously created 3 Click the symbol in the upper right corner 4 Choose SCAN QR 5 Scan QR code from other device s screen 6 A message on the device s connection status will be displayed on the mobile app screen Overview of the screen for adding a device ...

Страница 24: ...2 Log in to the account you previously created 3 Select the device you want to rename 4 Click the symbol in the upper right corner 5 Select RENAME DEVICE 6 Choose RENAME if you want to rename device or CANCEL if you don t want to rename device Overview of the screen for renaming a device ...

Страница 25: ...account 1 Open the mobile app 2 Log in to the account you previously created 3 Select the device you want to share 4 Click the symbol in the upper right corner 5 Select DELETE DEVICE 6 A message will be displayed choose DELETE if you want to delete the device or CANCEL if you don t want to delete the device Overview of the screen for deleting a device ...

Страница 26: ...active or inactive Battery The battery level of the thermostat is shown on the right side Software version The software version shows the current version of the software installed on the thermostat and receiver The status UPDATE means the newer version is available otherwise it shows UP TO DATE Window Open Detection Window Open Detection has three states Window Open Detection is enabled Window is ...

Страница 27: ... the mobile app 2 Log in to the account you previously created 3 Select the device 4 Click the symbol in the upper right corner and then click SETTINGS 5 Choose SENSOR CALIBRATION and set the desired value between 5 C and 5 C 5 Click SAVE Overview of the screen for calibrating the temperature sensor ...

Страница 28: ... heating on Hysteresis setup is possible via mobile app 1 Open the mobile app 2 Log in to the account you previously created 3 Select the device 4 Click the symbol in the upper right corner and then click SETTINGS 5 Choose HYSTERESIS and set the desired value between 0 2 C and 5 C 5 Click SAVE Overview of the screen for setting the hysteresis ...

Страница 29: ... temporarily disable window open detection for the next 30 minutes Also after 10 minutes have passed since the window open has been detected this will also temporarily disable window open detection for the next 30 minutes Window open detection can be enabled or disabled via mobile app at any given time 1 Open the mobile app 2 Log in to the account you previously created 3 Select the device 4 Click...

Страница 30: ...sabled The symbol is displayed on the thermostat 1 Open the mobile app 2 Log in to the account you previously created 3 Select the device 4 Click the symbol in the upper right corner and then click SETTINGS 5 Choose ANTIFROST and set the desired value between 0 C and 17 C 5 Click SAVE Overview of the screen for setting the antifrost temperature ...

Страница 31: ... is displayed on the thermostat 1 Open the mobile app 2 Log in to the account you previously created 3 Select the device 4 Click the symbol in the upper right corner and then click SETTINGS 5 Choose ECO temperature and set the desired value 6 Click SAVE Overview of the screen for setting the eco temperature ...

Страница 32: ...s displayed on the thermostat 1 Open the mobile app 2 Log in to the account you previously created 3 Select the device 4 Click the symbol in the upper right corner and then click SETTINGS 5 Choose COMFORT temperature and set the desired value 6 Click SAVE Overview of the screen for setting the comfort temperature ...

Страница 33: ...gram so that the desired room temperature is achieved at the scheduled time 1 Open the mobile app 2 Log in to the account you previously created 3 Select the device 4 Click the symbol in the upper right corner and then click SETTINGS 5 Choose ADAPTIVE PROGRAM and set the desired value desired value between 1 and 60 minutes or OFF 6 Click SAVE Overview of the screen for setting the adaptive program...

Страница 34: ...set by default in other half hour intervals 1 Open the mobile app 2 Log in to the account you previously created 3 Select the device 4 Click the symbol in the upper right corner and then click SETTINGS 5 Choose SEVEN DAYS PROGRAM 6 Choose half hour intervals in which you want to have COMFORT temperature activated for each day separately or the whole week at once Overview of the screen for setting ...

Страница 35: ...the mobile app 2 Log in to the account you previously created 3 Select the device 4 Click the symbol in the upper right corner and then click SETTINGS 5 Choose HOLIDAY 6 Click on the RETURN DATE and then choose the return date on the calendar 7 Click on the RETURN TIME and choose the return time on the clock 8 Click on the HOLIDAY TEMPERATURE and set the wanted Holiday Temperature 9 Click on Holid...

Страница 36: ...Overview of the screen for setting the holiday mode ...

Страница 37: ...ed on mobile app by setting the set temperature to 35 C If the receiver is connected to the WiFi the heating can also be controlled via mobile app Setting the temperature to the 7 C will turn off the heating and setting any temperature higher than 7 C will turn it on If the heating is turned off via mobile app if we want to turn on the heating with on off button on the receiver first pull down the...

Страница 38: ...e thermostat from the thermostat mount 2 Replace the batteries with two Alkaline AA 1 5V batteries 3 Place the thermostat on the thermostat mount 4 Set TIME by following the manual SETTING TIME The thermostat is ready to continue operating All set programs and advanced options have been preserved ...

Страница 39: ... again Press on off button for a refresh Turn the thermostat off and on again Condition The receiver activated the heating request but the heating system did not activate Check that all other conditions for activating the heating are fulfilled Check that the receiver is properly attached to the bracket Make sure the receiver is properly connected to the heating system Condition Unable to smart con...

Страница 40: ...ot place any open flames on the device such as a lit candle etc 7 Do not place the device in places where there is insufficient air flow 8 Do not place any objects in the vents of the unit 9 Do not touch the internal power openings of the device they may be damaged and thus automatically void the warranty Only a qualified person should operate the device 10 Use a slightly damp cloth to clean it Do...

Страница 41: ... resources More information about recycling this product will be provided by the municipality your household waste disposal organization or the point of sale where you purchased the product NOTE The contents of this manual are subject to change without notice due to limited printing the displayed symbols may be slightly different from the on screen display the contents of this manual may not be co...

Страница 42: ......

Страница 43: ......

Страница 44: ...Innentech GmbH Gubelstrasse 19 6300 Zug Switzerland ...

Отзывы: