background image

16

Integriti.

Integriti.

Integriti.

Integriti.

Integriti.

Revision 3.1  June 2014.

Remember:

 You have a limited time to exit the

Area once you have turned it ON.  (Usually 30-90
seconds.  Ask the Installer for the time used in your
system)

Your Graphic Terminal may be configured to
display this countdown timer and/or sound a
warning during the Exit Delay period.

When the operation is complete the display will
return to the Area status display.  The icon and text
colour will alter accordingly to indicate that the
operation was successful.

OR

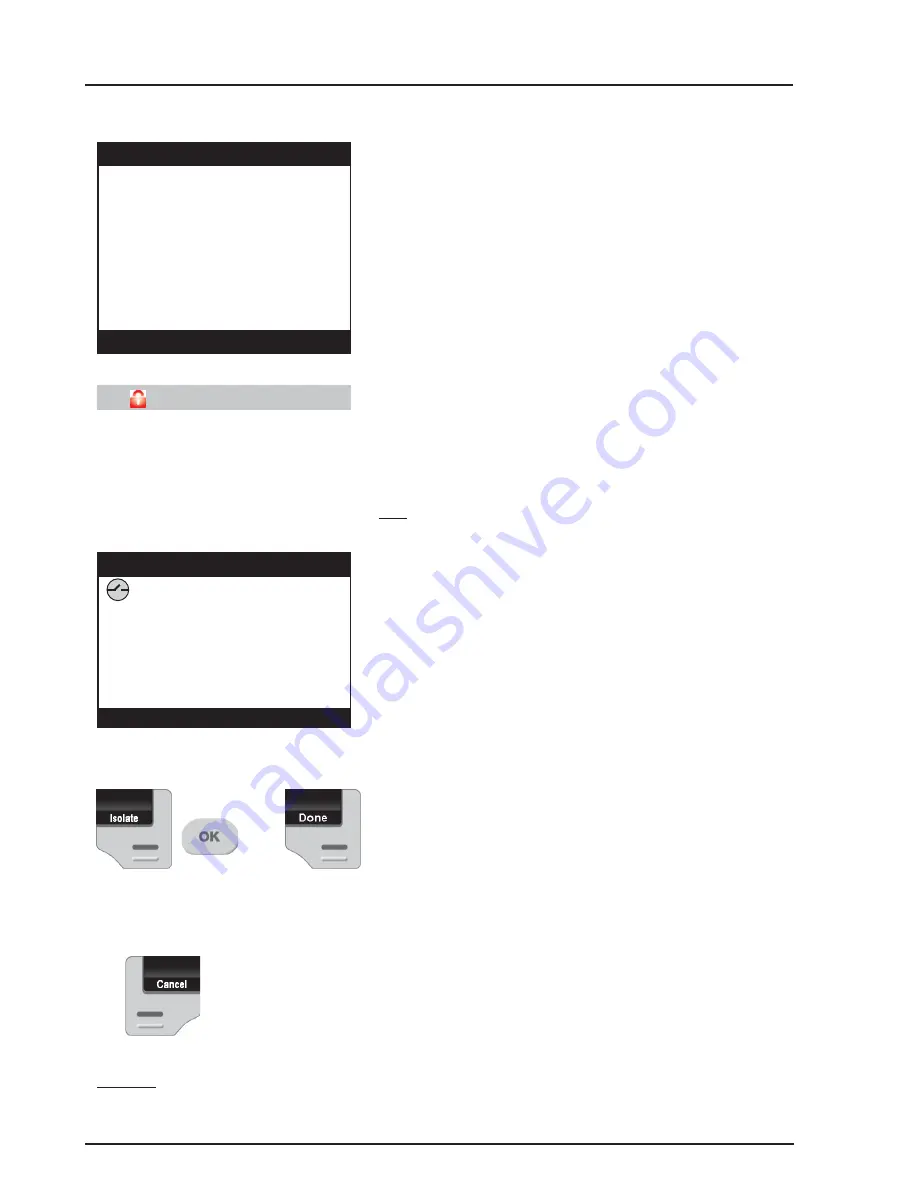
After pressing the <ON> key, the display may
show a message like this.  It means that any items
displayed are either in an alarm state or faulty, and
the Area will not turn ON.
e.g. A detector or it’s cabling have been damaged.

A door or window has been left open.

Try to rectify any problems before trying again.

If you are unable to rectify a problem, you have 2
options:
1)  You may be allowed to ISOLATE the item
while the “Unsealed Inputs” message is displayed.
Press the <Isolate> key, select the Input to Isolate
using the SCROLL WHEEL, then <OK> to
confirm the Zone Isolation operation.  When
complete, press <Done> to proceed with the Area
On operation.

2)  Press <Cancel> to cancel the Area On
operation.

NOTE:
Inputs isolated in this way are automatically de-isolated when the Area is turned OFF.

Admin

 then 

or  

Admin Timer

Exit Delay, Area will turn on in

37

Seconds

Logon

Unsealed Inputs

      Fire Door Reed Switch

Cancel

  Isolate

Содержание Integriti Prisma Keypad

Страница 1: ...nual Colour Graphic T Colour Graphic T Colour Graphic T Colour Graphic T Colour Graphic Terminal erminal erminal erminal erminal User Manual R User Manual R User Manual R User Manual R User Manual Rev...

Страница 2: ...riti Integriti Integriti Integriti Revision 3 1 June 2014 SYSTEM DETAILS CUSTOMER SITE ADDRESS LOCATION PHONE FAX E MAIL INSTALLED BY PHONE FAX E MAIL MAINTENANCE SERVICE PHONE FAX E MAIL MONITORED BY...

Страница 3: ...mation 22 MENU OPTIONS 23 Accessing the Menu 23 Keypad Functions in the Menu 24 If Used INNER RANGE recommends that all INTEGRITI systems are installed maintained by FACTORY CERTIFIED TECHNICIANS For...

Страница 4: ...e Menu for information and operations other than Area On Off Door Access etc A limited Menu is displayed if you are not logged on The Keypad Operations programming are performed by using the function...

Страница 5: ...to adjust numerical values e g In a Timer The Scroll Wheel can also be used to move the cursor left or right The LEFT arrow key will move the cursor to the left The RIGHT arrow key will move the curs...

Страница 6: ...ost operations can be performed These keys can also be used to search for an item by name e g A User to edit or an Input to Isolate HELP Can be pressed at any time to display a Help message about the...

Страница 7: ...e on front cover TIME DATE The current system Time Date may be displayed in one of 3 formats Single text line at the top or bottom of the screen Digital Clock with date below Analogue Clock in top lef...

Страница 8: ...nu options as icons i e PIN Code Logon Review Event log Information and Control MULTIPLE ENTITY STATUS The Multiple Entity status option allows the current status of up to 6 Entities to be viewed by n...

Страница 9: ...for Area Array the lamps will indicate the status of up to 8 sequential Areas in the following manner Green or Off Area Off Disarmed Green Slow Flash Entry or Exit Timer running Red Area On Armed Red...

Страница 10: ...l the condition is rectified The table below describes the messages currently provided For messages not listed here please consult the Installer You will probably require the Installer to rectify most...

Страница 11: ...ired If there is a message to be acknowledged refer to Acknowledge an Alarm The Area Control screen is now displayed with the first Area or Area List that you are allowed to control highlighted and a...

Страница 12: ...cate that the operation was successful AREA SELECTION You may select other Areas by using the SCROLL WHEEL or the UP DOWN Arrow keys Once you have Logged on to a Terminal and can view the Area status...

Страница 13: ...sion to turn off disarm will be turned Off 24 HOUR Allows the Installer or a User with the appropriate level of authority to turn the 24Hr part of an Area Off so that maintenance or changes can be per...

Страница 14: ...he Area Off again to re start the timer or Turn the Area back On and cancel the timer The sytem also allows a warning timer to be programmed for each Area that has a deferred arming timer When the def...

Страница 15: ...ts the state of all the inputs allocated to the Area to ensure that they are in the Sealed condition and the Area is ready to be turned ON If all Zones programmed to be tested are Sealed the Area will...

Страница 16: ...items displayed are either in an alarm state or faulty and the Area will not turn ON e g A detector or it s cabling have been damaged A door or window has been left open Try to rectify any problems be...

Страница 17: ...ed and how it will operate in your system Press the HELP key at any LCD Terminal that has the Panic option enabled The display will show the normal logon help message Press the HELP key again within 3...

Страница 18: ...d or The Later FUNCTION key to postpone acknowledgement of the alarm If there are other Areas that have had an event the next Area event messages will be displayed until all messages have been acknowl...

Страница 19: ...be limited to particular Users These User Actions can only be controlled by Users with access to the Control Menu MENU 9 After logging on and selecting the Menu option control operations will be the...

Страница 20: ...cursor on the time digit you wish to edit then use the SCROLL WHEEL or the ALPHA NUMERIC keys to enter the required value A period of up to 4 Hours may be entered Periods are accurate to 1 second The...

Страница 21: ...rded in the Review memory The Top of the display will show the selected alarm review event in full The Lower part of the display will show the first part of the four most recent alarm review events Th...

Страница 22: ...e System Information simply press the Menu FUNCTION key then the 4 key Alternatively press the Menu FUNCTION key highlight the Information icon using the SCROLL WHEEL then press the OK key The display...

Страница 23: ...up Menu Use the SCROLL WHEEL or ARROW keys to highlight the required option then press OK Press a DIGIT key to select a Main Menu option The display will then show the selected operation or a Sub Menu...

Страница 24: ...d for programming text or numerical values where available Saves the current screen exits the menu and logs the User Off Provides relevant help messages on the display whenever required e g Will tell...

Отзывы: