


20
IN1401 Operation Manual - v1.5 7/12/02 11:18 AM
© 2002 - INLINE, Inc.
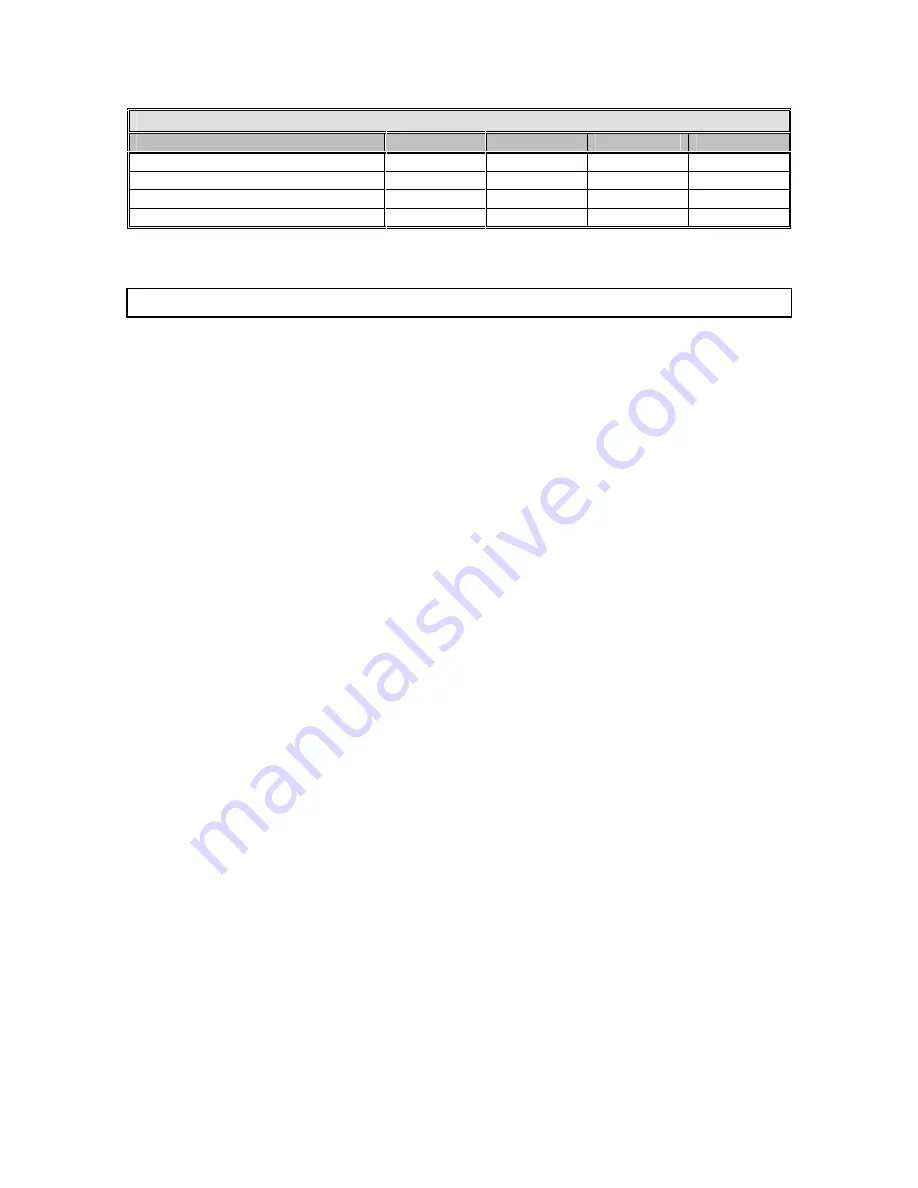
RGB Input Cables and Connectors
Cables
1-Conductor
3-Conductor
5-Conductor
6-Conductor
Standard Resolution
IN7000-5
Standard Resolution, Flexible Plenum
IN7000FP-5
Ultra High Resolution
IN7200-1 IN7200-3 IN7200-5 IN7200-6
Super High Resolution
IN7300-5
IN7300-6
All cable grades are available in lengths form 3’ to 250’ pre-terminated with high quality BNC connectors or as bulk cable.
Troubleshooting
Problem: There is no image on the monitor.
Solution 1: Make sure that the IN9230 IEC power cable is securely plugged into the unit and the A/C
source.
Solution 2: Make sure the A/C source is live.
Solution 3: Verify that the power switch is turned on for the video source, the IN1401 and the
monitor.
Solution 4: Verify the connection to the output display device. Even with no input signal, the
IN1401 menu can be displayed. Press MENU or ENTER to gain access to the menu screen.
Solution 5: Select an Output Resolution and Refresh Rate compatible with the monitor being used.
Use the default power-up buttons to select an Output Mode without the menu present, then
turn on the Blue Screen to verify these settings.
Solution 6: The input / output settings may be incorrect. Although the unit should not allow invalid
settings, they may need to be reloaded. If the menu is available, select Options, Auto Detect
and Redetect Now to reload these settings.
Solution 7: The output resolution may be less that the input (the IN1401 can only scale up). Select
an Output Resolution that is greater than or equal to the Input Active Area.
Problem: The image on the monitor is scrambled.
Solution: Select an Output Resolution and Refresh Rate compatible with the monitor being used.
Use the default power-up buttons to select an Output Mode without the menu present, then
turn on the Blue Screen to verify these settings.
Problem: The image on the monitor is stretched horizontally.
Solution 1: The Input Total Pixels may be set too high. Reduce the Input Total Pixels to match the
input signal. Refer to the Input Settings section on pages 10-13 to make the necessary
adjustment.
Solution 2: Increase the Input Active Pixels to match the input settings.
Solution 3: Increase the Output Resolution to a value greater than the input active area.
Problem: The image on the monitor is compressed horizontally.
Solution 1: Increase the Input Total Pixels setting to match the input signal. Refer to the Input
Settings section on pages 10-13 to make the necessary adjustments.
Solution 2: Reduce the Input Active Pixels setting to match the input signal.
Problem: The image on the monitor is stretched vertically.
Solution 1: Increase the number of Input Active Lines to match the input settings.
Solution 2: Increase the Output Resolution to a greater value than the input active area.


