background image

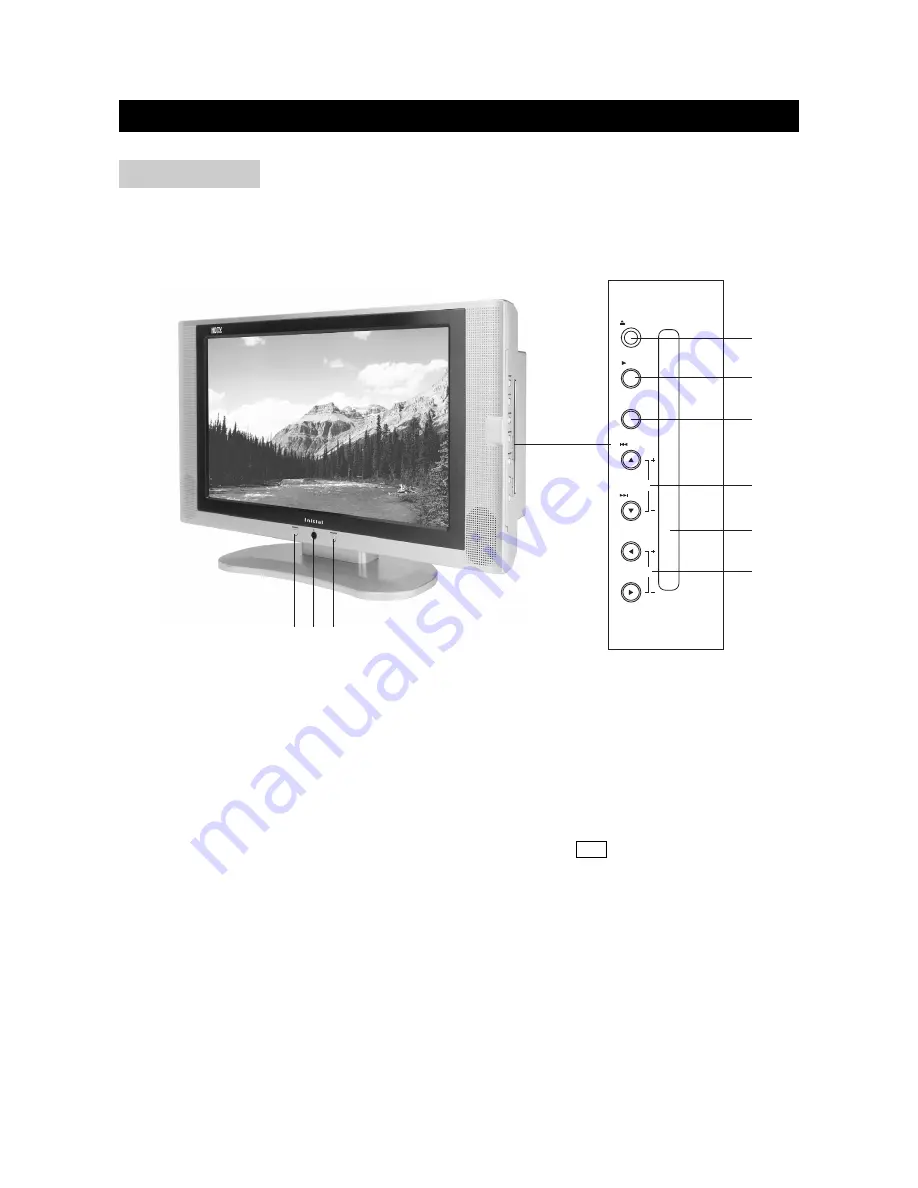
1) POWER BUTTON: Use to turn the unit on and off.

2) REMOTE SENSOR

3) SOURCE BUTTON: Use to select the AV signal source between: DVD, Analog RGB (PC input), 

Composite Video, S-Video, TV, Component Video, and use the  OK  button to confirm.

4) EJECT BUTTON: Use to eject the disc being played in the disc slot.

5) PLAY BUTTON: Use to begin the DVD playback.

6) LCD MENU: Use to bring up the LCD adjustment menu; use the cursor buttons to select an 

item and use the left or right button to adjust it.

7) PREV/NEXT (CH+/-): To skip to the previous/next chapter (previous/next channel).

8) DISC SLOT: Insert a DVD or CD disc to play under DVD status.

9) /-: Use to adjust the volume.

FUNCTIONAL OVERVIEW

page6

FRONT VIEW

LCD MENU

OK

VOL

CH

NEXT

PREV

PLAY

EJECT

1

2

3

4

5

6

7

8

9

Содержание DTV-171

Страница 1: ...17 16 9 AV TV PC MONITOR MULTI COLOR SYSTEM TV TUNER DTV 171 Operation Manual http www initialdvd com Please read carefully before use ...

Страница 2: ...OPERATIONS TURNING ON THE POWER TURNING OFF THE POWER TV AV MODE SELECTION WATCHING TV TURNING ON THE POWER TURNING OFF THE POWER SIMPLE BUTTON OPERATIONS FOR CHANGING CHANNELS USING LAST ON THE REMOTE UNIT SIMPLE BUTTON OPERATION FOR CHANGING VOLUME SOUND MENU ADJUSTMENT CHANNEL ADJUSTMENT PICTURE ADJUSTMENT AUDIO ADJUSTMENT WINDOW ADJUSTMENT OPTIONS ADJUSTMENT TROUBLESHOOTING SPECIFICATIONS 1 2 ...

Страница 3: ... and if not installed and used in accordance with the instructions may cause harmful interference to radio communications However there is no guarantee that interference will not occur in a particular installation If this equipment does not cause harmful interference to radio or television reception which can be determined by turning the equipment off and on the user is encourage to try to correct...

Страница 4: ... them or objects from resting on them Check the cords at the plugs and product 8 Overloading Do not overload AC outlets or extension cords Overloading can cause fire or electric shock 9 Entering of objects and liquids Never insert an object into the product through vents or openings High voltage flows in the product and inserting an object can cause electric shock and or short internal parts For t...

Страница 5: ...cart stand tripod or table Unstable installation is likely to make the product fall resulting in serious injuries as well as material damage Use only the cart stand tripod bracket or table specified by the manufacturer or sold with the apparatus 19 When a cart is used use caution when moving the cart apparatus combination to void injury from tip over 20 Ventilation The vents and other openings in ...

Страница 6: ...re provided with the product SUPPLIED ACCESSORIES page4 17 16 9 AV TV PC MONITOR MULTI COLOR SYSTEM TV TUNER DTV 171 Operation Manual http www initialdvd com Please read carefully before use Power adapter AV cable User guide Remote control ...

Страница 7: ... of the Display is under direct sunlight or strong lighting In such case change the angle of the lighting or Display or operate the remote control unit closer to the remote sensor window CAUTIONS REGARDING REMOTE CONTROL UNIT Use the remote control by pointing it towards the remote sensor on the TV Objects between the remote control and the sensor may disrupt operation Effective range is 20 feet b...

Страница 8: ...layed in the disc slot 5 PLAY BUTTON Use to begin the DVD playback 6 LCD MENU Use to bring up the LCD adjustment menu use the cursor buttons to select an item and use the left or right button to adjust it 7 PREV NEXT CH To skip to the previous next chapter previous next channel 8 DISC SLOT Insert a DVD or CD disc to play under DVD status 9 VOLUME Use to adjust the volume FUNCTIONAL OVERVIEW page6 ...

Страница 9: ...T Composite Video and Audio Out 5 PHONES 6 AV3 IN Component Video and Audio In 7 VGA PC Input 8 DC IN FUNCTIONAL OVERVIEW page7 REAR VIEW PHONES AV OUT AV2 IN AV1 IN ANT VIDEO L R S VIDEO VIDEO L R L R DC IN VGA Y CR PR CB PB COMPONENT VIDEO PROGRESSIVE SCAN OUT L R AV3 IN 2 1 5 6 8 7 3 4 ...

Страница 10: ...OK Use to confirm your selections 6 SETUP Use to bring up DVD setup menu 7 SOURCE Use to bring up the AV signal source selection screen and use the buttons to select between DVD Analog RGB PC input Composite Video S Video TV Component Video and press the OK button to confirm FUNCTIONAL OVERVIEW page8 REMOTE CONTROL 1 2 3 4 6 5 7 8 9 11 10 12 13 14 15 16 17 19 18 21 20 23 25 27 28 26 24 22 30 29 31...

Страница 11: ...ft the DVD playback audio mode 20 P MODE Use to shift DVD play mode 21 RETURN Return to the previous menu screen 22 OSD Use to bring up the DVD On Screen Display 23 SLEEP Set the sleep timer 24 PREV NEXT Use to skip to the previous next chapter 25 STOP Use to stop the DVD playback 26 LAST Press to return to the previous channel in normal viewing mode 27 TV MENU Use to bring up TV menu 28 TITLE Use...

Страница 12: ...ntenna cable connect the room antenna terminal to the antenna input terminal on TV set CONNECTIONS page10 MAIN CONNECTION ANTENNA CONNECTION DC IN VGA Y CR PR CB PB COMPONENT VIDEO PROGRESSIVE SCAN OUT L R AV3 IN PHONES AV OUT AV2 IN AV1 IN ANT VIDEO L R S VIDEO VIDEO L R L R ANTENNA CABLE ...

Страница 13: ...confirm 3 Connect AV equipment to the LCD through the AV2 IN jacks S Video and Audio In jacks press the SOURCE button on the remote to bring up Source selection screen use the buttons to select S Video and press the OK button to confirm 4 Connect AV equipment to the LCD through the AV3 IN jacks Component Video and Audio In jacks press the SOURCE button on the remote to bring up Source selection sc...

Страница 14: ... control the image on the screen disappears and the STANDBY ON indicator changes from green to red 2 Press the POWER button on the front panel to turn the TV set off NOTE Weak electric power is still consumed even when the power is turned off TURNING OFF THE POWER By pressing the SOURCE on the TV set and confirming by the OK button you can change the mode as follows DVD Analog RGB PC input Composi...

Страница 15: ...d the STANDBY ON indicator changes from green to red 2 Press the POWER button on the front panel to turn the TV set off NOTE Weak electric power is still consumed even when the power is turned off TURNING OFF THE POWER 1 Press CH to increase channel number 2 Press CH to decrease channel number NOTE CH on the TV set operates the same as CH on the remote unit CH You can change channels in several wa...

Страница 16: ...revious tuned channel Press LAST again to switch back to the currently tuned channel Select the channels directly by pressing the number buttons EXAMPLE To select a 1 digit channel e g channel 2 Press 2 To select a 2 digit channel e g channel 12 Press 1 followed by 2 USING LAST ON THE REMOTE UNIT NUMBER BUTTONS LAST ...

Страница 17: ...UTE on the remote control Press MUTE to mute the current sound output WATCHING TV page15 1 Press MUTE MUTE will display on the screen 2 Press MUTE again to cancel the mute 1 Press VOL to increase the volume 2 Press VOL to decrease the volume SIMPLE BUTTON OPERATION FOR CHANGING VOLUME SOUND VOLUME MUTE ...

Страница 18: ... Press TV MENU to bring up the TV menu screen 2 Press to select Channel 3 Press to select Auto Search 4 Press to begin the searching Wait until the searching ends NOTE The illustrations and on screen displays in this manual are for explanation purposes and may vary from the actual operations Manual Search 1 Press TV MENU to bring up the TV menu screen 2 Press to select Channel 3 Press to move to M...

Страница 19: ...l 3 Press to select Fine Tune 4 Press to enter Fine Tune screen 5 Press to tune for a better picture and sound press OK to return press TV MENU to exit Target channel 1 Press TV MENU to bring up the TV menu screen 2 Press to select Channel 3 Press to select Target Channel 4 Press to select a target channel number Channel skip 1 Press TV MENU to bring up the TV menu screen 2 Press to select Channel...

Страница 20: ...e to Brightness 4 Press to adjust the picture brightness Color 1 Press TV MENU to bring up the TV menu screen 2 Press to select Picture 3 Press to move to Color 4 Press to adjust the picture color Sharpness 1 Press TV MENU to bring up the TV menu screen 2 Press to select Picture 3 Press to move to Sharpness 4 Press to adjust the picture sharpness Press TV MENU to bring up the TV menu screen Press ...

Страница 21: ...o select Audio 3 Press to move to Bass 4 Press to adjust the bass weaker or stronger Treble To stress high frequency sound 1 Press TV MENU to bring up the TV menu screen 2 Press to select Audio 3 Press to move to Treble 4 Press to adjust the treble weaker or stronger Press TV MENU to bring up the TV menu screen Press to select Audio and press to enter into below items AUDIO ADJUSTMENT down for aud...

Страница 22: ...e sound 1 Press TV MENU to bring up the TV menu screen 2 Press to select Audio 3 Press to move to Mute 4 Press to select Off or On Sound System This function is to select the sound appropriate to your TV program 1 Press TV MENU to bring up the TV menu screen 2 Press to select Audio 3 Press to move to Sound System 4 Press to select among DK I Auto and BG MENU ADJUSTMENT page20 AUDIO ADJUSTMENT CONT...

Страница 23: ...will be applied in most of the case 1 First click on Setting on the Windows Start menu While Setting is selected move the cursor to submenu Control Panel MENU ADJUSTMENT page21 WINDOW ADJUSTMENT Resolution VGA SVGA XGA 640 480 640 480 640 480 640 480 720 400 800 600 800 600 800 600 800 600 1024 768 1024 768 1024 768 60 70 75 48 4 56 5 60 2 60 75 85 72 37 9 46 9 53 7 48 1 60 72 75 85 70 31 5 37 9 3...

Страница 24: ...log box The correct setting of size resolution is 1024 x 768 pixels Check the vertical frequency of your PC MENU ADJUSTMENT page22 WINDOW ADJUSTMENT CONTINUED 2 When the control panel screen appears click on Display and a display dialog box displays ...

Страница 25: ...ed image Before adjustment After adjustment WINDOW ADJUSTMENT CONTINUED window image size h position fill all Image Size 1 Press TV MENU to bring up the TV menu screen 2 Press to select Window 3 Press to move to Image Size 4 Press to select an image size between Fill All and Force 4 3 Press TV MENU to bring up the TV menu screen Press to select Window and press to enter into below items ...

Страница 26: ...elect the menu background between Translucent and Opaque Menu Language You can select a language from Function menu as well Select one between English and Chinese 1 Press TV MENU to bring up the TV menu screen 2 Press to select Options 3 Press to move to Language 4 Press to select the language between English and Chinese Reset Date 1 Press TV MENU to bring up the TV menu screen 2 Press to select O...

Страница 27: ...erly Check the antenna or its connection is correct and if not correct the antenna fault or connection cable fault Check if car traffic or neon sign disturbs the sound effect Check the susceptible interference by other electronic devices such as radio and television and keep magnetic or electronic devices away from the TV Long distance from the station or other radio waves can generate bad sound R...

Страница 28: ...TENNA IN LCD DIMENSION WEIGHT WITHOUT ACCESSORIES TV FUNCTION TERMINALS INPUT POWER SOUND OUTPUT POWER CONSUMPTION 17 WIDE TFT LCD 1280 X RGB X 768 WXGA 372 5 X 223 5 45 45 60 60 450 532 X 352 X 185 532 X 297 X 58 13 7lbs 6 6kg NTSC PAL ELECTRIC TUNING SYSTEM MTS SAP 125 CHANNELS DC12V AC100 240V 50 60Hz 2W 2W 44W VIDEO S VIDEO AUDIO L R Y Pb Cb Pr Cr VIDEO OUT 3 5 STEREO MINI JACK D SUB 15PIN RGB...

Страница 29: ... SUBTITLES ANGLES SELECT TIME SEARCH PROGRAM PLAY SHUFFLE RANDOM PLAY MENU SETTING GENERAL SETUP AUDIO SETUP VIDEO SETUP PASSWORD SETUP PREFERENCES MP3 OPERATIONS KODAK PICTURE CD PLAYBACK TROUBLESHOOTING TECHNICAL SPECIFICATIONS 27 31 27 27 27 30 30 30 31 31 37 31 32 32 32 33 33 34 34 35 35 36 36 37 37 38 43 39 40 40 42 42 42 43 43 44 45 46 TABLE OF CONTENTS FOR DVD PLAYER ...

Страница 30: ...the disc and turn off the unit You have to push button twice to stop playback of a DVD disc Pause Press To pause playback of a DVD while it is playing press The unit enters step play status Each time you press the picture advances one frame Press to make playback pause Press PLAY to resume playback OSD The On Screen Display OSD contains many playback features To see the Display press the OSD butto...

Страница 31: ... the Display 1 While the disc is playing press OSD on the remote to bring up the Display DVD 2 Press the or buttons to highlight the Chapter icon 3 Press the or buttons to go to the previous or next chapter Notes The chapter feature won t work if the disc isn t formatted with separate chapters You can also advance to the next chapter by pressing on the remote and go to the preceding chapter by pre...

Страница 32: ...n the remote Using the Repeat Feature The default mode for the Repeat feature is off There are three Repeat options All repeats the disc that is playing Title repeats the title that is playing Chapter repeats the chapter that is playing To Use Repeat 1 While a disc is playing press OSD on the remote to bring up the Display 2 Highlight the Repeat icon 3 Press the or buttons to scroll through the Re...

Страница 33: ...s to raise the volume 2 Press to lower the volume VOLUME DVD CD DVD Menu Play Some DVDs have title menus and chapter menus Press PLAY the screen shows the menu Press or to skip to the next or previous page Select with number buttons or direction buttons Example select track 13 1 Press to enter the next menu 2 Press number buttons to select directly You can also select as follows 1 Press to select ...

Страница 34: ...umber buttons to select tracks after the unit finishes reading the disc 1 If the track number isn t over 10 just push buttons 1 10 Example push 8 to select track 8 The screen shows 2 If the track number is over 10 press 10 once and a button between 1 10 Example if you select track 12 press 10 once and button 2 The screen shows Select with Number Buttons CD TRACK08 20 00 00 TRACK12 20 00 00 AUDIO 1...

Страница 35: ...O DVD CD CD 1 While disc is playing press to play in fast forward mode Each time you press the button the screen shows the following in order 2 While disc is playing press to play in fast reverse mode Each time you press the button the screen shows the following in order 3 Press PLAY to switch to normal play while in fast forward or fast reverse playing mode Fast Play When playing a disc you can p...

Страница 36: ...ing A Disc Repeatedly You can repeat a title or chapter 1 To repeat a chapter Press REPEAT the screen will show 2 To repeat a title Press REPEAT twice the screen will show 3 To repeat all Press REPEAT third time the screen shows ALL 4 To remove REPEAT function Press REPEAT until ALL disappears You may repeat a track or an entire disc according to the following steps 1 To repeat a track Press REPEA...

Страница 37: ...disappears A 2 To set an end point B press A B where you wish to end The screen shows AB DVD OR CD Select Subtitles This operation works only with discs with multiple subtitle languages recorded DVD 1 Press SUBTITLE repeatedly until the desired language is selected The screen shows 2 Remove the subtitle Press SUBTITLE until the screen shows TURN OFF SUBTITLE Notes For some discs subtitles cannot b...

Страница 38: ...le 2 4 select ANGLE2 3 4 select ANGLE3 4 4 select ANGLE4 1 4 DVD Time Search Time Search You may directly enter a time title or chapter number to quickly search the disc The unit will play from that point 1 Search a title or a chapter Example Search chapter 2 in title 6 Press TIME SEARCH the screen shows Press the direction button and move the cursor to illuminate the title number The screen shows...

Страница 39: ...e DVD or the tracks on the CD to play by creating a program 1 Press P MODE until the screen shows 2 Use the number buttons on the remote to enter the title and chapter you want to play first The title and chapter number you entered appears in the box For example Enter Chapter 1 in Title 8 the screen shows 3 The cursor jumps to the next spot in the program list section Make sure the box is highligh...

Страница 40: ...e Program 11 20 in the same way 1 10 were programmed 5 To remove program playback press the STOP button during the program play PROGRAM TRACK 01 20 01 _ _ 06 _ _ 02 _ _ 07 _ _ 03 _ _ 08 _ _ 04 _ _ 09 _ _ 05 _ _ 10 _ _ EXIT NEXT PROGRAM TRACK 01 20 01 08 06 _ _ 02 _ _ 07 _ _ 03 _ _ 08 _ _ 04 _ _ 09 _ _ 05 _ _ 10 _ _ EXIT START NEXT CD page37 PLAY DISCS IN VARIOUS WAYS 1 Press P MODE to select shuff...

Страница 41: ...tup Preference Password Setup and Exit Setup The screen shows Setup Menu Main page General Setup Audio Setup Video Setup Preferences Password Setup Exit Setup Go To General Setup Page Press direction buttons to select Left Mono The screen shows The screen shows Press direction buttons or to highlight Dolby Digital Setup and press PLAY to enter Dolby Digital Setup Page The screen shows the submenu ...

Страница 42: ...Main Page General Setup Audio Setup Video Setup Preferences Password Setup Exit Setup Go To Audio setup Page Dolby Digital Setup Dual Mono L Stereo Left Mono Right Mono Mixed Mono D R C Audio Setup Press PLAY to confirm your selection Set Dual Mono in Dolby Digital Setup to Left Mono The sereen shows General Setup The setting structure is General Setup Page TV Display PS Normal PS Normal LB Wide T...

Страница 43: ...cted when the unit is connected to a wide screen TV SPDIF OUTPUT SPDIF OFF No signal output is from digital port SPDIF RAW Select this when the DVD player is connected with a digital amplifier through digital port When a Dolby Digital disc or MPEG disc are played the digital output will be optional The power amplifier to be connected must have Dolby Digital and MPEG decoding SPDIF PCM Select this ...

Страница 44: ...adjust linear compression rate to obtain the different compression results of the signals DOLBY DIGITAL SETUP The setting structure is FULL 3 4 2 4 1 4 OFF Speaker Setup Page Downmix STR Lt Rt Stereo Audio Setup Dolby Digital Setup Dual Mono STR Stereo Left Mono Right Mono Mixed Mono D R C Audio Setup EQUALIZER This will help you to select graphic equalizer patterns according to the genre of the m...

Страница 45: ...Contrast 00 Main Page MEDIUM The sharpness level is medium LOW The sharpness level is lowest BRIGHTNESS You can use the or button to adjust the brightness CONTRAST You can use the or button to adjust the contrast The setting structure is PASSWORD MODE ON The password function is on and PARENTAL is dim and cannot be selected OFF The password is locked PARENTAL can be selected PASSWORD CHANGE Select...

Страница 46: ...ve 15 00 00 00 00 001 012 FOLDER CD01 CD02 CD03 CD04 CD05 CD06 CD02 The setting structure is Preferences Preference Page Audio ENG English French Spanish Chinese Japanese Subtitle ENG English French Spanish Chinese Japanese Off Disc Menu ENG English French Spanish Chinese Japanese Parental 08 1 G 2 3 PG 4 PG 13 5 PGR 6 R 7 NC17 8 ADULT Default Reset Main Page LANGUAGE SELECTION If a language menti...

Страница 47: ...Normal When a Kodak Picture CD is inserted on a player an automatic slide show is launched Each picture in the Kodak Picture CD will be displayed consecutively in a slide show fashion and will be scaled to fit in the TV screen Twelve slideshow transition modes are provided use PLAY MODE key to select Select transition mode prior to start of slideshow if one mode is desired for the entire show Cust...

Страница 48: ...Disc cannot be played There is no disc in the unit Put the disc on the disc tray properly with the label side up Clean the disc Moisture has condensed in the unit Remove the disc and leave the unit on for about an hour The unit doesn t operate normally Disconnect the power plug and insert it into the wall outlet again Remote control does not work Remove barriers between the remote control and the ...

Страница 49: ...d impedance 75 Ω Y 700mv 20 Cb Pb 535 5mv 20 Cr Pr 535mv 20 DC12V AC100 240V 50 60Hz 20W This manual is only for your reference any change to the design and specifications will not be advised Wavelength 650nm NTSC MULTI PAL 20Hz 20KHz 2 5dB 85dB 80dB 1KHz 85dB 1KHz 85dB 1KHz Audio distortion noise Channel separation Dynamic range Output Audio out analog audio Audio out digital audio Video out S vi...

Отзывы: