24
MAINTENANCE SECTION
21. Slide the Throttle Valve, Valve Seal end first, onto the
Throttle Valve Rod.
22. Secure the Throttle Valve Assembly by installing the
Valve Retaining Ring (10) in the small groove on the
Throttle Valve Rod.
23. Install the three Throttle Bushing Seals (5) in the
grooves on the Throttle Bushing (4).
24. Slide the Throttle Bushing Assembly onto the shaft of
the Throttle Valve Rod and position the Trigger (11)
on the same shaft. Install the Trigger Pin (12).
25. Insert the assembled Trigger into the Housing. Make
certain the widest end of the Trigger is nearest the
motor bore and the narrowest portion of the Throttle
Valve aligns with hole for the Throttle Retaining Pin
(13). Install the Pin making certain it captures the
Throttle Valve and secures the assembled Trigger.
26. Align the detent hole in the Reverse Valve (15) with
the hole inside the Reverse Valve Bushing (14) and
slide the Valve into the Bushing until almost reaching
the detent hole. Insert the Reverse Valve Detent
Spring (16) and Reverse Valve Detent Ball (17) into
the hole and while compressing the Spring with the
Ball, slide the Valve completely into the Bushing.
27. Using snap ring pliers, install the Reverse Valve
Retainer (18).
28. Slide the Reverse Lever (19) onto the Reverse Valve,
making certain the Reverse Lever Alignment Pin (21)
enters the notch on the face of the Reverse Valve
Bushing. Secure the Lever to the Valve by inserting
the Reverse Lever Retaining Pin (20).
Assembly of the Impulse Mechanism
1. Insert the long shaft of the Piston Stop (58) into the
central opening of the O–ring Installer furnished with
the Tool Kit (Part No. 700A–99). Place the Piston
Stop Seal (59) on the tapered end of the Installer and
roll the Seal up the taper and into the groove on the
large body of the Piston Stop. Install the Check
Valve Front Seal (61) and Check Valve Rear Seal (62)
on the Check Valve (60).
2. When looking inside the central opening of the Liner
Assembly (55), the internal wall has three holes on
one side which do not extend through the wall. The
opening on the end face of that wall is for the Torque
Valve Piston (57). Install the Torque Valve Piston,
large end trailing, into that opening.
3. Insert the Piston Spring (64) into hole in the end face
of the opposite wall. Insert the Check Valve Piston
(63), large end trailing, and the Check Valve Ball (65)
into the same opening.
4. Thread the Threaded Tee Wrench furnished with the
Tool Kit into the end of the Check Valve Assembly
and using the Wrench to hold the Assembly, insert the
Assembly into the opening against the Ball.
5. Unscrew the Wrench and screw it into the Piston Stop
Assembly and using the Wrench to hold the Assem-
bly, insert the Assembly into the opening against the
Piston. Mark this opening with a felt marker to indi-
cate that it contains the Torque Valve Piston.
6. Install the Sensor Seal Back–up O–ring (54) followed
by the Sensor Seal (53) on one end of the Sensor (62)
and insert the assembly, Seal end leading, into the
central opening of the Rear Liner Cover (50). Make
certain the assembly slides freely in the opening.
7. Install the Rear Liner Cover Seal (51) in the annular
groove on the face of the Rear Liner Cover.
8. Install the two Front Liner Cover Piston Seals (78) in
the openings on the face of the Front Liner Cover
(71).
9. Install the Seal Back–Up Ring (77) followed by the
Drive Shaft O–ring (76) in the central opening in the
face of the Front Liner Cover.
10. Insert the short round hub of the Drive Shaft (66) into
the central opening of the Rear Liner Cover.
11. Insert a Blade (69) into one slot in the Drive Shaft.
Install the Blade Springs (70) through the Drive Shaft
and into the holes in the Blade. Place the remaining
Blade on the Springs making certain the Springs enter
the holes in that Blade.
12. Using finger pressure, compress the Springs with the
Blades until the outer edges of the Blades are flush
with the drive shaft surface. Capture the Blades in
this position by installing the Liner Assembly, piston
stop end trailing, over the Drive Shaft and against the
Rear Liner Cover.
This installation can be accomplished more easily
by aligning the compressed Blades with the webs
at the narrowest portion of the opening. Keeping
the Blades on the web allows them to slide the
length of the Liner without interference.
13. Insert the hex end of the Rear Liner Cover into the
Disassembly Arbor from the Tool Kit and stand it on
a workbench with the Drive Shaft upward.
14. Install the Front Liner Cover Assembly over the
Drive Shaft and against the Liner. Make certain the
Torque Adjustment Screw (72) aligns with the proper
piston stop opening that was marked during assembly.
Содержание 500PS3
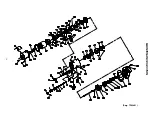
Страница 16: ...MAINTENANCE SECTION 16 Dwg TPA1481 ...

