Ingenico iSC Touch 250 Скачать руководство пользователя страница 1


One Blue Hill Plaza, 16

th

 Floor, PO Box 1546 

Pearl River, NY 10965 

1-800-PC-AMERICA, 1-800-722-6374 

(Voice) 845-920-0800 (Fax) 845-920-0880 

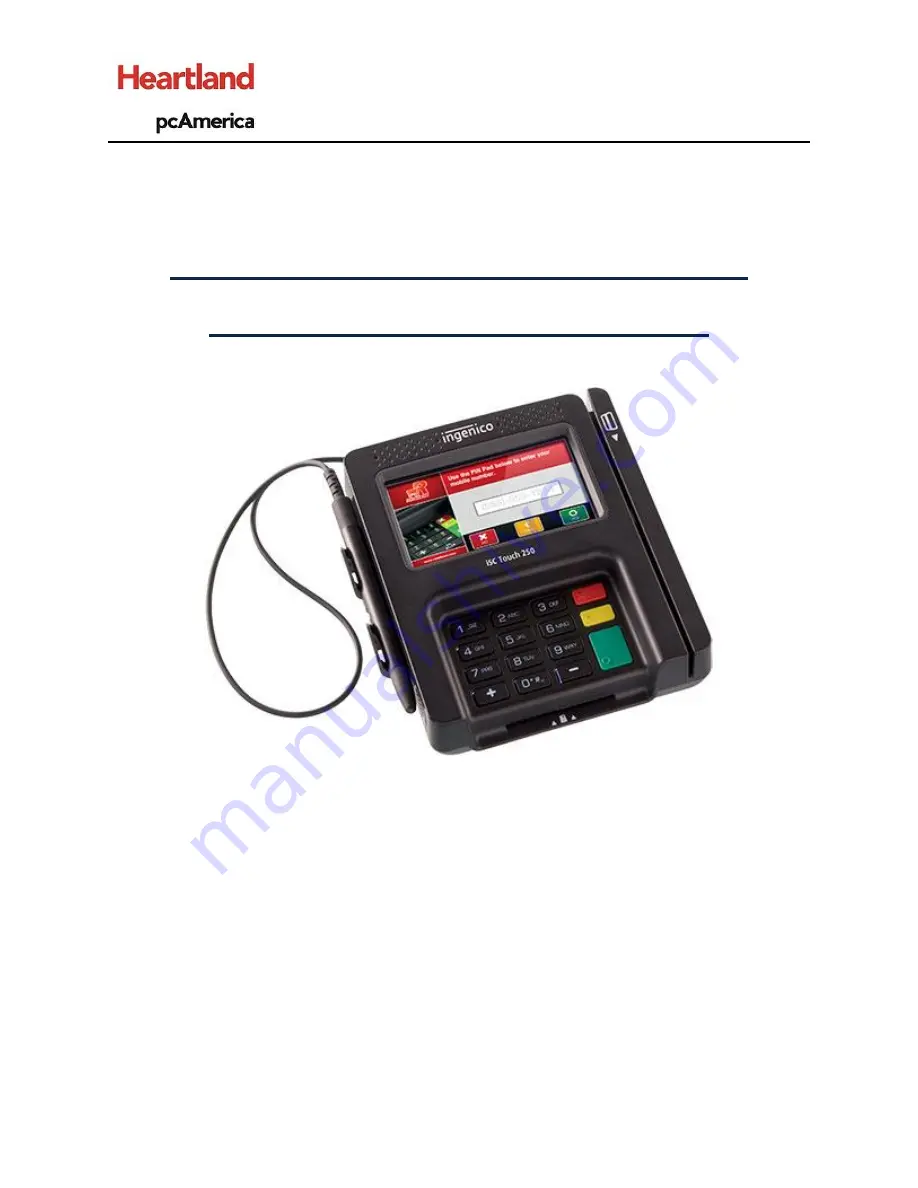
Ingenico iSC Touch 250 with Chase 

Paymentech through Datacap 


This document provides step-by-step instructions on installing the Ingenico iSC Touch 250, configuring 

settings, and processing transactions in CRE/RPE using Chase Paymentech Payments through DataCap. 


Note: 

You must have a Deployment ID for the computer acting as the NetEpay server created prior to 

attempting this installation. You must also have a License for each station that is processing 

transactions through the NetEpay server. If you do not have them, please contact your reseller or 

processor for information on how to obtain them. 


Содержание iSC Touch 250

Страница 1: ...enico iSC Touch 250 configuring settings and processing transactions in CRE RPE using Chase Paymentech Payments through DataCap Note You must have a Deployment ID for the computer acting as the NetEpa...

Страница 2: ...ING AN ISC TOUCH 250 11 INSTALLING NETEPAY REQUIRED ON PC THAT WILL ACT AS DATACAP SERVER ONLY 14 CONFIGURING CRE RPE REQUIRED ON EACH PC THAT WILL PROCESS CARD PAYMENTS 21 CONFIGURING CASH BACK WITH...

Страница 3: ...RE RPE Windows 7 or above is required The NETePay software only needs to be installed on 1 station which will act as the DataCap server It is recommended to install the NETePay Software on a back offi...

Страница 4: ...The driver for the USB cable can be downloaded from http download2 pcamerica com drivers 8 Manufacturer Ingenico IngenicoUSBDrivers_2 60_setup zip 1 Download the zipped file and extract it Right clic...

Страница 5: ...Feature to enable it 5 In the first box under Select by Connection Order enter the COM port the pinpad will be using i e 15 then select Next 6 Place a check in Uninstall Microsoft Usbser drivers s Sel...

Страница 6: ...e iSC250 is connected to a COM port To find out which COM port the computer has assigned to the iSC250 follow these steps 1 Open the Control Panel 2 Select Hardware and Sound 3 Select Device Manager 4...

Страница 7: ...7 5 Select Advanced 6 Make sure the COM port number selected matches the port that was entered during the driver installation i e 15 7 Click OK...

Страница 8: ...Download the latest dsiEMVUS control software for Chase Paymentech from the following link http www datacapepay com epay50 2752 1 Under dsiEMVUS 1 click on Download 2 Right click on the dsiEMVUS 100 I...

Страница 9: ...9 4 Accept the agreement and click Next 5 Enter a User Name and Organization then click Next 6 Click on Install...

Страница 10: ...10 7 Click on Finish 8 Click on Yes when prompted to restart...

Страница 11: ...iSC Touch 250 Download the latest dsiPDCX control software from the following link http www datacapepay com epay50 2752 1 Under dsiPDCX 1 4 click on Download 2 Right click on the dsiPDCX 14 Install201...

Страница 12: ...12 4 Accept the agreement and click Next 5 Enter a User Name and Organization then click Next 6 Click Install...

Страница 13: ...13 7 Click Finish 8 Click on Yes when prompted to restart...

Страница 14: ...her stations will not be able to process Credit Cards Download the latest NETePay software from the following link http www datacapepay com epay50 2752 1 Under Install NETePay Paymentech Host EMV PNH...

Страница 15: ...15 4 Click Next 5 Accept the agreement and click Next 6 Enter a User Name and Organization then click Next...

Страница 16: ...16 7 Click Install 8 Click Finish 9 Click on Yes when prompted to restart...

Страница 17: ...NetConnectIP_Host exe It can typically be found at the following path on your computer after the NETePay installation C Program Files x86 Datacap Systems NETePay Right click on the file DSINetConnectI...

Страница 18: ...og box on the left The dialog contains the 10 digit serial number that was automatically assigned to NETePay Click OK 14 This dialog box indicates that NETePay has not yet retrieved merchant parameter...

Страница 19: ...19 16 You will see the Setup Merchant Parameters screen Click Load New Parameters 17 Click Yes to Attempt Activation 18 Click I Have My Deployment ID...

Страница 20: ...17 21 If NETePay successfully retrieves the parameters associated with the entered DeploymentID from the PSCS server you will see the dialog box on the left Click OK and you will be brought back to t...

Страница 21: ...ter the IP address of the PC acting as the NETePay server 7 Select Ingenico iSCT250 from the Pinpad dropdown 8 Enter the of the COM port configured in the Device Manager 9 Enter the Merchant associate...

Страница 22: ...sing Other Options in the Max Debit Cashback field any amount greater than 0 to enable the cashback feature for debit and EBT sales To disable the cashback function enter 0 in the field NOTE the amoun...

Страница 23: ...elect Credit Debit 2 The Amount Tendered screen will gray out and go away after the transaction is completed Note You cannot cancel a card payment from within CRE at this point You can cancel by hitti...

Страница 24: ...24 4 The pinpad will prompt you to insert the card 5 Insert the card into the PINpad and wait for the sale to process 6 Remove the card when the PINpad beeps and prompts you to remove the card...

Страница 25: ...25 7 When prompted sign the PINpad and select OK 8 Wait for the sale to finish processing 9 The pinpad will display Authorized and return to the Welcome screen when the sale is finished...

Страница 26: ...26 10 A receipt will print with a copy of the captured signature...

Страница 27: ...it Debit 2 The Amount Tendered screen will gray out and go away after the transaction is completed Note You cannot cancel a card payment from within CRE at this point You can cancel by hitting the red...

Страница 28: ...28 4 The pinpad will prompt you to insert the card 5 Select NO when prompted if the card is a Debit card with a PIN 6 Sign the PINpad to authorize the transaction...

Страница 29: ...29 7 Wait for the sale to finish processing 8 The pinpad will display Authorized and return to the Welcome screen when the sale is finished 9 A receipt will print with a signature line...

Страница 30: ...redit Debit 2 The Amount Tendered screen will gray out and go away after the transaction is completed Note You cannot cancel a card payment from within CRE at this point You can cancel by hitting the...

Страница 31: ...t the RED cancel key 5 Enter the credit card number on the PINpad and press ENTER NOTE You can use the yellow cancel key as a backspace key to fix any mistakes made in the entered card number 6 Enter...

Страница 32: ...32 7 Enter the CCV code on the back of the card 8 Enter the Zip code of the owner of the card 9 Select Yes if the card is a chip card or NO if it is not a chip card...

Страница 33: ...33 10 Sign the PINpad to authorize the transaction 11 Wait for the sale to finish processing 12 The pinpad will display Authorized and return to the Welcome screen when the sale is finished...

Страница 34: ...34 13 A receipt will print with a signature line for the customer and the entry type of the sale...

Страница 35: ...int You can cancel by hitting the red button on the keypad or by waiting for the process to time out 3 Select YES to confirm that cashback will be included in the sale or NO to skip the cashback entry...

Страница 36: ...36 5 On the PINpad select the OK button to confirm that it is a debit card sale 6 Swipe the card when prompted by the PINpad 7 Confirm the final amount with cashback...

Страница 37: ...to Options Manager Administrative Credit Card Settlement 2 Click Settle 3 Click OK once the settlement has successfully completed Note The settlement can be done on any station and only needs to be do...

Отзывы: