background image

41 

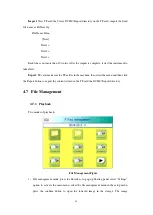
Import:

 New TF card the Create DCIM / Import directory on the TF card, import the fixed 

file name as PicNote.cfg


 File Name Form


  [Note] 

                   Note1 =  

                   Note2 =  

                   Note3 =  

Each line is not more than 20 words. After the import is complete, restart the instrument to 

take effect. 

Export: 

TF card, make sure the TF card is in the machine, then select the menu and then click 

the Export button to export the contents stored in the TF card the DCIM / Export directory.


4.7


 File Management 

4.7.1


Playback 

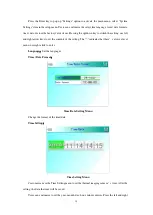
Two modes of playback


File Management Figure 

1


File management mode: press the Enter key to pop up floating panel select "Settings" 

option to activate the main menu, select the file management menu in the setup menu, 

press the confirm button to open the  infrared  image in the storage. The image 

Содержание DuraCam XT

Страница 1: ...DuraCam XT Therm al I m age Cam era User Manual INFRARED CAMERAS INC ...

Страница 2: ...rm anent dam age m ay result CAUTI ON The original shipping carton should be kept for use for future transportation Do not drop shake or impact the thermal imager excessively in use or during transportation CAUTI ON Store the unit in its original case in a cool dry well ventilated area away from strong electromagnetic fields CAUTI ON Protect the surface of the lens from being stained or damaged by...

Страница 3: ...3 CAUTI ON Do not open case Unit does not contain any user serviceable parts Repair should be performed by factory authorized technicians only ...

Страница 4: ...es 19 3 3 6 Screen Setting 19 3 3 7 Manu operation introduction 20 4 Operation guide 21 4 1 Graphic interface description 21 4 1 1 Screen graphic interface 21 4 1 2 Floating Bar interface Error Bookmark not defined 4 1 3 Main manu Error Bookmark not defined 4 1 4 sub manu interface Error Bookmark not defined 4 2 Measurement object adding Error Bookmark not defined 4 3 Recording Error Bookmark not ...

Страница 5: ...age 44 5 3 function operation 45 5 3 1 system parameter set 45 5 3 2 Photo settint 46 5 3 3 Graphic setting 47 5 3 4 Measurement Setting 47 5 3 5 Network 48 5 3 6 Local setting 49 5 3 7 System Maintenace 49 6 Configurations Error Bookmark not defined 7 Troubleshooting Error Bookmark not defined Appendix A 55 Common material emissivity FYI 55 Appendix B 56 Factory default parameter setting table 56...

Страница 6: ...ectable languages 2X 4X digital zoom 5 removable spot measurements 5 Areas measurements 2 lines measurements Custom shortcuts Blue tooth Power saving mode LCD Brightness adjustment Video Output NTSC or PAL Internet settings Time and Date settings Factory settings restore TF card uninstall formatting TF card image storage video storage Text and Audio annotation via image storage Consecutive image s...

Страница 7: ... Mechanical system Reduce downtime and avoid catastrophic failure Construction science Roof Quick identification of water penetration problems Structure Commercial and residential energy audits Moisture detection Determine root cause of moisture and mildew Evaluation Evaluate the resolution to ensure the area completely dry Others Iron and steel industry Inspect steel refining and rolling processe...

Страница 8: ...h wrist strap Carrying case Video out cable Lithium ion batteries 2 User manual Infrared report and analysis software system CD Lithium battery charger Lens cap TF card TF card reader USB cable 1 2 Optional accessories External 0 5x wide angle lens External 2x telescopic lens Eye patch Power adapter with power cable and plug European standard plug British standard plug Australian standard plug ...

Страница 9: ...9 2 Cam era overview 2 1 Function keys 2 3 1 4 5 6 7 ...

Страница 10: ...ess Menu to set properties press C to delete the selected measuring objects Color Palette Pressing the left or right arrows will scroll through the available color palettes displaying their name above the palette The selected palette will become active after about 3 seconds of selecting it and will be set as the default power on palette Level Span values Pressing the left or right arrow will reduc...

Страница 11: ...ge Press Confirm to save the image or Press C to return to real time measurement If Audio recording is enabled Audio comment dialog box will display In document management press S to delete video or image 5 Menu Confirm key bar Includes Up Dow n Left Right and Menu Confirm center keys Function varies with operation mode In Menu m ode it is used for menu selection Up and Dow n keys are for same lev...

Страница 12: ...dding an area or by selecting via the A key press the Confirm key to pop up the attribute box Select in the attribute box the parameter to be edited either size or position Press the four navigation keys to move the area location or change the size of the area 6 Trigger Shortcut key The trigger key serves as a shortcut to access the following functions Laser Pulling trigger activates laser sight a...

Страница 13: ...ard slot Accepting standard size TF card such as supplied 8GB capacity card for device upgrade or image storage 3 Video port It is a video output interface 4 Pow er interface External power input interface Power source should be 12VDC Center pin is positive terminal 1 4 2 3 ...

Страница 14: ...Replacem ent 3 1 1 I nserting or rem oving battery Battery compartment is located inside the handle Turn the cover counter clockwise to remove Remove battery for replacement Insert the battery the battery contacts must face into the battery compartment ...

Страница 15: ... result in physical or electrical damage to the instrument due to incorrect voltage or physical size difference 3 1 2 Replacing battery When battery displays empty and flashes for about 1 minute and 50 seconds the instrument displays a low battery dialog and shut down automatically after about 10 seconds Powering off display ...

Страница 16: ...reater than 50 charge prior to recharge The ambient temperature for charging should be 32 F 0 C to 104 F 40 C If under 32 F 0 C the battery capacity will be diminished if over 104 F 40 C the battery may overheat resulting in permanent damage W ARNI NG Never disassemble incinerate or puncture battery Never short circuit the battery Keep battery dry Keep out of reach of children Always dispose of ba...

Страница 17: ...x or Min temperature the temperature of the screen display XXX C or XXX C If you need to modify the properties of the temperature measurement object you should first check the temperature of the object and then press the Enter key the temperature of the object s Properties dialog box pops up on the screen The following figure is the temperature measurement points the temperature line the temperatu...

Страница 18: ...left and right selection press the A key to switch up and down Temperature value is displayed when the reference object option changes to open and other measuring object with the temperature difference of the temperature measurement points Area Measurement Properties Dialog Box Area temperature measurement properties can be modified amplitude coefficient ratio distance maximum temperature minimum ...

Страница 19: ...Photo then just need press this key to save image 3 3 4 Playback Image Two way to open the image file 1 Press the Ok key to activate the main menu select File Manager menu then select the submenu via the arrow keys to select 2 Click the Preview option in the floating panel to open the selected file via the left and right keys to switch selection After you open the image you could use upper and low...

Страница 20: ... and down key to select if there s the mark using right click to enter the lower menu Parameter interface The up and down key is to modify the left and right key is to choose means modify the setting of the current manu Press the OK button to confirm the changes save and return to the previous menu press the C key to cancel the changes and return to the previous menu Cancel and return to the previ...

Страница 21: ...lue of the target object Black and yellow denotes the temperature value of the selected object 5 Spot temperature measurement white crosshair 6 System the current system time 7 Min temperature indicate minimum value of the palette 8 Auto Enhancement select auto enhancement mode 9 Manual Enhancement select manual enhancement mode 10 Palette palette bar User can choose different palettes 1 6 14 13 1...

Страница 22: ...zoomed 17 Recording indicate the recording status 18 Continuous snap shot indicate the continuous snap shot status 19 Voice recording indicate the voice recording status 20 Calibration indicate the calibration status NOTE Not all models have all functions so the working status screen may not show all features 4 1 2 Floating Bar Interface Floating bar interface Floating bar interface From left to r...

Страница 23: ...system setting 4 1 4 Sub manu interface Sub manu interface 1 Figure name Displays the name of the dialog box The name of the dialog box as shown in the example is temperature measurement setting 2 Item title A dialog box may contain more than one item As shown in the above figure 3 Item Content each item corresponds to the content of a project the left and right keys to make changes indicates the ...

Страница 24: ...e measurement target to add and press the Enter key Temperature Measurement Object Adding Manu If select then press OK key then the all the objects will be cleared NOTE When you delete a single temperature measurement object direclty press A key and choose the object then press the C key to delete 4 3 Recording This function is used to save the video save format to MP4 Pressing the Enter key float...

Страница 25: ...sing confirming key Then finish the photo If turn up function of mark Backup note will pop up in the OSD as followed Voice record note for photo Continuous photos mark will appears in the status column if set the continuous photo 4 5 Preview This item is for the preview files of backup Press confirming key Pop up the floating items select preview and press confirming key will appears as followed ...

Страница 26: ...26 Preview OSD Switch to files by pressing key of left or right Open it and it appears in the screen by pressing confirming key Press C key to quit 4 6 Setting Main OSD ...

Страница 27: ... LCD unit of temperature unit of distance totally 7 items Switch to items by pressing key of up or down Change the value by pressing key of left or right means secondary menu and enter the menu by pressing key of right Time of Auto calibration Set time interval of auto calibration to get better thermal image and improve the precision The unit is second Auto calibration OSD Shortcut key Users could...
Страница 28: ...of area 1 It will add or remove the area 1 When select shortcut key of record It starts to record When select shortcut key of photo It starts to save the photos you took Shortcut key setting Bluetooth Turn on the Bluetooth will enable status of scanning and searching below Turn off Bluetooth the status is not valid Select scan and search key and start to scan the Bluetooth device the model and the...

Страница 29: ...ging camera will screen on This function is not valid when time is set to 00 minute Time of power off If without any operation thermal imaging camera will power off to save power This function is not valid when time is set to 00 minute Pow er saving OSD LCD brightness adjustm ent It is valid when changing the brightness LCD brightness adjust OSD ...

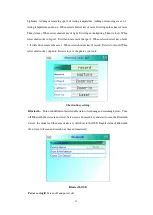
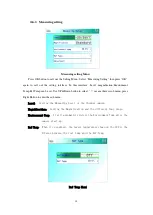
Страница 30: ...et Use UP Down button to select means there is sub menu press Right Button to enter the sub menu Level Seeting the Measuring Level of the thermal camera Magnification Seeting the Magnification and the different Temp range Environment Temp It will automaticly detect the Environment Temp after the camera start up Ref Temp When it is enabled the target temperature shown on the LCD is the D Value betw...

Страница 31: ...has different emissivity so the user can set different emissivity for different target If it is not set then will use default setting Attached Common emissivity table for reference Tcorrect Correct the target Temperature Distance Setting the distance between the camera and the target to make sure exact measuring Set the real distance if the distance is shorter than 10 meters unit 0 5m Humidity Set...

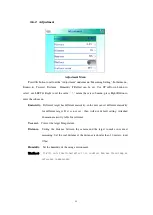
Страница 32: ...pose When Auto Enhance Mode is activated can switch between manual and automatic Press A button will enter manul mode it can adjust the pallet with UP Down LEFT Right buttons Press C will return into Auto Mode When Auto Enhance Mode is deactivated can switch between manual and automatic Press A button will enter manul mode it can adjust the pallet with UP Down LEFT Right buttons Press C will retur...

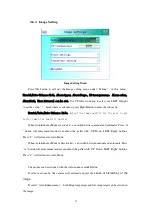
Страница 33: ... alarm OFF High temp alarm Low temp alarm here It will alarm when proper setting is selected Alarm color can be set in Alarm Color Alarm Color The color of the target area shown on the LCD will be changed into the alarm color set when the temperature is over the alarm temp 9 color types can be selected If colorless is selected then the color will not change when alarm Alarm Temperature Setting ala...

Страница 34: ...Off disables the feature Isotherm low value Set the Isotherm low value Isotherm upper value Set the Isotherm upper value IR Fusion High Low temperature Menu IR Fusion High Low temperature It consists of three options IR Fusion High Temp IR fusion Low Temp and OFF Set IR Fusion High Temp when the actual temperature is higher than the temperature of IR fusion set up CCD image will be shown Vice vers...

Страница 35: ...elect Network function IPAddress This IP address must be the only one can not be conflicted with the other IP address of the same network segment Sub network mask Divide the segment of the sub network Default network gateway Set the gateway address to realize the communication among different segment Link type Default 10M 100M self adapt 10M 100M ...

Страница 36: ...36 4 6 5 TF Card Management TF Card Management Figure TF Unload TF Card Format Figure ...

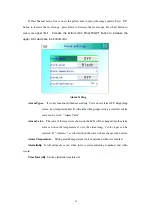
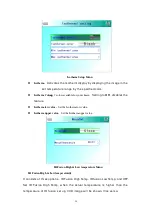
Страница 37: ...ns pressing the confirm key to format press cancel or C key to cancel the formatting Note Verify that the file is no longer needed or have been backed up before formatting after formation the saved thermal imaging pictures will be lost unrecoverable If format by PC please select FAT16 to format the card 4 6 6 Photo Setting Photo Setting Manu Pressing confirm key to pop up the floating panel then s...

Страница 38: ... picture text annotation is to add text messages when save the image CS Shots Set Continuous capture the number of sheets can be set for 1 3 5 10 shot Continuous Capture Interval can be 0 5s or 1s Record Time can set 1 3 5 10 or 15 minutes to shut off the recording Manu Setting Manu Setting Set the path to save the file directory type can be set by custom by month by date In preview mode the playb...
Страница 39: ... and right arrow keys to set the contents of the setting The indicates that there s a lower level menu use right click to enter Language Set the languages Time Date Format Time Date Setting Manu Change the format of the time date Time Setting Time Setting Manu Customer can via the Time Setting manu to set the thermal imaging camera s time After the setting the data the time will be saved Users can...

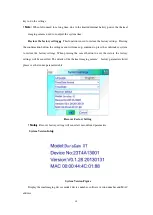
Страница 40: ...l come up continue to press the confirm key system to restore the factory settings When pressing the cancel button to exit the restore the factory settings will be cancelled The details of the thermal imaging camera factory parameters listed please see the Annex parameter table Recover Factory Setting Note Recover factory setting will cancel all user defined parameters System Version Info System V...

Страница 41: ... the TF card is in the machine then select the menu and then click the Export button to export the contents stored in the TF card the DCIM Export directory 4 7 File Management 4 7 1 Playback Two modes of playback File Management Figure 1 File management mode press the Enter key to pop up floating panel select Settings option to activate the main menu select the file management menu in the setup me...

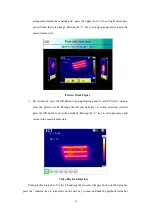
Страница 42: ...p floating panel to select Preview option enter the preview mode Through the left and right keys to switch selection selected press the OK button to enter the playback Pressing the C key to exit open image and return to the measurement state Video Playback Interface Video playback interface Via the left and right key to select the play button on the status bar press the confirm key to take effect ...

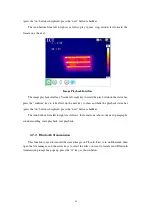
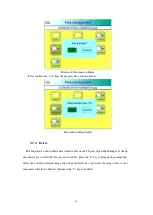
Страница 43: ...on the next key to show and hide the playback status bar press the on button is displayed press the next button is hidden The icon buttons from left to right is as follows the former one above the next paragraph sound recording voice playback text playback 4 7 2 Bluetooth Transmission This function is used to transfer the stored images on TF card First turn on Bluetooth then open the file manager ...

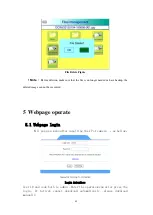
Страница 44: ...ction is used to delete data stored in files on the TF card Open File Manager by the up and down keys to select the file you want to delete press the S key to bring up the prompt box delete the currently selected image files when the Enter key is pressed the image voice or text comments will also be deleted then press the C key to undelete ...

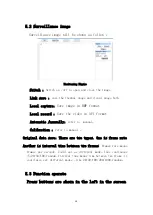
Страница 45: ...ckup the deleted image can not be recovered 5 Webpage operate 5 1 Webpage login Will pop up a menu after inputting the IP of camera as bellow Login interface User ID and code both is admin Enter the operate menu after press the login If ActiveX cannot download automatically please download manually ...

Страница 46: ... in AVI format Automatic manually refer to manual Calibration refer to manual Original data save There are two types One is frame rate Another is interval time between two frames Frames rate means frames per seconds Could set as different modes like continuous 5 20 50 100 random Interval time means time between two frame it could also set different modes like 20 40 100 200 1000 random 5 3 Function...

Страница 47: ...47 Buttons 5 3 1 System parameter set System parameter menu will pop up after login System Configuration Manu The manu include the setting for time for system setting ...

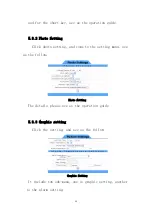
Страница 48: ...ck photo setting and come to the setting manu see as the follow Photo Setting The details please see as the operation guide 5 3 3 Graphic setting Click the setting and see as the follow Graphic Setting It include tow sub manu one is graphic setting another is the alarm setting ...

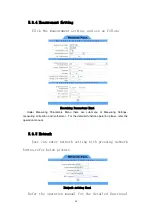
Страница 49: ...ters Menu there are sub menu of Measuring Settings measuring correction and isothermal For the detailed function operation please refer the operation manual 5 3 5 Network User can enter network setting with pressing network button refer below picture Network setting Menu Refer the operation manual for the detailed functional ...

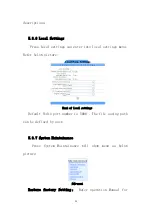
Страница 50: ... settings menu Refer below picture Menu of local settings Default Vedio port number is 5000 The file saving path can be defined by user 5 3 7 System Maintainance Press System Maintainance will show menu as below picture Sub manu Restore factory Setting Refer operation Manual for ...

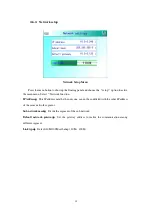
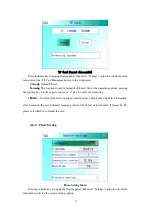
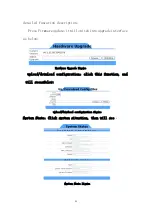
Страница 51: ...date it will switch into upgrade interface as below Hardware Upgrade Figure upload download configuration click this function and will seeasfolow upload download configuration figure System State Click system situation then will see System State Figure ...

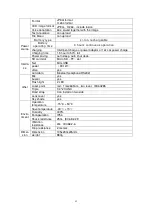
Страница 52: ...on function Image Enhance Auto manual enhance mode Measu remen t Range 20 650 two range Extend to1200 or2000 Accuracy 2 C or 2 of reading Whichever is greater Measurement Correction Auto Manual Mode Up to 5 movable spots Up to 5 movable areas maximum minimum and average temperatures Up to 2 movable lines Line profile Isotherms Temperature difference Alarm voice color Emissivity correction Variable...

Страница 53: ...ur to 50 full Power saving auto sleep auto shut down Interfa ce SD card slot Micro SD TF slot Net Mini USB power DC12V video yes Auto data Bluetooth earphone RS232 other Mic yes buzzer yes Flash light 2 LED Laser point red 1mw 635nm two level IEC60285 Triple 1 4 20 UNC Hand strap Can install on two side Lens cover yes Sky shade yes Enviro nment Operation temperature 15 50 Save temperature 40 70 Hu...

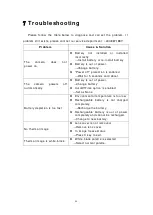
Страница 54: ...bled Wait for 5 seconds and reboot The camera powers off automatically Battery is out of power Change battery AutoOffTime option is enabled Set as None Battery depletion is too fast Environmental temperature is too low Rechargeable battery is not charged completely Recharge the battery Rechargeable battery is out of power completely and cannot be recharged Change to new battery No thermal image Le...

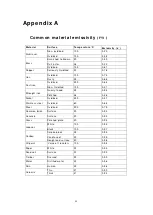
Страница 55: ... 100 0 21 Wrought iron Quarry faced 25 0 94 Polished 38 0 28 Nickel Oxidized 200 0 37 Stainless steel Oxidized 60 0 85 Steel Oxidized 200 0 79 Common brick Surface 20 0 93 Concrete Surface 20 0 92 Glass Polished plate 20 0 94 Lacquer White 100 0 92 Black 100 0 97 Carbon Smoke black 25 0 95 Candle soot 20 0 95 Rough lead surface 20 0 98 Oil paint Value of 16 colors 100 0 94 Paper White 20 0 93 Sand...

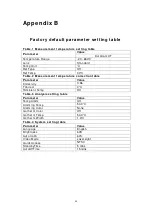
Страница 56: ...t tem perature correction table Param eter Value Emissivity 0 96 TCorrect 0 C TAmbient Temp Off Table 3 Analysis setting table Param eter Value Temp Alarm Off Alarming Temp 50 0 C Alarming Color None Isotherm Color Off Isotherm Temp 50 0 C Isotherm Width 1 0 C Table 4 System setting table Param eter Value Language English Brightness 60S Auto Calib 60 Video Mode Laser sight Quick Access NTSC Standb...

Отзывы: