background image

EonStor CS Installation Guide


page  67  /  86


Installation Guide 

5-4. Create Users and User Group 

After setting the disk pool, folder and shared folder, you can start to crate the user to set up the permission. 

There are two ways to create users for CS to manage 


Create a Local User 

After setting the disk pool, folder and shared folder, you can start to crate the user to set up the permission. 

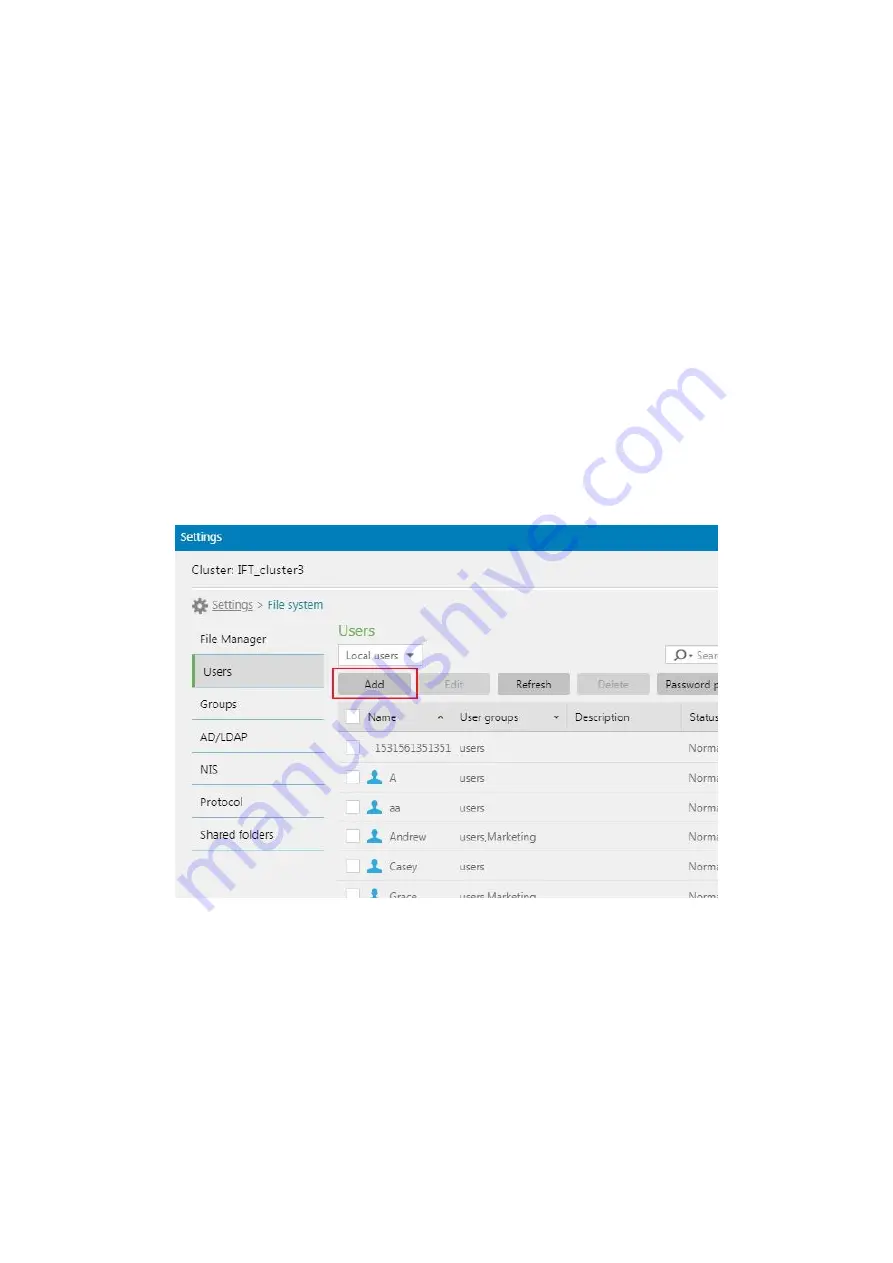
1.  Go to 

Settings > File system > Users


2.  Go to the top left menu and select Local users. 

3.  Click 

Add

 to add a new user. 


4.  Go to the General tab and provide the user information. 


Содержание EonStor CS 3016

Страница 1: ...This guide provides the procedure of setting up EonStor CS Hardware and software installation will be step by step introduced Version 1 00 Updated February 2020 EonStor CS Installation Guide...

Страница 2: ...4016 4024 13 For CS 4025B 15 1 4 JBOD connections Optional 17 1 5 Node Status Checking 19 Check LED status of front panel power supply 19 Check LED status of drive tray 26 2 Cluster Cabling 28 2 1 Cl...

Страница 3: ...older 65 5 4 Create Users and User Group 67 Create a Local User 67 Join an AD LDAP Domain 68 How to create Groups 71 5 5 Setup the folder permission 73 5 6 Access the share folder 75 Access the CS sha...

Страница 4: ...loying EonStor CS this guide can help you build up the system with step by step tutorial In this guide we separate into several chapters prepare for the installation install hardware cluster cabling a...

Страница 5: ...EonStor CS Installation Guide page 5 86 Installation Guide Audience This guide is intended for the Infortrend partners customers and employees who are going to building up EonStor CS...

Страница 6: ...ee different network to establish the CS cluster 3 Cluster Deployment After cluster network connection is established this section outline the process for assigning one of the CS as the master node an...

Страница 7: ...t Installation Outline the process for installing the CS into the rack including slide rail and CS installation 1 3 Install Drive on Trays Based on different CS model you have outline the process for...

Страница 8: ...ay Rackmount kit Slide rail kit Power cord Accessory Cable box CD Software Manual Quick Installation Guide Drive In another box if purchased with enclosure What You Should Prepare Screwdriver Locks th...

Страница 9: ...stallation Guide page 9 86 Installation Guide Switches For connecting management internal front end network We strongly recommend that use dedicated switch for each network to prevent system performan...

Страница 10: ...e rail kit on rack and enclosure Checking the contents of the slide rail kit Assembling the slide rail kit 1 Determine the position where to install the enclosure to the front and rear rack posts then...

Страница 11: ...l to fix the length 3 Attach the inner glides to both sides of the enclosure using the no 6 32 flathead screws 4 With the assistance of another person lift and insert the enclosure onto the slide rail...

Страница 12: ...EonStor CS Installation Guide page 12 86 Installation Guide...

Страница 13: ...se button to open the spring handle Orient the hard drive to the tray with the interface connectors facing the open side of the tray and the label is facing up A Secure the drive to the correct holes...

Страница 14: ...EonStor CS Installation Guide page 14 86 Installation Guide Close the spring handle when the drive is fully inserted to the bay IMPORTANT The system should be full of drives...

Страница 15: ...lation Guide For CS 4025B Press the release button to open the spring handle Place the hard drive on the tray A then secure the clips to both sides of the tray B Insert the assembled hard drive and tr...

Страница 16: ...EonStor CS Installation Guide page 16 86 Installation Guide Close the spring handle when the drive is fully inserted to the bay IMPORTANT Hard drives are installed in all drive slots of the systems...

Страница 17: ...the same JBOD models if you want to attach more storage expansions Refer to CS Expansion Guide for more information Install the new expansion enclosure to the rack Click here for more information abo...

Страница 18: ...EonStor CS Installation Guide page 18 86 Installation Guide Install the drives on the new expansion enclosure...

Страница 19: ...nt panel power supplies at the rear of the enclosure on drive tray Wait until all LEDs turn into normal status without red amber lights Please check LED status for each part in the following section I...

Страница 20: ...wer Cooling Module status Temperature status System fault The following table shows the status of CS Power supply LED The power supply works normally with green LED light CS front panel LED If you see...

Страница 21: ...EonStor CS Installation Guide page 21 86 Installation Guide different abnormal LED status and troubleshoot instructions Abnormal LED status 1 Troubleshooting Flow Chart...

Страница 22: ...EonStor CS Installation Guide page 22 86 Installation Guide Abnormal LED status 2 Troubleshooting Flow Chart...

Страница 23: ...EonStor CS Installation Guide page 23 86 Installation Guide Abnormal LED status 3 Troubleshooting Flow Chart...

Страница 24: ...EonStor CS Installation Guide page 24 86 Installation Guide Abnormal LED status 4 Troubleshooting Flow Chart...

Страница 25: ...EonStor CS Installation Guide page 25 86 Installation Guide Abnormal LED status 5 Troubleshooting Flow Chart...

Страница 26: ...status 6 Troubleshooting Flow Chart Check LED status of drive tray There are two LEDs on the tray that indicate the status of your drives When you get notified by a drive failure message you must che...

Страница 27: ...d from the drive The drive is extremely busy OFF The hard drive is plugged in but there is no activity going on Power Status The drive bay is occupied and working normally Disk drive failed or connect...

Страница 28: ...hat s the CS cluster network architecture topology and the network combination based on the host board installed on each CS node s controller 2 2 Cluster cabling Outline the process for connecting man...

Страница 29: ...s of network ports as below Management ports Administrator manages the cluster via these ports Internal network ports Nodes communicate via these ports Front end network ports Clients access the clust...

Страница 30: ...S Installation Guide page 30 86 Installation Guide Combination 2 4 x 10GbE Front end 2 x 25GbE Internal Combination 3 4 x 10GbE Front end 2 x 40GbE Internal Combination 4 2 x 25GbE Front end 2 x 25GbE...

Страница 31: ...EonStor CS Installation Guide page 31 86 Installation Guide Combination 5 2 x 40GbE Front end 2 x 40GbE Internal...

Страница 32: ...ease check cabling or switch setting 2 Connect internal ports to another switch Please check if the ports work normally after connecting to another switch If not please check cabling or switch setting...

Страница 33: ...ploying a cluster You can configure it afterwards Check Port Status The following tables shows the different host interfaces network status including 1Gb s management port on board 10Gb s SFP interfac...

Страница 34: ...tablished Data I O isongoing OFF No connection is established 10GbE Ports SFP LEDs Number LED Name Color Status Description Speed 10Gb s connection is establish OFF 10Gb s connection is establish Link...

Страница 35: ...on Link 10Gb s connection is establish OFF No connection is established Active Data I O isongoing OFF No Data I O Host Board 40GbE Ports QSFP LEDs LED Name Color Status Description Link 10Gb s connect...

Страница 36: ...the CS cluster IMPORTANT Before you set up a cluster ensure again that the following steps are met Hard drives are installed in all drive slots of the systems All systems are turned on All node devic...

Страница 37: ...the master in a cluster system When more than one node are set as the masters it may cause the deployment to fail or the cluster system to operate abnormally 1 Choose one of the CS node you want to a...

Страница 38: ...r enable the UDP ports on the firewall 8814 EonOne management 8097 8098 cluster deployment 1 Open a browser and enter IP http 10 10 0 1 8098 You will enter Infortrend Cluster Deployer to start the dep...

Страница 39: ...onStor CS Installation Guide page 39 86 Installation Guide 4 Select the nodes that you want to form your cluster and then click Next If you are unable to see the node please click Can t find your node...

Страница 40: ...ailed channel 6 Enter a cluster name Enable advanced features on your cluster Set the date and time and then click Next Advanced feature You cannot change the setting once enabled Enable tiered data m...

Страница 41: ...ke file sharing backup or other generic environment this option is recommended Multi Media Streaming and Editing If the cluster is used for Multi Media Streaming and Editing environment this option is...

Страница 42: ...EonStor CS Installation Guide page 42 86 Installation Guide 7 Select the drive protection type for your cluster and then click Next 8 Configure the network as needed and then click Next...

Страница 43: ...EonStor CS Installation Guide page 43 86 Installation Guide 9 Confirm the configuration you set and then click Create...

Страница 44: ...EonStor CS Installation Guide page 44 86 Installation Guide 10 Wait for the system to apply your cluster configuration...

Страница 45: ...EonStor CS Installation Guide page 45 86 Installation Guide 11 Review the details after the cluster is successfully created then click Exit...

Страница 46: ...lation Guide page 46 86 Installation Guide Check Item All parameters are well defined and the cluster deployer can successfully proceed without problem After clicking Exit you will jump to EonOne mana...

Страница 47: ...ection Outline the process for initialize CS cluster with EonOne Setup Wizard Contents After running the Infortrend Cluster Deployer the webpage will automatically jump to EonOne for CS Enter admin ad...

Страница 48: ...48 86 Installation Guide 1 You can set up email or SNMP notification in Notification page You can use Send test mail to try the functionality After setting click Next 2 Reset the login password to ens...

Страница 49: ...sk pool within cluster Fill in name description data protection policy pool size For data protection policy please check the description in Initial setup wizard After setting click Next 4 Enable the p...

Страница 50: ...Installation Guide page 50 86 Installation Guide 5 You can join the system to an AD or LDAP domain to allow access from domain users After setting click Next 6 Confirm the configuration you set then c...

Страница 51: ...EonStor CS Installation Guide page 51 86 Installation Guide 7 Wait for the system to apply your configuration 8 Click Exit to finish Initial Setup Wizard and dashboard will be shown...

Страница 52: ...Installation Guide page 52 86 Installation Guide 9 Quick start guide will pop out to guide you to create disk pool and shared folders Check Item Initial setup wizard can be successfully processed wit...

Страница 53: ...ver you can still create more than one disk pools at CS cluster for different purpose this section outline the process for creating more disk pools 5 2 Create Local Folder Outline the process for crea...

Страница 54: ...rately hold and manage folders and files of different uses Note If you only need to create one disk pool and it has been successfully created you can skip this step Please follow the instructions abou...

Страница 55: ...EonStor CS Installation Guide page 55 86 Installation Guide 3 Scroll down to fill in the Pool size 4 Click OK and it might take few minutes to finish the creation...

Страница 56: ...EonStor CS Installation Guide page 56 86 Installation Guide...

Страница 57: ...t from EonOne File Manager and then the share folder can be created in the CS local folder for management purpose Create local folders Create your folders in the disk pool to store files and share the...

Страница 58: ...CS Installation Guide page 58 86 Installation Guide 2 Click on the New folder icon to create a new folder 3 Select a folder to share Right click on it and then click on Share to configure the share s...

Страница 59: ...EonStor CS Installation Guide page 59 86 Installation Guide 4 In here you can enable the file sharing protocol name share name and advanced setting with this folder After setting up click Save button...

Страница 60: ...EonStor CS Installation Guide page 60 86 Installation Guide...

Страница 61: ...ger 2 Click Launch to open File Manager If you logged out of File Manager in the last access you are redirected to the login page Then provide the login username and password to log in Note Allow quic...

Страница 62: ...ms press Ctrl A 3 You also can drag and drop to upload the file 4 Click an icon on the top tool bar to perform a desired action on the selected item Back Return to the previous page Forward Go to the...

Страница 63: ...cate Duplicate the selected file in the displayed location Edit Edit the name quota setting and access permission of the selected file or folder Edit file Open a selected text file with a text editor...

Страница 64: ...tallation Guide 1 While enabling tiered data migration Go to Settings Storage Disk pool Advanced and enable Enable quota management 2 While disabling tiered data migration Go to Settings Storage Disk...

Страница 65: ...folder for file sharing purpose with different protocol CIFS SMB NFS FTP AFP and Rsync You can share local folders with remote users via the CIFS SMB and NFS protocols Note You must create a local fol...

Страница 66: ...d folder This name is displayed in the shared folder list Folder path Specify the location of the folder for sharing or click Browse to choose one Protocol Set the shared folder s accessing protocol C...

Страница 67: ...to set up the permission There are two ways to create users for CS to manage Create a Local User After setting the disk pool folder and shared folder you can start to crate the user to set up the perm...

Страница 68: ...to do proper management 1 Go to Settings File system AD LDAP 2 Select the type of domain to join the cluster to Windows active directory or Lightweight Directory Access Protocol LDAP 3 Specify the in...

Страница 69: ...ows AD server Domain controller Click Fetch to get the domain controller information DC Address This field displays the IP addresses of the fetched domain controllers LDAP domain Name Description LDAP...

Страница 70: ...y the root username and password of the LDAP server 4 Click Save to save the information 5 The system automatically retrieves the domain specific user information in Settings File system Users and use...

Страница 71: ...EonStor CS Installation Guide page 71 86 Installation Guide How to create Groups 1 Go to Settings File system Groups to add new groups 2 The group name is necessary to fill in...

Страница 72: ...EonStor CS Installation Guide page 72 86 Installation Guide...

Страница 73: ...nager here have two way to set up the folder permission 1 Create the folder switch the tab to permission to complete the setting 2 Click Edit to edit the folder Folder permission setting The users gro...

Страница 74: ...EonStor CS Installation Guide page 74 86 Installation Guide...

Страница 75: ...subnet 2 Make sure the shared folder list on EonOne 3 Check the protocol setting which you require to use for this shared folder You can check the folder type shown on the folder For example the fold...

Страница 76: ...EonStor CS Installation Guide page 76 86 Installation Guide 6 Go to Setting Cluster Protocol viewer to check the protocol service status...

Страница 77: ...e 77 86 Installation Guide Mount the shared folder as local disk 1 Download the EonView utility on Infortrend support page 2 Choose your OS type and install on your local side 3 Open the EonView the s...

Страница 78: ...ide 4 Or you can enter the specific IP to access the CS 5 Click next and enter the account and password to access the CS system 6 Switch the tab to the shared folders 7 Click the Add a shared folder a...

Страница 79: ...EonStor CS Installation Guide page 79 86 Installation Guide 8 After that you can start to share your file via this share folder...

Страница 80: ...fortrend and installing designated updated code including but not limited to firmware microcode basic input out system code utility programs device drivers and diagnostics delivered with Infortrend pr...

Страница 81: ...ty issues that may arise when 1 products software or options not certified and supported by Infortrend are used 2 configurations not certified and supported by Infortrend are used 3 parts intended for...

Страница 82: ...tor and EonServ are registered trademarks or trademarks of Infortrend Technology Inc Other names prefixed with IFT DS GS GSa GSc GSi GSe GSe Pro CS are trademarks of Infortrend Technology Inc All othe...

Страница 83: ...EonStor CS Installation Guide page 83 86 Installation Guide...

Страница 84: ...EonStor CS Installation Guide page 84 86 Installation Guide Contact Information...

Страница 85: ...EonStor CS Installation Guide page 85 86 Installation Guide Website For more information of Infortrend s products and services visit https www infortrend com global Home...

Страница 86: ...EonStor CS Installation Guide page 86 86 Installation Guide Customer Support Contact your system vendor or visit the following support site http www infortrend com global Support Support...

Отзывы: