InFocus IN3924 Скачать руководство пользователя страница 8

8

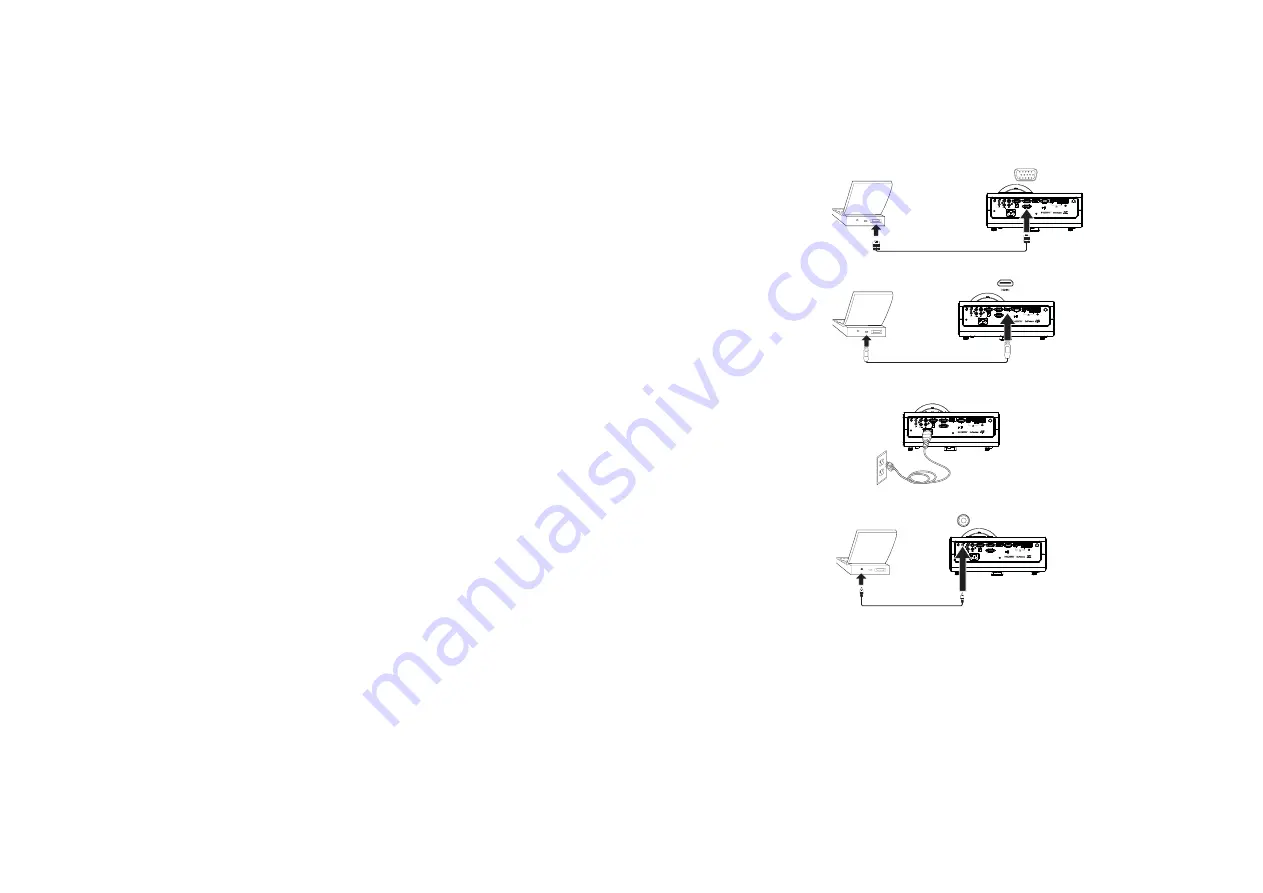
Connecting a computer source

VGA connection

Connect one end of the provided computer cable to the C

Computer 1/Computer 2 

connector on the projector and the other to the VGA connector on your 
computer. If you are using a desktop computer, you will need to disconnect the 
monitor cable from the computer’s video port first.

HDMI connection

HDMI is a standard, uncompressed, all-digital audio/video interface. HDMI 
provides an interface between sources, such as set-top boxes, DVD players, and 
receivers and your projector. Plug an HDMI cable into the video-out connector on 
the video device and into the HDMI connector on the projector.

Connecting power

Connect the black power cord to the P

Power connector on the rear of the 

projector and to your electrical outlet. If the Power Saving Mode feature is off, the 
Power LED on the Status Indicator Panel (page 12) blinks orange. If the Power 
Saving Mode feature is on, the Power LED is steady orange. By default, this feature 
is off. You can change the setting, see page 29.. NOTE: Always use the power cord 
that shipped with the projector.

Optional computer connections

To get sound from the projector, connect an audio cable (optional cable, not 
included) to your computer and to the A

Audio in connector on the projector. You 

may also need an adapter.

If you are using a desktop computer and want to see the image on your computer 
screen as well as on the projection screen, connect to the desktop’s computer 
cable to Computer 1 and the desktop’s monitor cable to the  Monitor out 
connector on the projector. 

connect VGA cable

connect HDMI

connect power

connect audio cable

Содержание IN3924

Страница 1: ...this device must accept any interference received including interference that may cause undesired operation Note This equipment has been tested and found to comply with the limits for a Class B digita...

Страница 2: ...provals may apply Please see product certification label This document applies to regulatory model IN3924 IN3926 Input ratings 100 240Vac 3 2A 50 60Hz InFocus reserves the right to alter product offer...

Страница 3: ...g the keypad buttons 22 Optimizing computer images 23 Presentation features 23 Optimizing video images 24 Customizing the projector 24 Using the menus 25 Basic Menu 26 Advanced Menu 27 Controlling the...

Страница 4: ...tteries in accordance with local disposal laws Use an InFocus approved ceiling mount kit for proper fitting ventilation and installation The warranty does not cover any damage caused by use of non app...

Страница 5: ...our multimedia projector be sure to visit our website at w www infocus com as specifications are subject to change Accessories The standard accessories that came with your projector are listed in the...

Страница 6: ...USB flash drive and for connecting a mouse keyboard or wireless adapter USB mini B for presentation slide and LiteBoard Wand control USB B for firmware upgrades LAN RJ45 for network control and video...

Страница 7: ...tor the desired distance from the screen The distance from the lens of the projector to the screen and the video format determine the size of the projected image The image offset for IN3924 is 115 5 T...

Страница 8: ...r on the rear of the projector and to your electrical outlet If the Power Saving Mode feature is off the Power LED on the Status Indicator Panel page 12 blinks orange If the Power Saving Mode feature...

Страница 9: ...ptop make sure its external video port is active Many laptops do not automatically turn on their external video port when a projector is connected Usually a key combination like FN F8 or CRT LCD key t...

Страница 10: ...screen press the top K Keystone button to reduce the upper part of the image and press the bottom K Keystone button to reduce the lower part If the left or right side of the screen is larger or smalle...

Отзывы: