InFocus in3138hd Скачать руководство пользователя страница 33

IN3138HD User’s Manual 
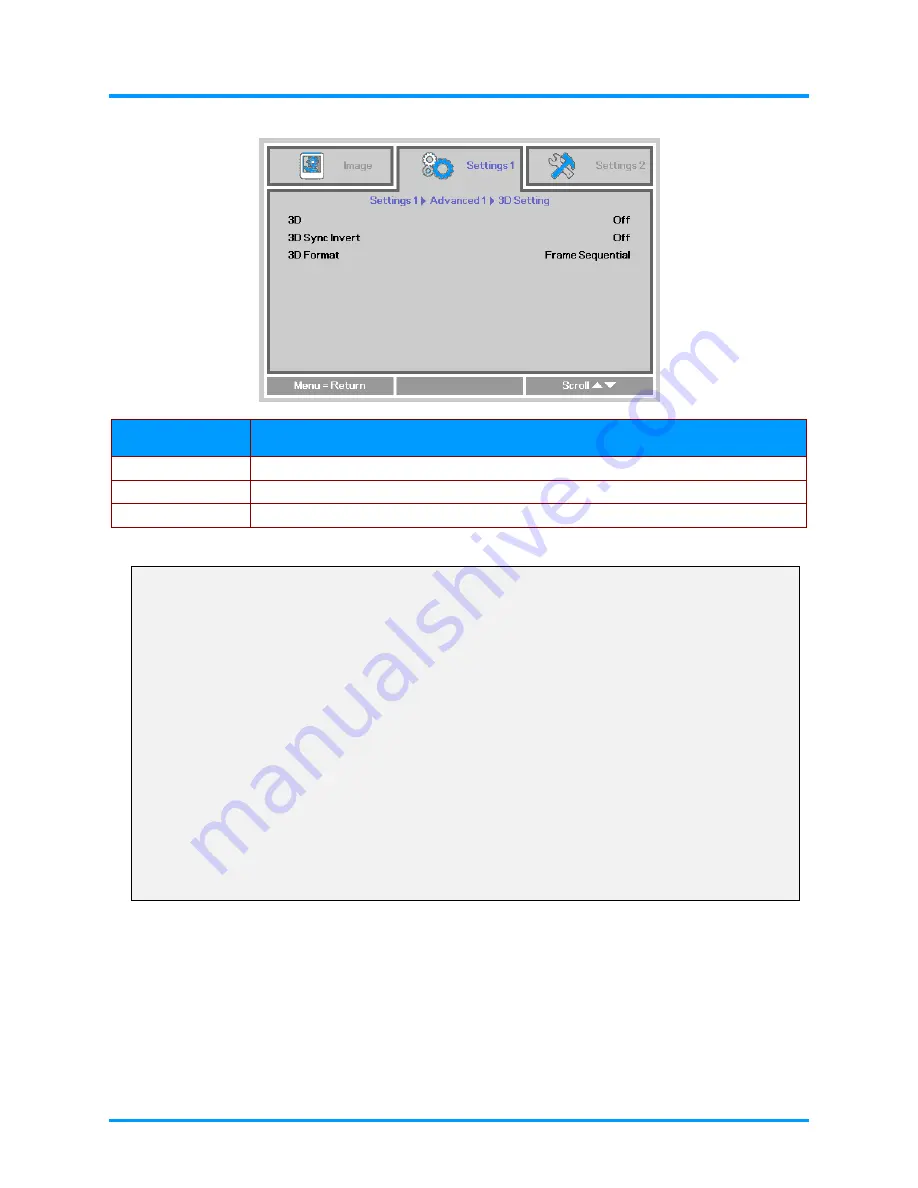
3D Setting 


I

TEM


D

ESCRIPTION


3D Press 

the 

◄►

 buttons to enter and select different 3D modes. 

3D Sync Invert 

Press the 

◄►

 buttons to enter and enable or disable 3D Sync Invert. 

3D Format 

Press the 

◄►

 buttons to enter and enable or disable different 3D Format. 


Note: 

1.  By default, if no 3D source is detected, the 3D OSD menu items will not be available. 

2.  When the projector is connected to an appropriate 3D source, the 3D OSD menu items are available 

for selection. 

3.  Use 3D glasses to view a 3D image. 

4.  You need 3D content from a 3D DVD or 3D media file. 

5.  You need to enable the 3D source (some 3D DVD content may have a 3D on-off selection feature). 

6.  You need DLP link 3D glasses. 

7.  The OSD 3D mode needs to match the type of glasses (DLP link). 

8.  Power on the glasses. Glasses normally have a power on -off switch.  

Each type of glasses has their own configuration instructions. Please follow the configuration 
instructions that come with your glasses to finish the setup process. 


26 


Содержание in3138hd

Страница 1: ......

Страница 2: ...k of ACCO Brand Corporation with issued registrations and pending applications in other countries throughout the world HDMI the HDMI Logo and High Definition Multimedia Interface are trademarks or reg...

Страница 3: ...he unit Warning Alerts you to situations that may damage the unit create a hazardous environment or cause personal injury Throughout this manual component parts and items in the OSD menus are denoted...

Страница 4: ...inch 19 69 inch 19 69 inch 3 94 inch 11 81 inch 19 69 inch Ensure that the intake vents do not recycle hot air from the exhaust vent When operating the projector in an enclosed space ensure that the s...

Страница 5: ...t Recycle Instructions Hg Lamp s inside this product contain mercury This product may contain other electronic waste that can be hazardous if not disposed of properly Recycle or dispose in accordance...

Страница 6: ...OLS 16 Navigating the OSD 16 SETTING THE OSD LANGUAGE 17 OSD MENU OVERVIEW 18 IMAGE MENU 19 Computer Menu 20 Advanced Features 21 Color Manager 22 SETTINGS 1 MENU 23 Audio 24 Advanced 1 Features 25 Ad...

Страница 7: ...ICATIONS 51 PROJECTION DISTANCE VS PROJECTION SIZE 52 Projection Distance and Size Table 52 TIMING MODE TABLE 53 PROJECTOR DIMENSIONS 55 REGULATORY COMPLIANCE 56 FCC WARNING 56 CANADA 56 SAFETY CERTIF...

Страница 8: ...IS USER S MANUAL QUICK START GUIDE WARRANTY CARD Contact your dealer immediately if any items are missing appear damaged or if the unit does not work It is recommended that you keep the original packi...

Страница 9: ...ge 4 Zoom ring Enlarges the projected image 15 5 Function keys See Top view On screen Display OSD buttons and LEDs 3 Important Do not block ventilation openings Locate the projector in a well ventilat...

Страница 10: ...w On screen Display OSD buttons and LEDs 3 1 2 ITEM LABEL DESCRIPTION SEE PAGE 1 Turns the projector On and Off 2 LAMP LED Blinking Red Error code Blue Lamp On 3 POWER LED Blinking Blue Powering up po...

Страница 11: ...from a HDMI device 9 RJ45 Connect a LAN cable from Ethernet 10 Kensington Lock Secure to a permanent object with a Kensington Lock system 45 11 VIDEO IN Connect a COMPOSITE cable from a video device...

Страница 12: ...rers Do not use this jack for anything other than intended use Connectivity Note If your video equipment has multiple connection options please note that HDMI provides the highest quality image follow...

Страница 13: ...ector on a ceiling 2 Tilt adjustor Rotate adjuster lever to adjust angle position 14 Note If you are installing the projector on the ceiling we strongly recommend using InFocus approved ceiling mounts...

Страница 14: ...eration 2 Be sure nothing obstructs the path between the remote control and the projector If the path between the remote control and the projector is obstructed you can bounce the signal off certain r...

Страница 15: ...he image when it is wider on the bottom 15 13 Down Navigates down and changes settings in the OSD 14 Left Navigates to the left and changes settings in the OSD 15 Menu Opens and exits the OSD 16 Remot...

Страница 16: ...the arrow A Pull out the cover B 2 Insert the battery with the positive side facing up 3 Replace the cover Caution 1 Only use a 3V lithium battery CR2025 2 Dispose of used batteries according to loca...

Страница 17: ...ector The projector splash screen displays and connected devices are detected See Setting an Access Password Security Lock on page 12 if the security lock is enabled 4 If more than one input device is...

Страница 18: ...hen the Power Off Press Power again message appears press the POWER button The projector turns off Caution 1 Be sure to remove the lens cap before starting projector 2 Do not unplug the power cord unt...

Страница 19: ...enus Important Keep the password in a safe place Without the password you will not be able to use the projector If you lose the password contact InFocus Support for information on clearing the passwor...

Страница 20: ...st be used Press the arrow buttons in any order to set the password Push the MENU button to exit the dialog box 6 If the Security Lock is enabled the user will be prompted to enter a password when the...

Страница 21: ...or The projector table or stand should be level and sturdy Position the projector so that it is perpendicular to the screen Ensure the cables are in a safe location You could trip over them To adjust...

Страница 22: ...on the projector only to sharpen the projected image 3 Use the KEYSTONE buttons on the remote control to correct trapezoid image issues wider top or bottom 4 The keystone control appears on the displ...

Страница 23: ...s the MENU button 2 There are three menus Press the buttons to move through the menus 3 Press the buttons to move up and down in a menu 4 Press the buttons to change setting values 5 Press the MENU bu...

Страница 24: ...button Press the buttons to navigate to Settings 1 Press the buttons to move to the Advanced 1 menu 2 Press Enter or to enter the Advanced 1 sub menu Press the buttons until Language is highlighted 3...

Страница 25: ...IN3138HD User s Manual OSD Menu Overview Use the following illustration to quickly find a setting or determine the range for a setting 18...

Страница 26: ...Display Mode must be set to User in order to access the other Image menu items Brightness Press the buttons to enter and adjust the display brightness Contrast Press the buttons to enter and adjust t...

Страница 27: ...the buttons to move up and down in the Computer menu ITEM DESCRIPTION Horizontal Position Press the buttons to enter and adjust the display position to left or right Vertical Position Press the butto...

Страница 28: ...r and adjust the Brilliant Color value Sharpness Press the buttons to enter and adjust the display sharpness Gamma Press the buttons to enter and adjust the gamma correction of the display Color Tempe...

Страница 29: ...enter the Green Color Manager Press the buttons to adjust the Hue Saturation and Gain Blue Select to enter the Blue Color Manager Press the buttons to adjust the Hue Saturation and Gain Cyan Select to...

Страница 30: ...ion Press the buttons to enter and choose from four projection methods Aspect Ratio Press the buttons to enter and adjust the video aspect ratio Keystone Press the buttons to enter and adjust the disp...

Страница 31: ...ve to the Settings 1 menu Press the buttons to move to the Audio menu and then press Enter or Press the buttons to move up and down in the Audio menu ITEM DESCRIPTION Volume Press the buttons to enter...

Страница 32: ...Press the buttons to enter and select a different localization Menu Security Lock Press the buttons to enter and enable or disable security lock function Blank Screen Press the buttons to enter and s...

Страница 33: ...ed to an appropriate 3D source the 3D OSD menu items are available for selection 3 Use 3D glasses to view a 3D image 4 You need 3D content from a 3D DVD or 3D media file 5 You need to enable the 3D so...

Страница 34: ...ced 2 menu and then press Enter or Press the buttons to move up and down in the Advanced 2 menu Press the buttons to enter and change setting values ITEM DESCRIPTION Test Pattern Press the buttons to...

Страница 35: ...when no signal is detected Auto Power On Press the buttons to enter and enable or disable automatic power On when AC power is supplied Lamp Mode Press the buttons to enter and select the lamp mode fo...

Страница 36: ...EM DESCRIPTION Active Source Displays the current active source type Video Information Displays resolution video information for RGB sources and color standard for Video sources Lamp Hours Lamp hour u...

Страница 37: ...s to enter and select OSD background translucent level Low Power Mode Press the buttons to enter and turn Low Power Mode on or off Fan Speed Press the buttons to enter and toggle between Normal and Hi...

Страница 38: ...DHCP Press to turn DHCP On or Off Note If DHCP is turned Off complete the IP Address Subnet Mask Gateway and DNS fields IP Address Enter a valid IP address when DHCP is turned off Subnet Mask Enter a...

Страница 39: ...red trademark of AMX LLC of the United States PJLink applied for trademark and logo registration in Japan the United States of America and other countries by JBMIA Supported External Devices This proj...

Страница 40: ...IN3138HD User s Manual LAN_RJ45 1 Connect an RJ45 cable to RJ45 ports on the projector and the PC laptop 2 On the PC laptop select Start Control Panel Network Connections 33...

Страница 41: ...al Area Connection and select Properties 4 In the Properties window select the General tab and select Internet Protocol TCP IP 5 Click Properties 6 Click Use the following IP address and fill in the I...

Страница 42: ...ss 10 10 10 10 Subnet Mask 255 255 255 0 Gateway 0 0 0 0 DNS Server 0 0 0 0 10 Press Enter to confirm settings Open a web browser for example Microsoft Internet Explorer with Adobe Flash Player 9 0 or...

Страница 43: ...232 command control way so called RS232 by TELNET for LAN RJ45 interface Quick Start Guide for RS232 by TELNET Check and get the IP Address on OSD of the projector Make sure that laptop PC can access...

Страница 44: ...nection ready and user can have RS232 command input then Enter key pressed the RS232 command will be workable How to have TELNET enabled in Windows VISTA 7 By default installation for Windows VISTA TE...

Страница 45: ...2 by Telnet control normally Close Windows Telnet utility directly after TELNET connection ready 5 Limitation 1 for Telnet Control there is less than 50 bytes for successive network payload for Telnet...

Страница 46: ...press Enter or Press the buttons to move up and down in the Advanced 2 menu Press the buttons to enter and change setting values ITEM DESCRIPTION Sleep Timer Press the buttons to enter and set the Sle...

Страница 47: ...or disable the HDMI source DP Press the buttons to enter and enable or disable the DisplayPort source VGA 1 Press the buttons to enter and enable or disable the VGA1 source VGA 2 Press the buttons to...

Страница 48: ...cases the lamp bulb may burn out during normal operation and cause glass dust or shards to be discharged outward from the rear exhaust vent Do not inhale or touch glass dust or shards Doing so could r...

Страница 49: ...ll firmly on the module handle to remove the lamp module 6 Reverse steps 1 to 5 to install the new lamp module While installing align the lamp module with the connector and ensure it is level to avoid...

Страница 50: ...ENU button to open the OSD menu 2 Press the buttons to move to the Settings 2 menu Press the button to move down to Advanced 1 and press enter 3 Press the buttons to move down to Lamp Hour Reset 4 Pre...

Страница 51: ...he projector serviced Cleaning the Lens You can purchase optic lens cleaner from most camera stores Refer to the following to clean the projector lens 1 Apply a little optic lens cleaner to a clean so...

Страница 52: ...Refer to the information that comes with the lock for instructions on how to use it The security lock slot corresponds to Kensington s MicroSaver Security System If you have any comment contact Kensin...

Страница 53: ...s are securely attached Ensure the attached device is turned on Ensure a connected PC is not in a suspended mode Ensure a connected notebook computer is configured for an external display This is usua...

Страница 54: ...ks Lamp voltage too low 5 blinks 7 blinks Ballast failure 5 blinks 8 blinks Ballast communication failure 5 blinks 10 blinks Ballast overheating 5 blinks 11 blinks Restrike lamp failure 1 5 blinks 12...

Страница 55: ...e OSD to the default settings 2 To ensure the problem is not caused by a connected PC s video card connect to another computer Problem The image is flat with no contrast Adjust the Contrast setting on...

Страница 56: ...he remote control Audio Problems Problem There is no sound 1 Adjust the volume on the remote control 2 Adjust the volume of the audio source 3 Check the audio cable connection 4 Test the source audio...

Страница 57: ...HDMI cables longer than 10 meters 32 81ft There are many HDMI Adopters working on HDMI solutions that extend a cable s effective distance from the typical 10 meter 32 81ft range to much longer length...

Страница 58: ...Hz 47 120Hz Safety certification FCC B cUL UL CB CE C tick CCC PSB CU TUV GS Operation temperature 5 35 C 41 95 F Dimensions 285 1 mm W x 264 1 mm D x 130 4 mm H 11 22 x 10 40 x 5 13 AC Input AC Unive...

Страница 59: ...5 3 2032 80 1771 0 69 73 996 2 39 22 2798 2 110 2 3400 4 133 9 149 4 5 9 2133 6 84 1859 6 73 21 1046 0 41 18 2938 2 115 7 3570 4 140 6 156 9 6 2 2286 90 1992 4 78 44 1120 7 44 12 3148 0 123 9 3825 4...

Страница 60: ...0 x 600 37 9 60 3 800 x 600 46 9 75 800 x 600 48 1 72 2 800 x 600 53 7 85 1 800 x 600 76 3 120 1024 x 768 48 4 60 1024 x 768 56 5 70 1 1024 x 768 60 75 1024 x 768 68 7 85 1024 x 768 97 6 120 1152 x 86...

Страница 61: ...DTV 480p 31 5 60 720p 37 5 50 720p 45 60 1080i 33 8 60 1080i 28 1 50 1080p 27 24 1080p 28 25 1080p 33 7 30 1080p 56 3 50 HDTV 1080p 67 5 60 O Frequency supported Frequency not supported The native res...

Страница 62: ...IN3138HD User s Manual Projector Dimensions 264 1mm 10 40 285 1mm 11 22 130 4mm 5 13 122 3mm 4 81 55...

Страница 63: ...y energy and if not installed and used in accordance with the instruction manual may cause harmful interference to radio communications Operation of this equipment in a residential area is likely to c...

Страница 64: ...PO RW 0 1 0 1 0 Disable 1 Enable 3V Aspect Ratio ARZ RW 0 5 0 1 0 Fill 1 4 3 2 16 9 3 Letterbox 4 Native 5 2 35 1 4V Auto Image AIM W n a 1 1 1 1 Enable 5V Auto Off Time AOT RW 0 36 6 1 0 Never 1 36 5...

Страница 65: ...7 Case open 8 DMD error 9 Color wheel 28V Factory Reset RST W n a 1 1 1 1 reset 32V Freeze Screen FRZ RW 0 1 0 1 0 Disable 34V Gamma GTB RW 0 5 Source Specific 1 Valid only when Display Mode User 0 1...

Страница 66: ...splay 79V Menu Navigation NAV W 0 5 n a 1 0 Menu Key 1 Up Key 2 Down Key 3 Select Key 4 Left Key 5 Right Key 81V Menu Transparency TOE RW 0 4 0 5 0 0 1 20 2 40 3 60 4 80 91V Mute MTE RW 0 1 0 1 0 disa...

Страница 67: ...Projector Resolution NRS R string 1080p 121V Projector Total Hours LMT R 0 9999 1 123V Lamp Hour Reset LRT RW n a 1 n a 1 Reset Lamp Hour OSD Status 126V Search Screen DSU RW 0 4 0 1 0 Black 1 Red 2 B...

Отзывы: