Indesit RA 24 S (FR) Скачать руководство пользователя страница 17

GB

17

•  Do not store liquids in open containers. They will increase 

humidity in the refrigerator and cause condensation to form.
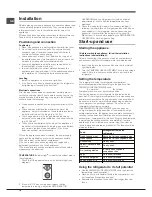
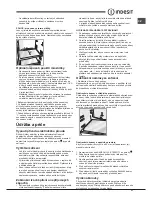
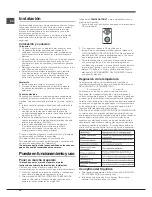
SHELVES

: with or without grill. 

Due to the special guides the shelves are removable and 
the height is adjustable (see diagram), allowing easy storage 
of large containers and food. Height can be adjusted without 
complete removal of the shelf.

1

2

Using the freezer to its full potential

•  Do not re-freeze food that is defrosting or that has already 

been defrosted. These foods must be cooked and eaten 

(within 24 hours).

•  Fresh food that needs to be frozen must not come into 

contact with food that has already been defrosted. 

Fresh food must be stored above the grill in the freezer 

compartment and if possible be in direct contact with the 

walls (side and rear), where the temperature drops below 

-18°C and guarantees rapid freezing.

•  Do not place glass bottles which contain liquids, and which 

are corked or hermetically sealed in the freezer because 

they could break.

•  The maximum quantity of food that may be frozen 

daily is indicated on the plate containing the technical 

properties located on the bottom left side of the refrigerator 

compartment (for example: Kg/24h: 4)

!

 Do not open the door during freezing.

!

 If there is a power cut or malfunction, do not open the freezer 

door. This will help maintain the temperature inside the freezer, 

ensuring that foods are conserved for at least 9 -14 hours.

!

 If the room temperature drops below 14°C for an extended 

period of time, the ideal temperature will not be reached in the 

freezer compartment and food preservation will be reduced.

Maintenance and care

Switching the appliance off

During cleaning and maintenance it is necessary to disconnect 

the appliance from the electricity supply.

It is not sufficient to set the temperature adjustment knobs on   

(appliance off) to eliminate all electrical contact.

Cleaning the appliance

•   The external and internal parts, as well as the rubber seals 

may be cleaned using a sponge that has been soaked in 

lukewarm water and bicarbonate of soda or neutral soap. Do 

not use solvents, abrasive products, bleach or ammonia.

•   The removable accessories may be soaked in warm water 

and soap or dishwashing liquid. Rinse and dry them 

carefully.

•   The back of the appliance may collect dust which can be 

removed by delicately using the hose of a vacuum cleaner 

set on medium power. The appliance must be switched 

off and the plug must be pulled out before cleaning the 

appliance.

Avoiding mould and unpleasant odours

•   The appliance is manufactured with hygienic materials which 

are odour free. In order to maintain an odour free refrigerator 

and to prevent the formation of stains, food must always be 

covered or sealed properly.

•   If you want to switch the appliance off for an extended 

period of time, clean the inside and leave the doors open.

Defrosting the appliance

!

 Follow the instructions below. 

Do not speed up the defrosting process by using any devices 

or tools other than the scraper provided, you may damage the 

refrigeration circuit.

Food hygiene 

1.  Once you have bought your food, remove all external 

packaging made of paper/cardboard or other wrappers, 

which could introduce bacteria or dirt inside your 

refrigerator.

2.  Protect the food, (especially easily perishable items and 

those that have a strong smell), in order to avoid contact 

between them, thereby removing both the possibility of 

germ/bacteria contamination as well as the diffusion of 

strong odours inside the fridge.

3.  Store all food in such a way as to ensure air can circulate 

freely between different items.

4.  Keep the inside of your fridge clean, taking care not to use 

oxidiser or abrasive products.

5.  Remove all food past its expiry date from the refrigerator.

6.  For the correct preservation of food, all easily perishable 

items (soft cheeses, raw fish, meat, etc.) should be stored in 

the coldest zone of the fridge compartment, i.e. just above 

the salad crisper where the temperature indicator is situated.

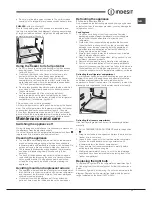
Defrosting the refrigerator compartment

The refrigerator has an automatic defrosting function: water is 

ducted to the back of the appliance by a special discharge 

outlet (see diagram) where the heat produced by the 

compressor causes it to evaporate. It is necessary to clean the 
discharge hole regularly so that the water can flow out easily.

Defrosting the freezer compartment

If the frost layer is greater than 5 mm, it is necessary to defrost 
manually:

1.  Set the TEMPERATURE ADJUSTMENT knob to the position 

.

2.  Wrap frozen foods in newspaper and place them in another 

freezer or in a cool place.

3.  Leave the door open until the frost has melted completely. 

This can be made easier by placing containers with 
lukewarm water in the freezer compartment.

4.  Clean and dry the freezer compartment carefully before 

switching the appliance on again.

5.  Wait for approximately 2 hours, i.e. until the ideal storage 

conditions have been restored, before placing food in the 
freezer compartment.

Replacing the light bulb

To replace the light bulb in the refrigerator compartment, pull 
out the plug from the electrical socket. Follow the instructions 
below.
Access the light bulb by removing the cover as indicated in the 
diagram. Replace it with a similar light bulb within the power 
range indicated on the cover (15W or 25W).

Содержание RA 24 S (FR)

Страница 1: ...dy a zp sob jejich odstran n 28 Tartalom Haszn lati tmutat 1 Szervizszolg lat 4 A k sz l k le r sa 9 Ajt nyit s ir ny v ltoztat s 15 Beszerel s 23 zembe helyez s s haszn lat 24 Karbantart s s v delem...

Страница 2: ...maire Mode d emploi 2 Assistance 6 Description de l appareil 12 R versibilit des portes 15 Installation 41 Mise en marche et utilisation 42 Entretien et soin 42 Pr cautions et conseils 43 Anomalies et...

Страница 3: ...rvice 7 Beschrijving van het apparaat 14 Draairichting deuren verwisselbaar 15 Installatie 54 Starten en gebruik 55 Onderhoud en verzorging 55 Voorzorgsmaatregelen en advies 56 Storingen en oplossinge...

Страница 4: ...e ausschlie lich Original Ersatzteile einbauen Szervizszolg lat Miel tt szerel h z fordulna Ellen rizze hogy a hib t nem tudja e elh r tani l sd Hibaelh r t s Ha minden ellen rz s ellen re a k sz l k...

Страница 5: ...PAGUE AVERIAS NUNCA MAS Servicio de asistencia t cnica SAT Llame al 902 133 133 y nuestros t cnicos intervendr n con rapidez y eficacia devolviendo el electrodom stico a sus condiciones ptimas de func...

Страница 6: ...e dell operatore telefonico per maggiori informazioni consultare il sito www indesit com Assistance Avant de contacter le centre d Assistance V rifiez si vous pouvez r soudre l anomalie vous m me voir...

Страница 7: ...rgeven het type storing het model apparaat Mod het serienummer S N Deze informatie bevindt zich op het typeplaatje links onderin het koelgedeelte Wendt u zich nooit tot onbevoegde installateurs en wei...

Страница 8: ...ELVES 9 BOTTLE shelf Varies by number and or position Available only on certain models Beschreibung Ihres Ger tes Ger teansicht Die Gebrauchsanleitungen gelten f r mehrere Ger temodelle Demnach ist es...

Страница 9: ...9 VEGT ROL polc A sz m s vagy elhelyezked s elt r lehet Csak bizonyos modellekn l tal lhat meg Popis za zen Celkov pohled Pokyny k pou it plat pro r zn modely a proto je mo n e na obr zku budou zobraz...

Страница 10: ...m s complejas se encuentra en las p ginas sucesivas 1 PATAS de regulaci n 2 Recipiente FRUTA y VERDURA 3 CAJA DE CARNE 4 BANDEJAS 5 Mando para la REGULACI N DE LA TEMPERATURA 6 Compartimiento CONGELAM...

Страница 11: ...mienna ilo i pozycja Znajduje si tylko w niekt rych modelach Descrizione dell apparecchio Vista d insieme Le istruzioni sull uso valgono per diversi modelli per cui possibile che la figura presenti pa...

Страница 12: ...S 9 Balconnet BOUTEILLES Leur nombre et ou leur emplacement peut varier N existe que sur certains mod les Descri o do aparelho Vis o geral Estas instru es sobre a utiliza o s o v lidas para v rios mod...

Страница 13: ...je uveden na nasleduj cich str nkach 1 Nastavite n NO I KY 2 Z suvka OVOCIE a ZELENINA 3 M SO BOX 4 POLICA 5 Oto n gomb k REGUL CIE TEPLOTY 6 MRAZIACI a KONZERVA N priestor 7 Vy ahovate n dr iak s vie...

Страница 14: ...voor VARIA 9 Vak voor FLESSEN Deze kunnen vari ren voor wat betreft aantal of positie Alleen op enkele modellen aanwezig 4 3 5 1 2 6 7 8 9 Descriere aparat Vedere de ansamblu Instruc iunile de utiliz...

Страница 15: ...ario cambiare il verso di apertura delle porte rivolgersi al servizio di Assistenza Tecnica Zam nitelnost sm ru otev r n dv ek V p pad e je t eba zm nit sm r otev r n dv ek se obra te na servisn slu b...

Страница 16: ...r it means that the temperature is too high adjust the REFRIGERATOR OPERATION knob to a higher position colder and wait approximately 10 hours until the temperature has been stabilised 3 Check the ind...

Страница 17: ...th hygienic materials which are odour free In order to maintain an odour free refrigerator and to prevent the formation of stains food must always be covered or sealed properly If you want to switch t...

Страница 18: ...on the product reminds you of your obligation that when you dispose of the appliance it must be separately collected Consumers should contact their local authority or retailer for information concern...

Страница 19: ...t werden Das Kabel muss regelm ig kontrolliert werden und darf nur durch autorisiertes Fachpersonal ausgetauscht werden siehe Kundendienst Der Hersteller lehnt jede Verantwortung ab falls diese Vorsch...

Страница 20: ...au en und innen sowie die T rdichtungen k nnen mit einem mit Wasser und Bikarbonat oder einer milden Sp llauge getr nkten Schwamm gereinigt werden Vermeiden Sie L se Scheuer Bleichmittel oder Ammonia...

Страница 21: ...r allen Reinigungs und Wartungsma nahmen muss der Netzstecker gezogen werden Es gen gt nicht den TEMPERATURSCHALTER auf Position Ger t ausgeschaltet zu drehen um jeglichen Stromkontakt auszuschlie en...

Страница 22: ...lschrank oder das Gefrierfach wurde zu sehr beladen Die Ger te Betriebsraumtemperatur liegt unter 14 C Der K hlschrank k hlt zu stark das K hlgut gefriert Der TEMPERATURSCHALTER ist nicht richtig eing...

Страница 23: ...vezet knek s a konnektornak k nnyen hozz f rhet nek kell lennie A vezet k nem hajolhat meg s nem lehet sszenyom dva A vezet ket rendszeresen ellen rizni kell cser j t csak enged llyel rendelkez szerel...

Страница 24: ...ldal n por rak dhat le amit vatosan a k sz l k kikapcsol sa s kih z sa ut n a porsz v hossz cs v vel a porsz v t k zepes er re ll tva letiszt that A pen sz s a kellemetlen szagok kialakul s nak megel...

Страница 25: ...peket szelekt ven kell sszegy jteni hogy optimaliz lni lehessen a benn k l v anyagok jrahasznos t s t s cs kkenteni lehessen az emberi eg szs gre s k rnyezetre gyakorolt hat sukat Az th zott szemetesk...

Страница 26: ...kazatel TEPLOTY k ur en nejchladn j z ny chladni ky 1 Zkontrolujte zda je na ukazateli dob e viditeln n pis OK viz obr zek 2 Kdy se nezobraz n pis OK znamen to e je teplota p li vysok nastavte oto n k...

Страница 27: ...zen bylo vyrobeno z hygienicky nez vadn ch materi l kter nep en ej z pachy Za elem zachov n t to vlastnosti je t eba aby byla j dla neust le chr n na a dn uzav ena Zabr n se tak tvorb skvrn V p pad p...

Страница 28: ...t popelnice na v robku v s upozor uje na povinnost odevzdat za zen po skon en jeho ivotnosti do odd len ho sb ru Spot ebitel by m li kontaktovat p slu n m stn ady nebo sv ho prodejce ohledn informac t...

Страница 29: ...GR 29 1 2 3 10 cm 5 cm 4 5 1 2 3 150 W 220 240 V 1 2 1 5 1 2...

Страница 30: ...30 GR 24 freezer 18 C Kg 24h 4 9 14 14 C freezer 1 OK 2 10 h 3 OK 10 h 5 mm 1 2 3 4 5 2 15 W 25 W 1 2...

Страница 31: ...GR 31 73 23 CEE 19 02 73 89 336 CEE 03 05 89 2002 96 CE H 2002 96 EK O O 14 C 2 3 mm...

Страница 32: ...das estas normas Puestaenfuncionamientoyuso Poner en marcha el aparato Antes de poner en marcha el aparato siga las instrucciones sobre la instalaci n ver Instalaci n Antes de conectar el aparato limp...

Страница 33: ...iales higi nicos que no transmiten olores Para mantener esta caracter stica es necesario que los alimentos est n siempre protegidos y bien cerrados Esto evitar tambi n la formaci n de manchas Si se de...

Страница 34: ...la autoridad local o con el vendedor para informarse en relaci n a la correcta eleminaci n de su electrodom stico viejo Ahorrar y respetar el medio ambiente Instale el aparato en una ambiente fresco...

Страница 35: ...ie zosta zgnieciony Przew d elektryczny musi by okresowo sprawdzany i wymieniany jedynie przez autoryzowanych technik w patrz Serwis W przypadku braku przestrzegania powy szych warunk w producent zwol...

Страница 36: ...du Unikanie ple ni i nieprzyjemnych zapach w Urz dzenie zosta o zbudowane z higienicznych surowc w kt re nie wytwarzaj zapach w Aby utrzyma t w a ciwo potrawy musz by zawsze zabezpieczone i dobrze za...

Страница 37: ...i materia w Pozwala to ograniczy zanieczyszczenie rodowiska i pozytywnie wp ywa na ludzkie zdrowie Przekre lony symbol kosza umieszczony na produkcie przypomina klientowi o obowi zku specjalnego sort...

Страница 38: ...lato periodicamente e sostituito solo da tecnici autorizzati vedi Assistenza L azienda declina ogni responsabilit qualora queste norme non vengano rispettate Avvio e utilizzo Avviare l apparecchio Pri...

Страница 39: ...ciugarli con cura Il retro dell apparecchio tende a coprirsi di polvere che pu essere eliminata utilizzando con delicatezza dopo aver spento l apparecchio e staccato la presa di corrente la bocchetta...

Страница 40: ...tasso di recupero e riciclaggio dei materiali che li compongono ed impedire potenziali danni per la salute e l ambiente Il simbolo del cestino barrato riportato su tutti i prodotti per ricordare gli...

Страница 41: ...it en cas de non respect des normes num r es ci dessus Mise en marche et utilisation Mise en service de l appareil Avant de mettre l appareil en service suivez bien les instructions sur l installation...

Страница 42: ...s avoir teint l appareil et d branch la fiche servez vous d un aspirateur montant un accessoire ad quat et r gl sur une puissance interm diaire Contre la formation de moisissures et de mauvaises odeur...

Страница 43: ...riaux qui les composent et r duire l impact sur la sant humaine et l environnement Le symbole de la poubelle barr e est appos e sur tous les produits pour rappeler les obligations de collecte s par e...

Страница 44: ...te por t cnicos autorizados veja a Assist ncia A empresa exime se de qualquer responsabilidade se estas regras n o forem obedecidas In cio e utiliza o Iniciar o aparelho Antes de iniciar o aparelho ob...

Страница 45: ...dor de p regulado numa pot ncia m dia Evite bolor e maus cheiros Este aparelho foi fabricado com materiais higi nicos que n o transmitem odores Para manter esta caracter stica necess rio os alimentos...

Страница 46: ...forma a recordar a obrigatoriedade de recolha separada Os consumidores devem contactar as autoridades locais ou os pontos de venda para solicitar informa o referente ao local apropriado onde devem de...

Страница 47: ...BG 47...

Страница 48: ...48 BG...

Страница 49: ...BG 49 1 2...

Страница 50: ...50 BG...

Страница 51: ...ud dodr an uveden pravidl Uvedenie do innosti a pou itie Uvedenie zariadenia do innosti Pred uveden m zariadenia do innosti sa ria te pokynmi pre in tal ciu vi In tal cia Pred zapojen m zariadenia dok...

Страница 52: ...e osu te Zadn strana zariadenia m tendenciu pokry sa prachom ktor je mo n po vypnut zariadenia a po odpojen z str ky zo z suvky elektrick ho rozvodu opatrne odstr ni a to dlh m n stavcom vys va a nast...

Страница 53: ...otn prostredie Symbol pre iarknutej popolnice na v robku V s upozor uje na povinnos odovzda zariadenie po skon en jeho ivotnosti do oddelen ho zberu Spotrebitelia maj povinnos kontaktova ich lok lny r...

Страница 54: ...Service De fabrikant kan niet verantwoordelijkheid worden gesteld als deze normen niet worden nageleefd Starten en gebruik Het apparaat starten Voordat u het apparaat in gebruik stelt dient u de instr...

Страница 55: ...wegvalt of wanneer er een storing optreedt dient u de deur van de diepvrieskast niet te openen de levensmiddelen blijven op deze manier nog ongeveer 9 14 uur goed bewaard Als de kamertemperatuur zich...

Страница 56: ...e of puntige voorwerpen of elektrische apparaten die niet door de fabrikant worden aanbevolen Plaats nooit ijsblokjes die net uit de diepvrieskast komen in uw mond Dit apparaat is niet geschikt voor g...

Страница 57: ...de goede stand De levensmiddelen staan in contact met de achterwand De motor blijft doorlopend draaien De deur is niet goed dicht of wordt constant geopend De buitentemperatuur is erg hoog De ijslaag...

Страница 58: ...uit de electricieni autoriza i vezi Asisten a Firma i declin orice responsabilitate n cazul n care aceste norme nu se respect Pornire i utilizare Activare aparat nainte de a pune n func iune aparatul...

Страница 59: ...abile pot fi puse la nmuiat n ap cald i s pun sau detergent de vase Dup sp lare cl ti i le i terge i le bine Variaz ca num r sau ca pozi ie numai pe anumite modele Partea posterioar a combinei atrage...

Страница 60: ...atul Ambalajele nu sunt juc rii pentru copii Lichidare aparat Lichidarea ambalajelor respecta i normele locale n acest fel ambalajele vor putea fi utilizate din nou Lichidarea unui aparat vechi RESPEC...

Страница 61: ...frigiderului Motorul func ioneaz continuu U a nu este bine nchis sau a fost deschis frecvent Temperatura exterioar este foarte ridicat Grosimea brumei dep e te 2 3 mm vezi ntre inere Aparatul emite p...

Страница 62: ...62 RO...

Страница 63: ...RO 63...

Страница 64: ...64 RO 19505855905 09 2013...

Отзывы: