H H W"
T D
F T T
A
N
[i \X/
R
T
B
B U
N
By following these instructions, in conjunction with the. diagrams
on
the
opposne
page,
the
fitting
ofa
new
ribbon
is
:1
simple
operation.
Before
commencing
the
operation
observe
closely
how
the.
old
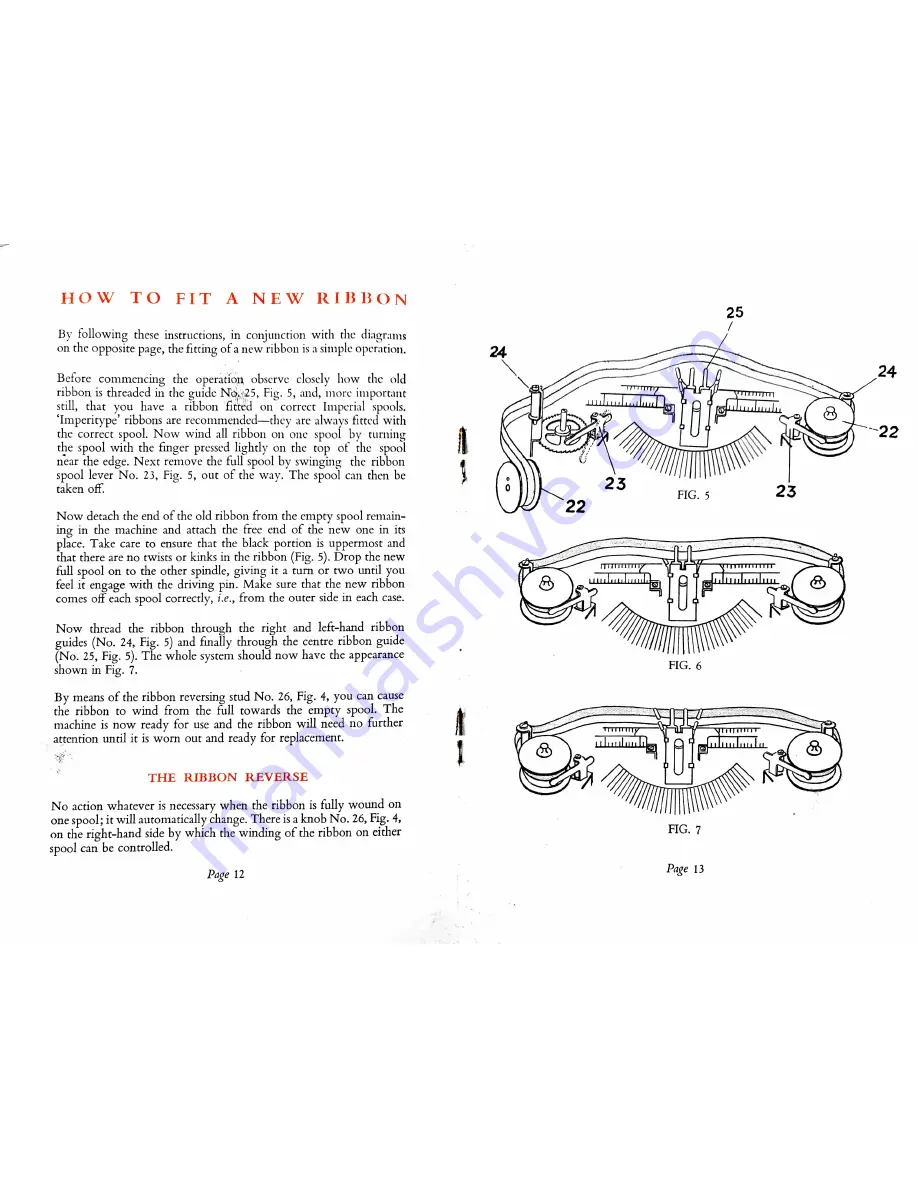
ribbon is threaded in the guide Nq,y;.25, Fig. 5, and, more important
still,
that
you
have
a
ribbon
fitted
on
correct
Imperial
spools.
‘Imperitype’ ribbons are tecommended—they are always fitted with
the correct spool.
Now Wind all ribbon
on one
spool
by
turning
the spool with the finger pressed lightly on the top of. the spool
near
the
edge.
Next
remove
the
full
spool
by
swinging
the
ribbon
spool lever No. 23, Fig. 5, out of the way. The spool can then be
taken of.
N ow detach the end of the old ribbon from the empty spool remain-
ing in the machine and attach the free end of the new one in its
place. Take care to ensure that the black portion is uppermost and
that there are no twists or kinks in the ribbon (Fig. 5). Drop the new
full spool on to the other spindle, giving it a turn or two until you
feel it engage with the driving pin. Make sure that the new ribbon
comes
01?
each
spool
correctly,
i.e.,
from
the
outer
side
in
each
case.
Now
thread
the
ribbon
through
the
right
and
left—hand
ribbon
guides (No. 24, Fig. 5) and finally through the centre ribbon guide
(No. 25, Fig. 5). The whole system should now have the appearance
shown in Fig. 7.
By means of the ribbon reversing stud No. 26, Fig. 4, you can cause
the
ribbon
to
wind
from
the
full
towards
the
empty
spool.
The
machine is now ready for use and the ribbon Will need no further
attention until it is Worn out and ready for replacement.
THE
R US BUN
REVERSE
No action whatever is necessary when the ribbon is fully wound on
one
spool;
it
Will
automatically
change.
There
is
a knob
N o.
26,
Fig.
4,
on
the
right—hand
side
by
Which
the
winding
of
the
ribbon
on
either
spool can be controlled.
Page 12
11
FIG.
6
FIG.
7
Page 13


