background image

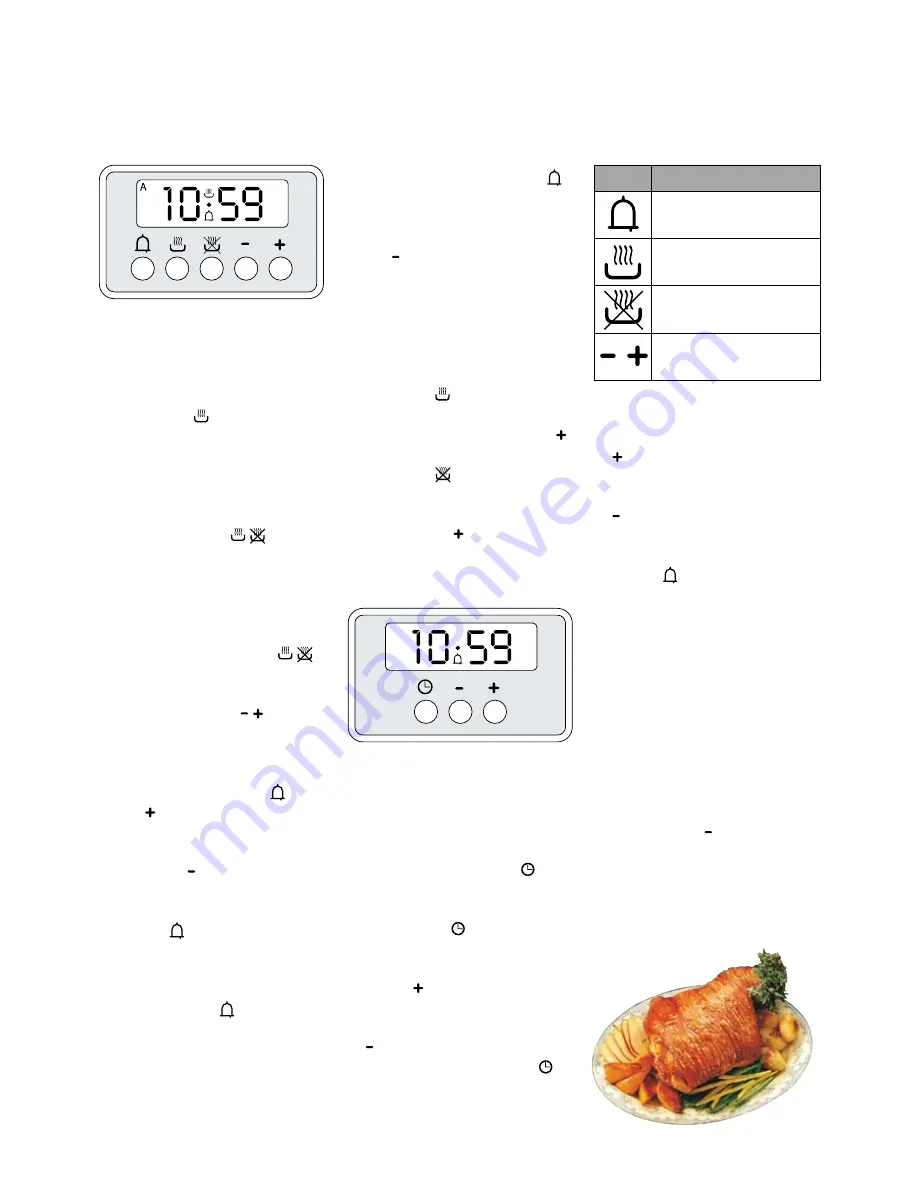
Digital Clock

(24 Hour Clock)

Always ensure the oven is in 
manual mode   - the pot symbol 
with the steam coming from it 
should be displayed. If there is 
an [A] on the display it means 
that the oven is in auto mode, to 
cancel this you must press both 
pot symbol buttons     simulta-

neously. The oven will not operate 
if it is pre programmed; it has to 
be brought back to manual mode.

1. To set or adjust the time:

  Press both pot buttons   

simultaneously and then to 

  adjust the timer press either 

the plus or minus     button 

  accordingly.

2. To set the alarm:

  Hold in the bell button   then 

the   plus button until you 
reach the required time. If 
you go over the required time, 
press the   minus button to 
bring it back.

  You will now notice a bell 

symbol   on the display, this 
highlights that the alarm is on.

  If you need to check how much 

time is left on the alarm-press 
the bell button   again as this 
will return to the time display.

  When the alarm goes off the 

oven will remain on and will 
ring for seven minutes unless 
turned off, which can be done 

by pressing the bell button  .

  You can adjust the tone of the 

alarm-only when the alarm is 
ringing press the minus but-
ton   and it will scroll through 
three available tones. Select 
the tone that you require, this 
tone will then sound the next 
time you set the alarm.

3. Pre-programming the oven:

  Press the   button. Put in the 

duration that you want to cook 
the item for by pressing the   
button.

  Press the   button. Select 

the time that you want the 
item to finish cooking (by 
pressing the   button).

  You then need to select the 

mode and temperature.

Digital clock  

(Non programmable)

1. To set or adjust the time:

  Press the clock button   
  once and then release.
  After you have pressed the 

clock button   once, you 

  can then immediately set the 

minutes by using the plus 

  button  . 
  If you enter an incorrect time 

you can use the minus button 

 to correct the time. Press 

and hold the clock button   
until the LED display flashes 

  to set the hours.

2. To set the alarm:


  Only press the plus button 
 

, until you reach the set time 

required. If you go over the 
time, press the minus button 

 to bring it back. A maximum 

of 99 minutes can be set.

  You will now notice a bell 

symbol   on the display, this 
highlights that the alarm is on. 
The display will only show the 
countdown of the timer while 
it is set, it will not show the 
time.

  When the alarm rings, the 

oven will remain on and the 
alarm will continue to ring for 
seven minutes unless turned 
off. You can adjust the tone 
of the alarm - only when the 
alarm is ringing, press the 
minus button   and it will 
scroll through the available 
tones. Select the tone that 
you require, this tone will then 
sound the next time you set 
the alarm.

Clocks And Timer Controls

ICON

MODE

Minute

Minder

Automatic 

Cooking Time

End of

Cooking Time

Timer

Settings

12

Содержание 1739ae

Страница 1: ...Operating Instructions and Recipe Manual IGNITE YOUR PASSION FOR COOKING ...

Страница 2: ...s to offer and serves as an introduction to the wonderful benefits of ILVE s dynamic cooking systems In section one we present detailed information on each of the advanced cooking systems built into ILVE appliances Once you have read this section you will be able to choose the most appropriate settings for your oven or cooktop when cooking different types of food Also if you re stuck for ideas sec...

Страница 3: ...u start 14 Catalytic self cleaning liners 14 Oven floor removal 15 Oven door removal 15 Cooktops 16 Oven light replacement 16 Ignition trouble shooting 17 Rangehoods 17 Recommended cleaning products 17 COOKING WITH ILVE 18 Wok Cooking 18 Pan Frying 18 Steaming 19 Braising 19 Rotisserie 19 Deep Frying 19 Pizza Stone 19 Simmering 20 Griddle Plate 20 Tepanyaki 20 Batch Cooking 20 Volcanic Rock BBQ Gr...

Страница 4: ...5 minutes 5 Clean the oven thoroughly when you have completed burn in process so that the oven and grill rotisserie will be ready for use in cooking There may be a slight unpleasant odour during the initial burn off procedure As a result we advise you open doors and windows in the kitchen during this procedure Installation Features Cavity Cooling Fan ILVE ovens are equipped with a cavity cooling f...

Страница 5: ...m deep large dimension barbe cue which features 12 temperature settings Meat poultry and sea food chargrilled on the barbecue grill remain succulent and moist while developing subtle smoky flavours The volcanic rock barbecue grill is easily disassembled for ease of cleaning ILVE Range Hoods A complete range of designer range hoods are available for all ILVE stoves and cooktops please consult your ...

Страница 6: ...Both cooking techniques give exceptional results for a wide range of meat cuts such as chicken breasts beef steaks lamb and pork It is also ideal for grilling fish and fish fillets Grilling Systems Electric Traditional Grill 1 Select the grill mode Mode 5 on the function control knob 2 Turn the temperature control knob to 250º C The oven heating indicator light at the front control panel comes on ...

Страница 7: ...ke FOOD TO BE GRILLED RECOM MENDED SHELF POSITION TRADITIONAL GRILLING FAN GRILLING OVEN TEMP GRILLING TIME 2 OVEN TEMP GRILLING TIME 2 THIN CUTS Steaks 3 4 180ºC 10 16 mins 180ºC 10 16 mins Kebabs 3 180ºC 25 30 mins 180ºC 25 30 mins Chicken Kebabs 3 180ºC 20 25 mins 170ºC 180ºC 20 25 mins Cutlets Schnitzel 3 4 180ºC 12 18 mins 180ºC 18 20 mins Liver 3 4 180ºC 8 12 mins 180ºC 10 14 mins Burgers 3 ...

Страница 8: ...mode which allows the oven to heat from 0 180ºC in just 6 to 8 minutes Oven Systems Electric PREPARING YOUR ELECTRIC OVEN FOR USE Setting the clock To enable use of your ILVE oven you must first set the clock to the correct time If the clock is not set correctly the oven will not operate See page 12 Using the oven When using your ILVE oven you must select using separate knobs both a mode of cookin...

Страница 9: ...d is inserted into the thickest part of the roast away from the bone When the probe is fitted to the connection point the thermom eter activates By pressing the or buttons you can program the probe to the desired tem perature for the roast to reset remove the probe from oven Roasting guide Rare 45 degrees Medium 55 degrees Well Done 65 degrees If the meat is left in the oven an alarm will sound an...

Страница 10: ...ra red grill to ensure hot air is circulated evenly around the oven This is the ideal mode to use when multitask ing grilling chops and sausages on the top level whilst baking a potato bake on the lower level For best results the door should be closed during this grilling mode MODE 7 Convection heating mode With both the top and bottom elements in use and the fan circulating hot air this cooking m...

Страница 11: ...tric grill must be carried out with the door of the oven closed The grill does not operate when the gas function of the oven is on It is advisable to preheat the grill for 5 minutes before putting food in Do not grill on the top level of the oven for even grilling cook on the second level from the top Rotisserie Still using the grill function this function is also used as a rotis serie in all oven...

Страница 12: ...rm 3 Pre programming the oven Press the button Put in the duration that you want to cook the item for by pressing the button Press the button Select the time that you want the item to finish cooking by pressing the button You then need to select the mode and temperature Digital clock Non programmable 1 To set or adjust the time Press the clock button once and then release After you have pressed th...

Страница 13: ...rogramming of the start of cooking To program the oven so that it starts automatically you must set the time for the desired start of cooking Ensure that the program timer is in man ual position See manual use Turn the knob E clockwise until the symbol 0 appears in the window on display D Pull the knob gently and turn it clockwise to select the desired time for start of cooking with the pointer C ...

Страница 14: ...ne on the rear and one on the roof of your oven Only the side liners are removable To maintain your oven you must regularly do a self clean to remove the fat absorbed in the liners during the cooking process This may be weekly monthly or yearly depending on oven usage Fat build up is easily distinguishable by a slight discolouration of the liners To do a self clean you must at the end of the cooki...

Страница 15: ... and remove the centred thumb screw on the side shelving racks This will enable you to lift the side racks up and off the locating pins and out of the floor hole locks which secure the floor into the oven The oven floor will then simply slide out of the oven 4 Removal of door and inner glass For ease of cleaning ILVE have made their oven doors removable so that the interior oven glass can be remov...

Страница 16: ... warm soapy water using a gentle scouring pad to remove any burnt on food splatter A commercial product such as Autosol which is de signed for cleaning aluminium can be used following makers instructions Do not put skirts in the dishwasher as this may cause the aluminium to discolour Stainless steel Stainless steel can be cleaned using the ILVE cleaning cloth avail able from ILVE or a range of com...

Страница 17: ...e dishwasher we recommend you use a hot rinse mode with no detergent RECOMMENDED CLEANING PRODUCTS Burner Skirts and Brass Burners Autosol metal polish available at automotive shops Autosol shine available at supermarkets Trivets Hot soapy water only To remove surface staining use any cooking oil and a fine brush or scourer lightly oiling trivets will also help in keeping their new appearance Soli...

Страница 18: ... quad ring burner provides the high heat needed to quickly sear meat and achieve the best results ILVE TIP Always pat dry wet food with paper towel before putting into hot oil as hot oil will spit and spatter when it comes into contact with droplets of water Pan Frying Pan frying is a popular and quick way of frying thin cuts of meat and vegetables in butter or oil This should be done over a high ...

Страница 19: ...this way will need approximately 40 to 50 minutes per kilo at a temperature of 180 to 200 C This is a guide only it is recom mended that meat is checked every 30 minutes Deep Frying Use the quad ring wok burner on the cooktop for deep frying Remember to bring the cooking oil to the correct temperature before adding the food to be cooked Oil will begin to give off smoke when it is hot enough to com...

Страница 20: ...ood for cooking this way include bacon eggs pikelets pancakes steaks sausages fish prawns and poultry Batch Cooking ILVE s advanced hot air systems are perfectly suited to batch cooking The large oven capacity enables you to bake two stand ard family roasts side by side You can also cook two chickens on the rotisserie simultaneously bake racks of multilayered cakes trays of biscuits a variety of p...

Страница 21: ...iment with different shelf positions to obtain the best results The thermostat in ILVE gas ovens is mechanical it oper ates on a different system than electric ovens There is no in dicator light on the front of the panel of the upright to show you when the oven has reached the correct temperature however the gas oven heats up fairly quickly due to the powerful gas burner at the base of the oven A ...

Страница 22: ...ated Seafood Skewers Scampi with Lime Orange Butter Sauce Tasmanian Scallops Creole Style Gourmet Pizza Layered Vegetable Frittata Fettuccine with Chilli Garlic Vegetable Soup with Vermicelli Mini Christmas Cakes Panna Cotta Thai Stlye Chicken Chicken Casserole with Moroccan Spices Cous Cous Rosemary Damper Almond Shortbread Hearts Hazelnut Torte with Chocolate Ganache Lemon Curd Tart ...

Страница 23: ...or chicken stock 2 cups beans cut into 2 5cm pieces 2 zucchini halved then sliced thickly 250g vermicelli cup coarsely chopped parsley Salt and pepper to taste Sauté onion in a heavy stockpot until soft Add garlic capsicum and carrots and cook for 5 minutes Add potatoes and stock and simmer for 10 minutes or until potatoes are tender Add green beans zucchini and vermicelli and cook until vermicell...

Страница 24: ...to the boil Cook fettuccine uncovered until just tender then drain Heat oil in a large frying pan add chilli and garlic frying gently for 2 minutes Add drained pasta to chilli and garlic mix toss gently to combine Divide pasta among serving bowls and top with grated parmesan Fettuccine with Chilli and Garlic ILVE Cooking Tip For variations of this dish add seafood meats cream or tomato sauces acco...

Страница 25: ...n to Mode 5 Place vegetables in a large bowl and combine with oil and pesto Heat teppanyaki plate to high Add a small amount of vegetables and cook for a few minutes Put each batch of vegetables to the side until all vegetables are cooked Grease and flour a large ovenproof dish and layer vegetables into the dish In a bowl beat together eggs cream and season with salt and pepper slowly pour over ve...

Страница 26: ...ning to make soft dough Transfer dough onto a lightly floured board and knead to a smooth ball Place dough back into a clean oiled bowl Cover with plastic wrap and leave to rise in a warm place until the dough has doubled in size Preheat oven Mode 9 to hot 220ºC Once this temperature is reached turn oven to Mode 3 Remove dough from bowl and return to lightly floured board Knead to form a ball Cut ...

Страница 27: ...yolks 2 teaspoons sweet chilli sauce Dash brandy optional Preheat grill to high Mode 6 Place scallops in shell on baking tray Combine all crumb mixture ingredients to make a smooth paste Either pipe or spoon mixture onto each shell making sure scallop meat is fully covered Place baking tray under grill and cook for 5 8 minutes or until golden brown Serve with either lime or lemon wedges ILVE Cooki...

Страница 28: ...ightly Place on a plate and pour over garlic oil and pepper marinade and leave for at least 10 minutes Meanwhile heat teppanyaki or grill plate to hot Once hot place marinated scampi cut side down and cook for 5 minutes Turn scampi over and cook for a further minute Place on warm serving dish Lime and orange butter sauce Place lime juice orange juice zest sugar and butter in a small saucepan and b...

Страница 29: ...oaked in water Cut salmon into cubes peel prawns and cut tentacles off octopus leaving on tails Mix together oil lemon parsley or dill and pepper to taste in a bowl making marinade Add seafood and marinate for about 15 minutes Heat teppanyaki plate or grill plate to hot Place skewers on heated plate and cook for approximately 5 minutes turning frequently Serve immediately ILVE Cooking Tip Do not o...

Страница 30: ... below the eyes discard head Remove side wings and fine membrane from body Rinse body tentacles and wings thoroughly and dry with paper towel Cut calamari down the centre and open flat slice body and wings into 5mm strips Combine flour chilli powder and salt Add calamari and toss to coat shaking off excess flour mixture Heat oil in deep fryer and when hot add half the calamari and cook for 1 minut...

Страница 31: ...onto a perforated tray into fish kettle Carefully pour in 6 8 cups of water or stock in fish kettle and lower tray with trout carefully into fish kettle cover with lid Steam the fish with a gentle simmer for approximately 10 15 minutes Test fish after 10 minutes by using a fork to flake the thickest part of the trout It is ready when it flakes easily ILVE Cooking Tip Check fish with point of knife...

Страница 32: ...utlets Selection of your favourite vegetables for example capsicum Spanish onion and zucchini Extra Virgin Olive Oil Salt and Pepper Season cutlets with salt and pepper Slice vegetables toss in oil and season with salt and pepper Heat grill plate or teppanyaki to hot Place on seasoned cutlets and cook for about 8 minutes turning occasionally Remove to warmed serving plate and cover with foil Add v...

Страница 33: ...ion wider by stretching cavity with your fingers Finely chop rosemary and mix with marinade oil of sundried tomatoes gently rub over the outside of lamb rack and through the cavity made in lamb Insert sundried tomatoes and cheese into cavity plug ends with a sundried tomato to stop the cheese from melting out during cooking process Lay pancetta slices over meaty part of lamb rack and place lamb in...

Страница 34: ...to make slits Place garlic slivers into slits Mix together seeded mustard and soy sauce making a paste and spread paste evenly over the leg of lamb Place lamb in a baking dish Pour a small amount of water into bottom of baking dish This helps to keep leg of lamb moist Place baking dish into centre of oven and cook for 90 minutes Serve with roast vegetables Mustard Crusted Roast Leg of Lamb ILVE Co...

Страница 35: ...t oil in a large casserole dish Place chicken in dish and brown until a golden colour Remove chicken from casserole dish and set aside on a plate Add onions garlic tomatoes and capsicum to the casserole dish and cook for 2 minutes Add ginger cloves nutmeg cinna mon and turmeric and pour in stock Return chicken pieces to casserole dish and cook over a gentle heat for about 40 minutes this dish can ...

Страница 36: ...g chopped spanish onion 4 small fresh chillies whole 20g fresh garlic 20g sugar palm sugar if possible 20ml fish sauce Make marinade by combining all ingredients and blending to a paste Coat chicken and allow to marinate for a minimum of 2 hours Preheat oven Mode 9 to 175 C Make vinaigrette by combining red wine vinegar onion chillies garlic sugar and fish sauce and liquidise in a blender Place ch...

Страница 37: ... a small amount of the cream mixture into a bowl add gelatine into mixture to dissolve and then pour in remaining cream mixture Stir to combine thoroughly Pour mixture into 4 x cup moulds cover and refrigerate until set To unmould wrap each panna cotta in a cloth dipped in hot water and tip upside down onto a serving plate Shake gently to release from mould Repeat process if this does not work Ser...

Страница 38: ...160 C Once this temperature is reached turn oven to Mode 5 Grease then line a 5x10cm round cake tin with baking paper Cream butter and sugar until the mixture is pale in colour then add eggs gradually beating well after each egg is added Sift flours and stir into creamed egg sugar and butter mixture with of the rum soaked fruit Divide mixture evenly among the 5 tins and bake in preheated oven for ...

Страница 39: ...flan ring Roll out cooled pastry to fit into pie plate or flan ring Crimp or decorate the edges Place a sheet of baking paper over pastry pour in some rice and bake in oven for 10 minutes Remove from oven and take out paper and rice Return pastry and bake for a further 15 minutes or until golden brown allow to cool Lemon Curd Beat egg yolks and strain through sieve into a medium heavy saucepan ove...

Страница 40: ...isk egg whites until they begin to foam Gradually add remaining sugar and beat until mixture forms peaks Add half the egg white mixture into the hazelnut mixture and gently fold in Sprinkle mixture with flour and fold in remaining egg white mixture Line and butter a 25cm spring form tin and pour cake mixture into tin Bake cake for 35 45 minutes until cake shrinks away from sides of tin Remove cake...

Страница 41: ... in half and place between two sheets of baking paper Roll out dough to about 4mm in thickness Using a heart shaped cutter cut out biscuits repeat with other half of the dough If there is any dough remaining roll into a ball and repeat process Place biscuits on to greased baking trays leaving a space between each biscuit Cook for 10 12 minutes or until a pale golden colour Leave to cool for a few ...

Страница 42: ...urn oven to Mode 2 Sift flour sugar and salt into a large bowl Rub butter into sifted flour and salt then stir in lemon rind and 1 tablespoon of rosemary and parmesan cheese Add enough milk to make a soft dough and stir Turn dough onto a floured board and knead until smooth Shape dough into a round shape about three cm in thickness Score with a knife to make 8 portions Carefully place on a greased...

Страница 43: ...raying liquid type cleaners can also create a problem If this does occur the cook top should be turned off at power point and left to dry out Removing all knobs and using a hair dryer on the control panel will assist the drying out process All the igniters spark at the same time when lighting This is normal and how they are designed to operate The knob is loose on shaft Knob retaining spring clip ...

Страница 44: ...ALIA 10 55 Howe Street Osborne Park WA 6017 Ph 08 9201 9299 Fax 08 9201 9188 SOUTH AUSTRALIA 73 Welland Ave Welland SA 5007 Ph 08 8340 5200 Fax 08 8340 8933 TASMANIA Ph 03 6343 0944 Fax 03 6344 3082 QUEENSLAND COUNTRY Ph 07 5477 5844 Fax 07 5477 5866 NEW ZEALAND P O Box 11 160 Sockburn Christchurch Ph 0508 458 369 Fax 03 344 5906 Email ilve eurolinx com au Website www ilve com au In the interests ...

Отзывы: