background image


1.


Keep work area clean. 

Cluttered areas invite injuries. 

2.


Observe work area conditions. 

Do not use machines or power tools in damp or 

wet locations. Don’t expose to rain. Keep work area well lighted. Do not use 
electrically powered tools in the presence of flammable gases or liquids. 

3.


Keep children away. 

Children must never be allowed in the work area. Do not 

let them handle machines, tools or extension cords. 

4.


Store idle equipment. 

When not in use, tools must be stored in a dry location to 

inhibit rust. Always lock up tools and keep out of reach of children. 

5.


Avoid Unintentional Starting

. Be sure the air pressure is in the off position when 

not in use and before making hose connection. 

6.


Stay alert

. Watch what you are doing, use common sense. Do not operate any 

tool when you are tired. 

7.


Check for damaged parts

. Before using any tool, any part that appears damaged 

should be carefully checked to determine that it would operate properly and 
perform  its  intended  function.  Check  for  alignment  and  binding  of  moving 
parts;  any  broken  parts  or  mounting  fixtures;  and any other  condition that 
may  affect  proper  operation.  Any  part  that  is  damaged  should  be  properly 
repaired  or  replaced  by  a  qualified  technician.  Do  not  use  the  tool  if  any 
control or switch does not operate properly. 

8.


Replacement  parts  and  accessories. 

When  servicing,  use  only  identical 

replacement  parts.  Use  of  any  other  parts  will  void  the  warranty.  Only  use 
accessories intended for use with this tool. 

9.


Do  not  operate  tool  if  under  the  influence  of  alcohol  or  drugs. 

Read  warning 

labels  if  taking  prescription  medicine  to  determine  if  your  judgment  or 
reflexes are impaired while taking drugs. If there is any doubt, do not operate 
the tool. 

10.


Maintenance.

 For your safety, service and maintenance should be performed 

regularly by a qualified technician. 


Note: Performance of this tool may vary depending on variations in air pressure 

and compressor capacity. 


Содержание HC-3297

Страница 1: ...k ytt ohjeet huolellisesti ennen laitteen k ytt vakavien tapaturmien v ltt miseksi K ytt jien on noudatettava kaikkia turvallisuus ja k ytt ohjeita Maahantuoja Importer ISOJOEN KONEHALLI OY Keskustie...

Страница 2: ...OT 3 3 YLEISET TURVALLISUUSOHJEET 3 4 TUOTEKOHTAISET TURVALLISUUSOHJEET 5 5 VAROITUS 6 6 KULJETUS JA PAKKAUKSESTA POISTO 6 7 TOIMINNOT 7 8 ASENNUSOHJEET 8 9 K YTT OHJEET 8 10 TURVALAITE 11 11 VIANETSI...

Страница 3: ...turvallisuusohjeet ja varotoimenpiteet asennusohjeet purku ja huolto ohjeet osaluettelon ja varaosakaavion S ilyt laitteen ostokuitti t m n k ytt ohjeen sis ll Kirjoita laskun tai ostokuitin numero et...

Страница 4: ...neet osat Aina ennen laitteen k ytt se olisi tarkastettava huolellisesti sen turvallisen toimintakunnon varmistamiseksi Tarkasta liikkuvien osien kohdistus ja tartunta mitk tahansa vialliset osat asen...

Страница 5: ...t m sti ja korjaa vuodot 4 l ylit suositeltua k ytt ilmanpainetta T m voi vaurioittaa laitetta 5 Pid tyypin ABC palonsammutin l hist ll 6 Suojaa aina iho ja silm t kosketukselta ljyn ja liuottimien ka...

Страница 6: ...aan k yt n j lkeen 5 l k yt alemmalla paineella kuin minimisy tt paine l ylit maksimisy tt painetta 6 l anna valtuuttamattoman henkil n purkaa laitetta T m mit t i takuun 7 Jos sinulla on kysytt v ota...

Страница 7: ......

Страница 8: ...n liikuttaminen yl s ja alas on helppoa K YTT OHJEET ljyn poistaminen 1 Nosta ajoneuvo yl s ty nn kone oikeaan paikkaan moottorin ljyn tyhjennysaukon alle 2 Nosta nostopilaria kahvalla sopivalle korke...

Страница 9: ...venttiili asteittain jonka k ytt j n on asennettava tyhji n muodostamiseksi 5 Kun osoitin tyhji mittarissa saavuttaa MAX alueen sulje ilmansy tt venttiili Tyhji n muodostuminen kest noin 4 5 minuuttia...

Страница 10: ......

Страница 11: ...suljettu 2 Avaa vasen tyhjennysventtiili katso kuva 1 3 Kiinnit poistokoukku ulkoiseen ker yss ili n 4 Liit paineilma ilman tuloaukko s ili n yl osassa ja avaa ilmansy tt venttiili asteittain ja hitaa...

Страница 12: ...asta ett vaimenninta ei ole tukittu TARKASTUS HUOLTO JA PUHDISTUS 1 Ennen jokaista k ytt Tarkasta l ys t ruuvit ilma ja ljyvuodot liikkuvien osien kohdistus ja yhdensuuntaisuus murtuneet tai vahingoit...

Страница 13: ...p att du f rst r samtliga varningar och anvisningar innan anv ndning Anv ndaren m ste efterleva samtliga s kerhetsanvisningar och anvisningar Import r Maahantuoja ISOJOEN KONEHALLI OY Keskustie 26 618...

Страница 14: ...ETSANVISNINGAR 3 4 SPECIELLA S KERHETSANVISNINGAR F R DENNA PRODUKT 5 5 VARNING 6 6 TRANSPORT OCH UPPACKNING 6 7 EGENSKAPER 7 8 MONTERINGSANVISNINGAR 8 9 HANDHAVANDEANVISNINGAR 8 10 S KERHETSANORDNING...

Страница 15: ...nvisningar och tg rder monteringsanvisningar handhavande och underh llsprocedurer reservdelsf rteckning och ritningar F rvara fakturan tillsammans med denna manual Anteckna fakturans nummer p omslaget...

Страница 16: ...kadat Kontrollera innan verktyget anv nds att samtliga delar fungerar korrekt och utf r den avsedda funktionen Kontrollera inriktning och eventuell k rvning f r r rliga delar eventuellt brustna delar...

Страница 17: ...bart fr nskiljas och l ckan repareras 4 verskrid inte det rekommenderade arbetslufttrycket Att g ra det kan skada utrustningen 5 Ha en brandsl ckare typ ABC tillg nglig n ra utrustningen 6 Skydda allt...

Страница 18: ...5 S nk inte lufttrycket under det l gst rekommenderade Var god verskrid inte maximala lufttrycket 6 Till t inte att maskinen demonteras av okvalificerad eller icke auktoriserad personal Att g ra s ka...

Страница 19: ...sonder med hylsor d Bruksanvisning Egenskaper Denna typ av m tglas r av explosionss kert utf rande och skyddar maskinen och anv ndaren enligt speciellt patent Sk lens h jd kan p ett enkelt s tt juste...

Страница 20: ...emperaturen n r 40 60 C 7 Vid f rsta anv ndningen lossa l smuttern se figur 1 och vrid pelaren flera varv Lyft den sedan rakt upp HANDHAVANDEANVISNINGAR Oljeuppsamling 1 Lyft fordonet och skjut maskin...

Страница 21: ...ventiler 2 Anslut tryckluften till maskinens luftintag figur 1 3 ppna kulventilen se figur 1 4 ppna luftventilen gradvis tillhandah lls av kunden f r att generera vakuum 5 N r visaren p manometern n...

Страница 22: ...p sugslangen efter avslutad utsugning Observera H gsta oljetemperatur vid utsugning r 60 C Var verskrid inte 60 C Var god h ll i den svarta hylsan f r att undvika br nnskador verf ring verf ring av ol...

Страница 23: ...oljetanken 4 Anslut tryckluft till luftintaget p tankens ovansida och ppna d refter inloppsventilen gradvis och sakta varvid oljan verf rs till den yttre tanken 5 St ng samtliga ventiler efter dr neri...

Страница 24: ...dd mparen inte r blockerad INSPEKTION UNDERH LL OCH RENG RING 1 Kontrollera f re varje anv ndning maskinens allm nna kondition Kontrollera att inga skruvar r l sa att inget olje och luftl ckage f reko...

Страница 25: ...serious injury Read and understand all Warnings and instructions before use Operators must obey all safety procedures instructions Importer Maahantuoja ISOJOEN KONEHALLI OY Keskustie 26 61850 Kauhajok...

Страница 26: ...AFETY RULES 3 4 SPECIFIC SAFETY RULES FOR THIS PRODUCT 5 5 WARNING 6 6 TRANSPORT AND UNPACKING 6 7 FEATURES 7 8 ASSEMBLY INSTRUCTIONS 8 9 OPERATION INSTUCTIONS 8 10 SAFETY DEVICE 11 11 TROUBLES HOOTIN...

Страница 27: ...the safety warnings and precautions assembly instructions operating and maintenance procedures parts list and diagram Keep your invoice with this manual Write the invoice number on the inside of the...

Страница 28: ...maged should be carefully checked to determine that it would operate properly and perform its intended function Check for alignment and binding of moving parts any broken parts or mounting fixtures an...

Страница 29: ...leaks 4 Do not exceed the recommended operating air pressure This could damage equipment 5 Keep a type ABC fire extinguisher nearby in case of fires 6 Always protect your skin and eyes from contact w...

Страница 30: ...ll the pipe to its original place 5 Do not lower than the min air inlet required pressure Do not exceed the max air inlet required pressure 6 Do not dismantle this machine by unqualified or unauthoriz...

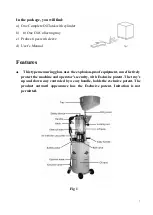
Страница 31: ...s Manual Features This type measuring glass uses the explosion proof equipment can effectively protect the machine and operator s security with Exclusive patent The tray s up and down easy controled b...

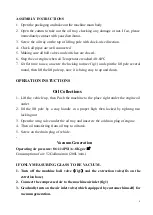
Страница 32: ...n OPERATION INSTUCTIONS Oil Collections 1 Lift the vehicle up then Push the machine to the place right under the engine oil outlet 2 lift the lift pole by a easy handle in a proper high then locked by...

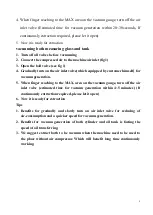
Страница 33: ...omer himself for vacuum generation 5 When finger reaching to the MAX area on the vacuum gauge turn off the air inlet valve estimated time for vacuum generation within 4 5 minutes If continuously extra...

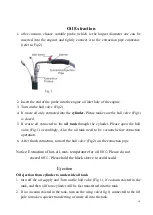
Страница 34: ...en the ball valve Fig 1 accordingly Also the oil tank need to be vacuum before extraction operation 6 After finish extraction turn off the ball valve Fig 2 on the extraction pipe Notice Extraction of...

Страница 35: ...and wing valve fig 1 are closed 2 open the left ejection valve see fig 1 3 hook the ejection hook on the external disposal tank 4 connect the compressed air with the air inlet fixed on the top of the...

Страница 36: ...ot block off and probe don t touch the bottom of tank f Make sure that the silencer haven t been blocked INSPECTION MAINTENANCE AND CLEANING 1 Before each use inspect the general condition of the mach...

Отзывы: