background image

18 


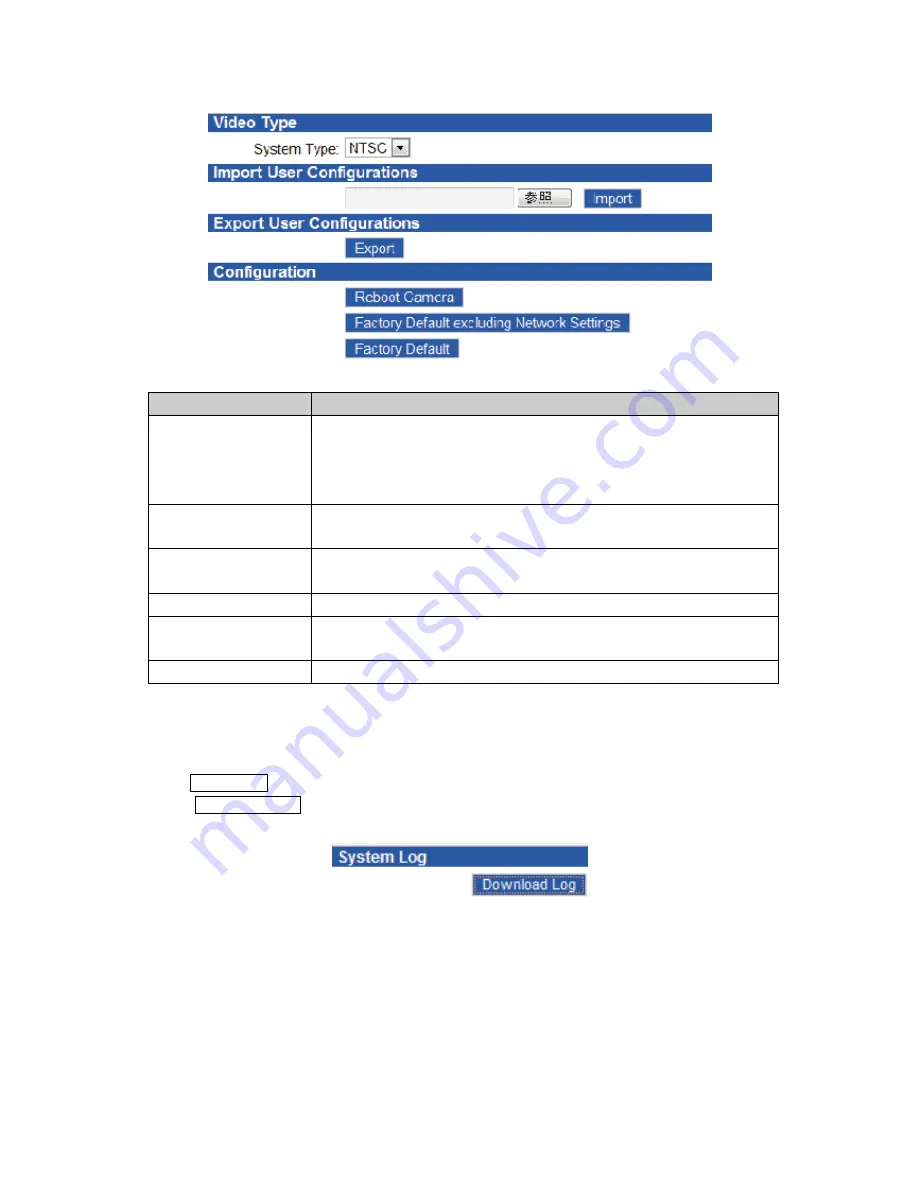
(4) Initialize 

Initializing the setting data is possible to the factory default value. 


Item 

Description 

Video Type 

It selects NTSC/PAL. 
Flickering by the fluorescent light can be reduced when “NTSC” is 
selected for the power supply frequency of 60 Hz and “PAL” for the 
power supply frequency of 50 Hz. 

Import 
User Configuration 

Click the “Reference” and select the file. Clicking "Import” enables 
uploading the setting. 

Export 
User Vonfiguration 

Clicking "Export” enables downloading the setting to the PC. 

Reboot Camera 

It reboots the camera. 

Factory Default 
Excluding Network 

It returns all settings to the factory default values excluding the 
network setting. 

Factory Default 

It returns all settings to the factory default values. 


4.7 Event Log 


It is used for analyzing in case the camera becomes faulty. 
Clicking “Event Log” in the menu indicates the event log acquisition menu. 
Click the “Download Log” button and save the log file to the PC. 


Содержание IPD-BX300

Страница 1: ...Mega pixel Network Camera IPD BX300 IPD DM300 Instruction Manual Application Part Before start using the manual read this manual thoroughly and handle the device correctly...

Страница 2: ...Network 3 4 Basic Settings 4 4 1 Inforrmation 4 4 2 Network Settings 4 1 Network 5 2 RTSP 6 4 3 Image Parameters 7 1 Codec 7 2 Exposure 9 3 White Balance 10 4 Basic Color 10 5 Remote Lens Control Vali...

Страница 3: ...nual Introduction Part delivered with the camera Adobe Reader Japanese version is required to view the PDF file Please download and install the latest version of Adobe Reader from the web site of Adob...

Страница 4: ...for the network password opens 3 Enter the login name user name and the password of the administrator z In the default setting the login name and the password of the administrator are both admin z If...

Страница 5: ...pshot enables saving the still image in the PC Fit displays the screen in a size that concise the actual display size 1 1 displays the screen in a size that concise the actual screen size Audio Input...

Страница 6: ...ork 4 1 Inforrmation It indicates the version information Click Information from the menu at the left section of the screen The system information including the firmware version MAC address and model...

Страница 7: ...tically acquired ON IP Address It inputs the IP address to be allocated to this device Or it is the IP address of when the DHCP could not be acquired 192 168 1 100 Subnet Mask It inputs the subnet mas...

Страница 8: ...ot be saved z URL Each stream has the unicast and the multicast which are as follows respectively Unicast stream1 Multicast stream1m z Multicast address The IP address for the multicast is from 224 0...

Страница 9: ...the camera Clicking Image Parameters in the menu indicates the camera settings menu 1 Codec It sets the codec When the settings are changed be sure to click the SAVE button Without clicking the SAVE b...

Страница 10: ...lity It sets the image quality in the JPEG compression image Only MJPEG is valid 60 Correlation between resolution stream FPS Codec NTSC Resolution Single stream Double stream 1920 x 1080 1920 x 1080...

Страница 11: ...the camera Selection between Manual and Auto is possible Item Description Default value Exposure Mode It sets Auto Manual Auto Auto Exposure Type It sets the auto exposure mode AES Auto Electronic Sh...

Страница 12: ...Auto 64 Caution Clicking the Reset to default button returns the setting to the factory default value 4 Basic Color It sets the image quality of the camera Item Description Default value Brightness I...

Страница 13: ...zooms in Zoom Out It zooms out Auto Focus Clicking One Push AF adjusts the focus automatically Manual Focus Continuous It adjusts the focus manually Focusing starts with Start and stops with Stop Manu...

Страница 14: ...e and four locations at the maximum are possible while looking at the live view screen It adjusts the privacy mask size by dragging in the target area while pressing the left button of the mouse It se...

Страница 15: ...Account Setting Click Account Setting in the menu z The administrator registration screen opens 2 User List Select admin or user1 from the User List z admin Administrator right Setting all functions...

Страница 16: ...sets the motion detection function z It turns on the motion detection function z Detection sensitivity can be set with Sensitivity z Click the Save button z When any motion is detected the following...

Страница 17: ...15 2 Alarm I O It sets the alarm input z Turn on the alarm input and click the Save button NO Normal Open NC Normal Close...

Страница 18: ...t sets the date and time Item Description Current Server time It indicates the current time of the device Synchronization Mode Manual Date time can be input manually PC It synchronizes to the date tim...

Страница 19: ...d select the firmware to update Clicking the Upload button starts the version up process After updating the firmware click the Initialize on the menu Then click Factory Default to return the setting t...

Страница 20: ...Clicking Import enables uploading the setting Export User Vonfiguration Clicking Export enables downloading the setting to the PC Reboot Camera It reboots the camera Factory Default Excluding Network...

Страница 21: ...power is not supplied z Turn on the power of the device z In case PoE is adopted confirm that the cable is connected to the port of which PoE compatible hub power can be supplied refer to the instruct...

Страница 22: ...mail engineering ikegami com service ikegami com URL http www ikegami com Ikegami Electronics Europe GmbH Ikegami Strasse 1 D 41460 Neuss GERMANY Phone 49 0 2131 123 0 Fax 49 0 2131 102820 E mail info...

Отзывы: